Deze versie kan foutieve bewerkingen bevatten. Schakel over naar de recentste gecontroleerde momentopname.
Wat je nodig hebt
-
-
Gebruik een P5 Pentalobe-schroevendraaier(bitje) om de tien schroeven die de onderste behuizing bevestigen te verwijderen. Deze hebben de volgende lengtes:
-
Twee 9 mm lange schroeven
-
Acht 2.6 mm lange schroeven
-
-
-
Pak het doorzichtige plastic treklipje dat aan de batterijaansluiting zit vast en trek het naar de voorkant van de Air om de batterij los te koppelen van het moederbord.
-
-
-
Til de batterij op vanaf de rand die het dichtst bij het moederbord ligt en verwijder de batterij uit de behuizing.
-
Laad je batterij op tot 100% en laat je toestel daarna nog minimaal twee uur aan de oplader liggen. Gebruik je toestel vervolgens tot deze zichzelf uitschakelt als gevolg van een lege batterij. Wacht ten minste vijf uur en laad je laptop dan nog een keer ononderbroken op tot 100%.
-
Als je toestel niet naar behoren functioneert nadat je je nieuwe batterij hebt geïnstalleerd, raden we je aan de SMC van je MacBook te resetten.
-
-
Deze stap is niet vertaald. Help het te vertalen
-
Use the tip of a spudger or your fingernail to flip up the retaining flap on the trackpad ribbon cable ZIF socket.
-
Pull the trackpad ribbon cable straight out of its socket toward the rear edge of the Air.
-
-
-
Deze stap is niet vertaald. Help het te vertalen
-
While carefully lifting the keyboard ribbon cable with one hand, use the tip of a spudger or your fingernail to flip up the retaining flap on the keyboard ribbon cable ZIF socket.
-
Pull the keyboard ribbon cable straight out of its socket toward the front edge of the Air.
-
-
Deze stap is niet vertaald. Help het te vertalen
-
Remove the following twelve screws:
-
Six 1.6 mm Phillips screws securing the trackpad to the upper case.
-
Six 1.6 mm Phillips screws securing the trackpad brackets to the trackpad.
-
A Phillips #000 should be sufficient, but a JIS #000 may also work as well.
-
-
Deze stap is niet vertaald. Help het te vertalen
-
Remove the right and left trackpad brackets from the upper case.
-
-
Deze stap is niet vertaald. Help het te vertalen
-
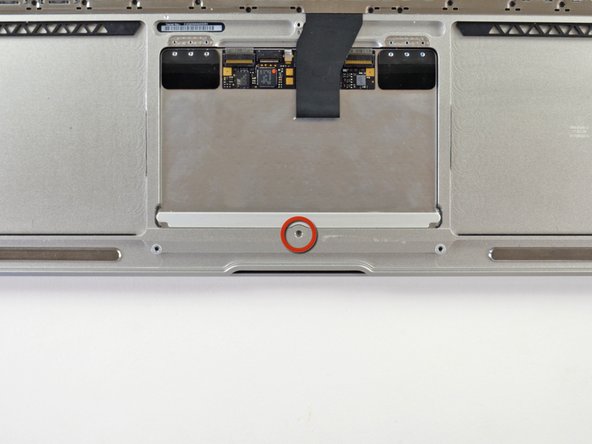
Remove the 1.4 mm T5 Torx set screw from its tapped hole near the front edge of the upper case.
-
-
Deze stap is niet vertaald. Help het te vertalen
-
Use the flat edge of a spudger to carefully lift the edge of the trackpad closest to the keyboard from its recess in the upper case by lifting it away from the brackets attached to the upper case.
-
Remove the trackpad from the upper case.
-
-
Deze stap is niet vertaald. Help het te vertalen
-
This is the seat of the buffer.
-
You will find the rest of the rotten buffer here, which made your trackpad rattle
-
Peel it off and clean with some alcohol or similar untill you see the raw aluminium surface
-
-
Deze stap is niet vertaald. Help het te vertalen
-
Cut two tiny (approx. 1,5 x 4 mm) pieces of double sided adhesive tape and place them on the seat
-
the red colour comes form the protective film of Tesa 4965, which works perfectly for this job. But principally any double sided tape, which is not too thick should do
-
On the second photo you see the empty seat on the left and the prepared one on the right
-
-
Deze stap is niet vertaald. Help het te vertalen
-
Now cut a piece of foam material of the same size. My foam material is black, and therefore a bit hard to see
-
In this case an EPDM foam was used, which can be compressed with little force but has a high longevity
-
The material must be below one milimeter thick! depending on your source material you will have to cut all tree dimensions
-
This took me many tries…
-
-
Deze stap is niet vertaald. Help het te vertalen
-
Peel off the protective film of the double sided tape and position the foam parts on both sides.
-
It should look more or less like on the photos
-
-
Deze stap is niet vertaald. Help het te vertalen
-
Reinstall trackpad by following step 8 in reverse order but only tighten the 6 screws at the trackpad (orange) firmly and leave the 6 screws of the case (red) slightly loose
-
Open the MacBook to nearly 90° so that it stands stable on its display case.
-
Check the feel of the click. Does it go back gently into rest position? Has it enough stroke?
-
If not, you might have chosen to rigid or to thick material (or both)
-
You may also try to readjust the central screw which is marked in step 10 and which you hopefully did not unscrew!
-
-
Deze stap is niet vertaald. Help het te vertalen
-
Finally center the trackpad in the case. This can easily be done by positioning a lamp behind the vertically standing lower case.
-
Move the trackpad in order to have an equal gap all around it. Then tighten the remaining 6 screws firmly to fix your adjustment.
-
Reassemble the rest going back from Step 8 and you're done!
-


Annuleren: ik heb deze handleiding niet afgemaakt.
4 andere personen hebben deze handleiding voltooid.
5 opmerkingen
Hello, good tutorial. Today on my Macbook Air disarm the trackpad, since it was loose and it sounded when using it. The only solution and that was good for me, was to tighten the central screw, to the point that it remained firm and allowed the clicks.
Another thing, the brackets I found on ebay, the pair at $ 5.
Very good guide. I did this yesterday on my Macbook Air Early 2014 and it solved the problem but as @ifixitkit mentioned in Step 8, “Removing the bracket is completely unnecessary”.
Thank you for the guide. I do advise against removing the 6 Philips screws attaching the trackpad to its hinges as described in Step 8. They simply don’t have to be removed, unless you’re replacing the trackpad.
My 2013 11” Air’s trackpad had started rattling after a battery swap and the noise drove me positively nuts. The trackpad does feel as good as new now. I used a ~1mm thick double sided foam tape instead of EPDM, hoping that it’s robust enough to last.
Nice guide, my 5 year old machine had a loose trackpad that was making it difficult to register clicks and drags. All I had to do was step 10, not even remove the battery and the trackpad is as flush as new now 😊
Thank you so much! The trackpad of my MacBook Air 11'' early 2015 was ratteling because I changed the battery. I really couldn´t find out the problem. Than I found this guide and as mentioned I just had to adjust the screw in step 10 a little bit and now it is working perfectly again.