Ga door naar hoofdinhoud

Mac Pro Late 2013 Interconnect Board Replacement

Wat je nodig hebt

  1. Mac Pro Late 2013 Interconnect Board Replacement, Outer Case: stap 1, afbeelding 1 van 2 Mac Pro Late 2013 Interconnect Board Replacement, Outer Case: stap 1, afbeelding 2 van 2
    • Slide the lock switch to the right, to the unlocked position.

  2. Mac Pro Late 2013 Interconnect Board Replacement: stap 2, afbeelding 1 van 3 Mac Pro Late 2013 Interconnect Board Replacement: stap 2, afbeelding 2 van 3 Mac Pro Late 2013 Interconnect Board Replacement: stap 2, afbeelding 3 van 3
    • Lift the outer case straight up off the Mac Pro.

    • It may help to push down on the center of the fan while lifting the case up.

  3. Mac Pro Late 2013 Interconnect Board Replacement, Fan Assembly: stap 3, afbeelding 1 van 3 Mac Pro Late 2013 Interconnect Board Replacement, Fan Assembly: stap 3, afbeelding 2 van 3 Mac Pro Late 2013 Interconnect Board Replacement, Fan Assembly: stap 3, afbeelding 3 van 3
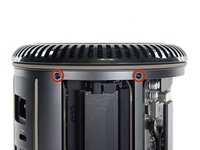
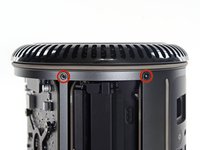
    • Remove five 5.1 mm T10 Torx screws from around the outer perimeter of the fan assembly.

  4. Mac Pro Late 2013 Interconnect Board Replacement: stap 4, afbeelding 1 van 2 Mac Pro Late 2013 Interconnect Board Replacement: stap 4, afbeelding 2 van 2
    • The fan assembly is attached to the rest of the computer by two cables on the IO board side.

    • Tilt the assembly up away from the IO board.

    • Do not try to remove the fan assembly yet, as it is still attached by two cables.

  5. Mac Pro Late 2013 Interconnect Board Replacement: stap 5, afbeelding 1 van 1
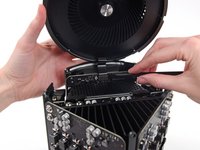
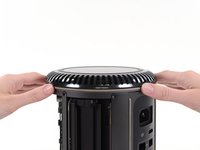
    • While supporting the fan assembly with one hand, loosen the two T8 captive screws in the fan cable bracket.

    • These screws are captive in the Mac Pro. Do not try to remove these screws from your Mac Pro.

  6. Mac Pro Late 2013 Interconnect Board Replacement: stap 6, afbeelding 1 van 1
    • Use a pair of tweezers to pull the fan cable bracket away from the fan assembly.

  7. Mac Pro Late 2013 Interconnect Board Replacement: stap 7, afbeelding 1 van 2 Mac Pro Late 2013 Interconnect Board Replacement: stap 7, afbeelding 2 van 2
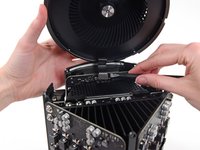
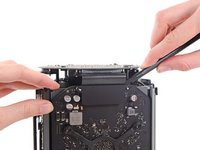
    • Use the flat end of a spudger to disconnect the fan assembly ribbon cable from the IO board.

  8. Mac Pro Late 2013 Interconnect Board Replacement: stap 8, afbeelding 1 van 1
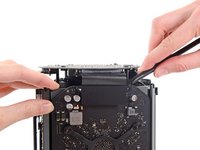
    • Disconnect the fan assembly antenna cable from the IO board.

    • Remove the fan assembly from the Mac Pro.

  9. Mac Pro Late 2013 Interconnect Board Replacement, Lower Case: stap 9, afbeelding 1 van 3 Mac Pro Late 2013 Interconnect Board Replacement, Lower Case: stap 9, afbeelding 2 van 3 Mac Pro Late 2013 Interconnect Board Replacement, Lower Case: stap 9, afbeelding 3 van 3
    • Flip the Mac Pro upside down, 180 degrees.

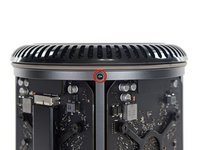
    • Remove five 5.1 mm T10 Torx screws from the outer perimeter of the lower case.

  10. Mac Pro Late 2013 Interconnect Board Replacement: stap 10, afbeelding 1 van 2 Mac Pro Late 2013 Interconnect Board Replacement: stap 10, afbeelding 2 van 2
    • Carefully lift the lower case up and remove it from the Mac Pro.

  11. Mac Pro Late 2013 Interconnect Board Replacement, Interconnect Board: stap 11, afbeelding 1 van 2 Mac Pro Late 2013 Interconnect Board Replacement, Interconnect Board: stap 11, afbeelding 2 van 2
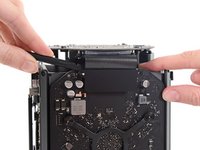
    • Use the flat end of a spudger and a twisting motion to gently separate one side of the graphics card data connection.

  12. Mac Pro Late 2013 Interconnect Board Replacement: stap 12, afbeelding 1 van 3 Mac Pro Late 2013 Interconnect Board Replacement: stap 12, afbeelding 2 van 3 Mac Pro Late 2013 Interconnect Board Replacement: stap 12, afbeelding 3 van 3
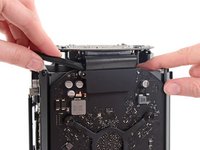
    • Gently separate the other side as well.

    • Flip the connector up and out of the way of the graphics card.

    • Repeat this procedure on the other graphics card.

  13. Mac Pro Late 2013 Interconnect Board Replacement: stap 13, afbeelding 1 van 1
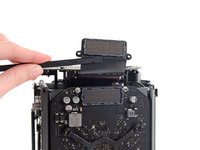
    • Remove the two 6.0 mm T8 Torx screws securing the interconnect board to the heat sink.

  14. Mac Pro Late 2013 Interconnect Board Replacement: stap 14, afbeelding 1 van 3 Mac Pro Late 2013 Interconnect Board Replacement: stap 14, afbeelding 2 van 3 Mac Pro Late 2013 Interconnect Board Replacement: stap 14, afbeelding 3 van 3
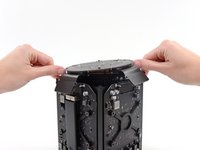
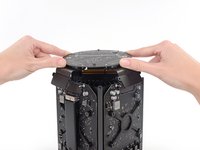
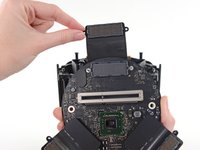
    • Gently walk the interconnect board straight up off the logic board's slot connection.

    • It is recommended to lift one side and then the other.

    • Do not try to remove the interconnect board from the Mac Pro yet, as it is still connected to the IO board.

  15. Mac Pro Late 2013 Interconnect Board Replacement: stap 15, afbeelding 1 van 2 Mac Pro Late 2013 Interconnect Board Replacement: stap 15, afbeelding 2 van 2
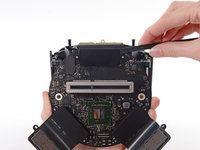
    • Flip the interconnect board up and over, exposing the IO board data cable.

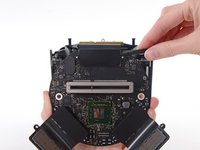
    • Use the same sort of twisting and spreading motion with the flat end of a spudger to separate one side of the IO board data cable.

  16. Mac Pro Late 2013 Interconnect Board Replacement: stap 16, afbeelding 1 van 2 Mac Pro Late 2013 Interconnect Board Replacement: stap 16, afbeelding 2 van 2
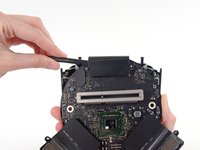
    • Use the flat end of a spudger to separate the other side of the IO board data cable.

    • Bend the cable out of the way and remove the interconnect board from the Mac Pro.

Conclusie

To reassemble your device, follow these instructions in reverse order.

7 andere personen hebben deze handleiding voltooid.

Andrew Optimus Goldheart

Lid sinds: 10/17/09

502.106 Reputatie

407 handleidingen geschreven

Team

iFixit Lid van iFixit

Staff

135 Leden

16.475 handleidingen geschreven

4 opmerkingen

Why is it necessary to remove the fan?

johnsburdett - Antwoord

Hola necesito comprar esta placa de interconexión, donde puedo encontrarla? Saludos

RailabMac - Antwoord

excellent, thank you very much, I wanted to ask you where I can get this plate, what is the reference?

Asdrubal - Antwoord

Voeg opmerking toe

Weergavestatistieken:

Afgelopen 24 uren: 1

Afgelopen 7 dagen: 9

Afgelopen 30 dagen: 54

Altijd: 5,414