Deze vertaling is door een computer gegenereerd en is nog niet door iemand nagekeken. Spreek je deze taal? Bekijk het hier.

Logitech Harmony Ultimate-batterij vervangen

Aaron Diaz en 8 andere bijdragers
Voor het laatst geüpdatet op 19 aug 2026
Bekeken: 56K
Statistieken weergeven:
- Afgelopen 24 uur:
- 20
- Afgelopen 7 dagen:
- 109
- Afgelopen 30 dagen:
- 487
- Altijd:
- 55.915
Commentaar: 28
6 comments on steps, 22 guide comments.
Go to guide commentsVoltooid: 36 37
36 mensen hebben deze handleiding als "voltooid" gemarkeerd. Ben jij de volgende?
37 personen hebben deze handleiding als "voltooid" gemarkeerd. Een daarvan ben jij—lekker bezig!
Favorieten: 5 6
5 mensen hebben deze handleiding als favoriet gemarkeerd en volgen deze. Ben jij de volgende?
6 personen hebben deze handleiding als favoriet gemarkeerd (en blijven daarmee op de hoogte van meldingen)—een daarvan ben jij!
Inleiding
Ga naar stap 1 ↓Als je batterij steeds leeg raakt, raadpleeg dan deze korte en eenvoudige handleiding voor het verwijderen en vervangen van je batterij. De onderdelen van het apparaat zijn kwetsbaar, dus wees voorzichtig bij het openen van het apparaat. Voor deze handleiding worden een plastic openingsgereedschap en een kruiskopschroevendraaier aanbevolen. Het moeilijkste deel van deze handleiding is het vinden van alle schroeven en het fysiek openen van het achterpaneel van de afstandsbediening.
Wat je nodig hebt
Gereedschap


-
-
-
Verwijder de enkele 6 mm kruiskopschroef die zich onder de sticker bij de USB-oplaadpoort bevindt.
 Vraag FixBot
-
-
-
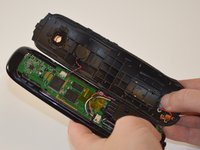
Gebruik een plastic Openingsgereedschap om de lipjes los te maken die het voorpaneel en achterpaneel bij elkaar houden. Er zitten aan elke kant van het apparaat drie lipjes die los moeten komen om het apparaat te kunnen openen.
-
-
-
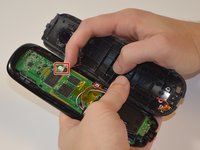
Koppel de bedrading los die van de achterbehuizing naar het moederbord loopt.
-
-
-
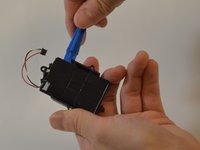
De batterij is nog steeds verbonden met het apparaat via bedrading. Om de batterij volledig los te maken, verwijdert u het donkere plastic onderdeel uit de sleuf met het plastic Openingsgereedschap. Draai het donkere plastic onderdeel en de batterij langzaam met de klok mee totdat ze onder de kleine Printplaat met de USB-poort vandaan kunnen worden gehaald.
-
-
-
-
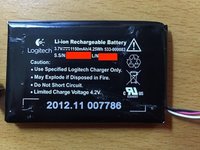
Gebruik het plastic Openingsgereedschap om de accu los te maken van de behuizing.
-
-




Volg deze instructies in omgekeerde volgorde om je apparaat weer in elkaar te zetten.
Annuleren: ik heb deze handleiding niet afgemaakt.
36 andere personen hebben deze handleiding voltooid.

Team

USF Tampa, Team 8-1, Eyestone Fall 2015 Lid van USF Tampa, Team 8-1, Eyestone Fall 2015
USFT-EYESTONE-F15S8G1
5 Leden
60 handleidingen geschreven
22Gids Commentaar
Step 6 (disassembly and re-assembly) Only thing to point out is that the PCB on the bottom of the battery holder twists into the holder (small plastic holding feature). This is important to get proper alignment of the Micro-USB connector). When removing the battery holder make sure the PCB pops out of the snap that is on the opposite side from the screw that holds the Micro-USB connector. This avoids putting too much strain on the leads of that PCB.
Wish I read the comments before I did the work - came close to snapping the leads. To anyone trying this, the battery holder is not attached to that small pcb but rather there are small notches that hold the battery case in place. Knowing that will allow you to apply the right pressure in the right places to move it away from the PCB.
Rest of the instructions were fairly self explanatory, although I'm grateful for the confirmation to reduce risk
This point is an absolute saver though!
Battery model please
