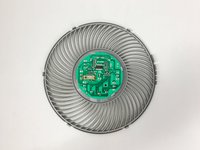
Ga door naar hoofdinhoud
Word lid van de reparatiegemeenschap - Account aanmaken

Levoit Core 300-RAC Control Board Replacement

Wat je nodig hebt

  1. Levoit Core 300-RAC Control Board Replacement, Control Board: stap 1, afbeelding 1 van 3 Levoit Core 300-RAC Control Board Replacement, Control Board: stap 1, afbeelding 2 van 3 Levoit Core 300-RAC Control Board Replacement, Control Board: stap 1, afbeelding 3 van 3
    • Make sure the device is turned off and unplugged before disassembling it.

    • Insert the Jimmy between the gray grille cover and the top of the device.

    • Work your way around the grille cover with the Jimmy to release the clips holding it in place.

    • Take note of the placement of the clips, as they are keyed and need to go back in the exact way they came out.

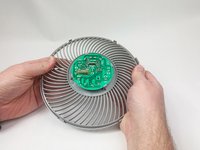
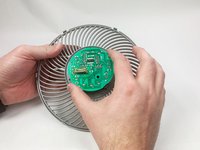
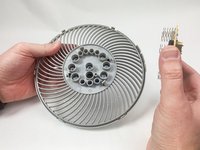
    • Remove the grille cover gently as it is connected by a ribbon cable.

    • Be careful not to put too much strain on the ribbon cable as it may break.

    Vraag FixBot

    Voeg opmerking toe

  2. Levoit Core 300-RAC Control Board Replacement: stap 2, afbeelding 1 van 3 Levoit Core 300-RAC Control Board Replacement: stap 2, afbeelding 2 van 3 Levoit Core 300-RAC Control Board Replacement: stap 2, afbeelding 3 van 3
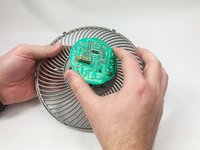
    • Squeeze the tab on the connector to release the bundled cable from the control board.

    • The connector should come out fairly easily, so do not force it. Pulling too hard could damage the connector.

    Vraag FixBot

    Voeg opmerking toe

  3. Levoit Core 300-RAC Control Board Replacement: stap 3, afbeelding 1 van 2 Levoit Core 300-RAC Control Board Replacement: stap 3, afbeelding 2 van 2
    • Gently bend the gray plastic cover to release the control board.

    • There are several hard tabs holding the control board in place.

    Vraag FixBot

    Voeg opmerking toe

  4. Levoit Core 300-RAC Control Board Replacement: stap 4, afbeelding 1 van 3 Levoit Core 300-RAC Control Board Replacement: stap 4, afbeelding 2 van 3 Levoit Core 300-RAC Control Board Replacement: stap 4, afbeelding 3 van 3
    • Lift the control board from the gray plastic cover.

    • Take note of the orientations of the buttons, as that will help during reassembly.

    Vraag FixBot

    Voeg opmerking toe

Conclusie

To reassemble your device, follow these instructions in reverse order.

Annuleren: ik heb deze handleiding niet afgemaakt.

Mustafa

Lid sinds: 11/03/23

259 Reputatie

1 Handleiding geschreven

Team

UMass Dartmouth, Team 1-6, Petersen Fall 2023 Lid van UMass Dartmouth, Team 1-6, Petersen Fall 2023

UMASSD-PETERSEN-F23S1G6

5 Leden

8 handleidingen geschreven

0Gids Commentaar

Voeg opmerking toe

Weergavestatistieken:

Afgelopen 24 uren: 5

Afgelopen 7 dagen: 25

Afgelopen 30 dagen: 77

Altijd: 1,760