Inleiding
If the touchpad on your Lenovo ThinkPad X1 Carbon (2nd Gen) lacks proper response, use this guide to replace it.
The touchpad is a control surface that allows you to move the cursor on your screen.
Before using this guide, check to make sure your touchpad driver is updated and clean off the touchpad surface.
Before you begin, make sure your computer is off.
Wat je nodig hebt
-
-
Using a Phillips #0 screwdriver, remove the seven 7mm screws holding the back cover onto your computer.
-
-
-
-
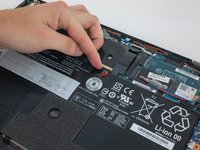
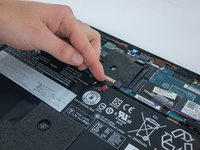
Remove the battery by pulling it directly towards you.
Before installing the new battery, the attached cables connecting it to the board need to be bent or kinked in a similar manner to how the old battery’s cables were. I looked at the old battery’s cables for an idea of how to bend the new cables.
Also, I saw how the old battery had some very thin foam attached to the battery (as seen in the photos), and that the replacement iFixit battery didn’t have such foam. I couldn’t figure out a way to remove the foam from the old battery without destroying it, so I went ahead and installed the new battery without it.
-
-
-
Use a Phillips #1 screwdriver to remove the four 1.9 mm screws holding in the touchpad.
On my Carbon gen 2 there was a 5th screw, located just shy right of the two screws to the left in this picture (you can see a recess where mine was). It seems like gen 2 touchpads have this screw, however if you're upgrading to a gen 3 touchpad this screw will be omitted, so don't panic if you end up with 1 screw left over!
-


To reassemble your device, follow these instructions in reverse order.
To reassemble your device, follow these instructions in reverse order.
Annuleren: ik heb deze handleiding niet afgemaakt.
Één andere persoon heeft deze handleiding voltooid.

Team

Cal Poly, Team S18-G4, White Winter 2020 Lid van Cal Poly, Team S18-G4, White Winter 2020
CPSU-WHITE-W20S18G4
4 Leden
9 handleidingen geschreven
2 opmerkingen
Even the weirder of their models is still amazingly engineered, this was so easy to do and finding parts - not only of the same model but compatible newer parts - was an absolute breeze! Was able to upgrade my laptop during my work lunchtime, and still have time to actually eat lunch!