Wat je nodig hebt
-
-
Slide the back cover off using the release latch with your fingers to expose the battery.
 Vraag FixBot
-
-
-
Lift one side of the battery using a plastic opening tool or your fingers.
-
Carefully remove the battery and set it aside.
-
-
-
Turn your phone around and open the flip phone. The screen is now facing you.
-
Locate the two grey rubber plugs on the bottom corners of the screen. These plugs cover up two screws.
-
Remove the two grey screw-covers.
-
-
-
-
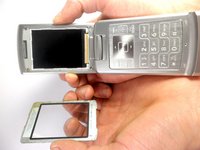
Use the ejection tab at the top to remove the screen.
-
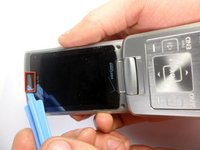
There is a gap between the case and the screen near the ear piece.
-
Insert the plastic opening tool in the gap and pry up the screen.
-
-
-
Unscrew the four corners of the screen using 3.21mm screws to separate the top cover of the phone.
-
-
-
Turn your phone around. The battery side will be facing you.
-
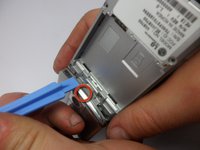
Insert the plastic opening tool into the groove to remove the top cover of the phone.
-
Carefully open the cover.
-
-
-
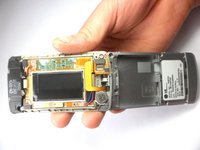
Now we have the LCD outer case off. The LCD display can be seen on the left, the camera on the right.
-
Place the phone assembly down, it is not needed anymore.
-
-
-
To remove the camera the ribbon connector should be removed.
-
This ribbon connector is glued to the case, using the plastic opening tool pry the connector off.
-
-
-
The camera should come loose after the connector is pried off.
-
Take the new camera and apply a small square of double sided tape to the new ribbon connector.
-


To reassemble your device, follow these instructions in reverse order.
Team

Cal Poly, Team 8-16, Maness Winter 2012 Lid van Cal Poly, Team 8-16, Maness Winter 2012
CPSU-MANESS-W12S8G16
4 Leden
28 handleidingen geschreven