Inleiding
After completing the inner cover, you can access the rear-facing camera.
Wat je nodig hebt
-
-
Once you have access to the phone, there is a small indent on the bottom left side. Use your fingernail or a plastic opening tool to pry from here and pull off the back casing.
-
-
-
Once you have properly removed the outer casing, the back should look as so.
-
To remove the battery, pull up from the red mark using your finger. The battery should come up at an angle, and easily be able to be removed.
-
Once the battery is removed you may safely proceed to the next step.
-
-
-
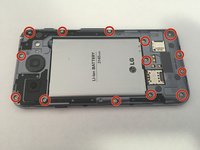
Make sure you remove the battery first. You will see that there are 14 screws on the back of the inner case. Use the Phillips head screwdriver to remove each of the screws, make sure to put the screws in a safe place where they will not get lost.
-
-
-
-
Once you have removed all the screws, you can begin removing the inside cover.
-
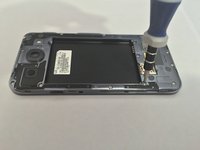
Insert the opening tool using a sliding motion into one of the corners and move it along the edges of the inside cover. This will loosen the edges and the inside cover will pry apart from the shell.
-
-
-
The inner cover is now removed, you now have access to the many parts on the inside of the phone.
-
-
-
Using a plastic opening tool, pry the connection between the cable and the phone. With even pressure the cable should disconnect from the logic board easily.
-
-
-
After removing the the Ribbon Cable, the Rear-Facing Camera should be able to be removed easily with your fingers.
-


To reassemble your device, follow these instructions in reverse order.
Annuleren: ik heb deze handleiding niet afgemaakt.
5 andere personen hebben deze handleiding voltooid.

Team

USF Tampa, Team 15-5, Remmell Fall 2014 Lid van USF Tampa, Team 15-5, Remmell Fall 2014
USFT-REMMELL-F14S15G5
3 Leden
7 handleidingen geschreven