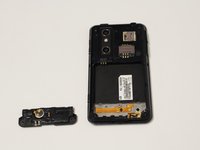
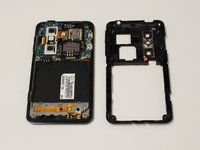
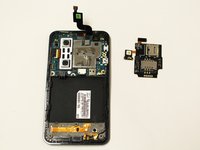
Ga door naar hoofdinhoud

LG Optimus 3D MicroSD/SIM Card Board Replacement

Wat je nodig hebt

  1. LG Optimus 3D MicroSD/SIM Card Board Replacement, Back Cover Removal: stap 1, afbeelding 1 van 2 LG Optimus 3D MicroSD/SIM Card Board Replacement, Back Cover Removal: stap 1, afbeelding 2 van 2
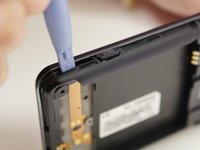
    • Pry the back cover off of the phone with your fingernail. There is a notch located at the bottom of the phone for improved leverage.

  2. LG Optimus 3D MicroSD/SIM Card Board Replacement, Battery Removal: stap 2, afbeelding 1 van 3 LG Optimus 3D MicroSD/SIM Card Board Replacement, Battery Removal: stap 2, afbeelding 2 van 3 LG Optimus 3D MicroSD/SIM Card Board Replacement, Battery Removal: stap 2, afbeelding 3 van 3
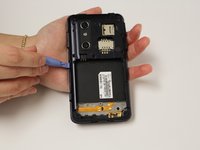
    • The battery is the large black rectangle towards the bottom half of the phone.

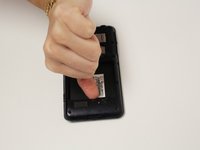
    • There is a semi-circular notch at the bottom edge of the battery. Press against and up on the battery to pop it out.

  3. LG Optimus 3D MicroSD/SIM Card Board Replacement, Screw Removal: stap 3, afbeelding 1 van 2 LG Optimus 3D MicroSD/SIM Card Board Replacement, Screw Removal: stap 3, afbeelding 2 van 2
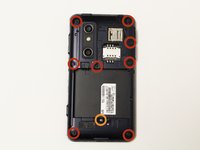
    • Remove 9 screws from the phone. The locations of these screws are circled in the picture.

    • 5.5mm length PH00 screws

    • 4mm length PH00 screws

  4. LG Optimus 3D MicroSD/SIM Card Board Replacement, Bottom Cover Removal: stap 4, afbeelding 1 van 2 LG Optimus 3D MicroSD/SIM Card Board Replacement, Bottom Cover Removal: stap 4, afbeelding 2 van 2
    • Gently pull down on the bottom cover to remove it.

  5. LG Optimus 3D MicroSD/SIM Card Board Replacement, Mid-Cover Bezel Removal: stap 5, afbeelding 1 van 3 LG Optimus 3D MicroSD/SIM Card Board Replacement, Mid-Cover Bezel Removal: stap 5, afbeelding 2 van 3 LG Optimus 3D MicroSD/SIM Card Board Replacement, Mid-Cover Bezel Removal: stap 5, afbeelding 3 van 3
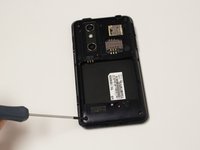
    • Using a plastic opening tool, gently pry around the perimeter of the device.

    • The ribbons behind the buttons and ports are very delicate. Make sure you do not run your plastic opening tool too deep into the bezel, as you could damage them.

    • The button covers rest under the Mid-Cover Bezel. Remove them and set aside.

  6. LG Optimus 3D MicroSD/SIM Card Board Replacement, Ribbon Cable Disconnection: stap 6, afbeelding 1 van 2 LG Optimus 3D MicroSD/SIM Card Board Replacement, Ribbon Cable Disconnection: stap 6, afbeelding 2 van 2
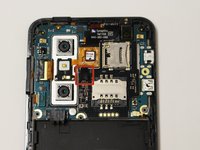
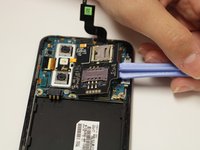
    • Using a spudger or plastic opening tool, gently disconnect the ribbon cable attached to the black SIM card board.

  7. LG Optimus 3D MicroSD/SIM Card Board Replacement, Adhesive Loosening: stap 7, afbeelding 1 van 1
    • Use a hair-dryer on high, or a heat-gun on low to heat the device and loosen the adhesive which holds down the SD/SIM Card Board.

    • Evenly heat the device in short intervals for about one minute.

    • Do not heat the device for more than 30 seconds at a time to prevent over-heating.

  8. LG Optimus 3D MicroSD/SIM Card Board Replacement, SD/SIM Card Board Removal: stap 8, afbeelding 1 van 3 LG Optimus 3D MicroSD/SIM Card Board Replacement, SD/SIM Card Board Removal: stap 8, afbeelding 2 van 3 LG Optimus 3D MicroSD/SIM Card Board Replacement, SD/SIM Card Board Removal: stap 8, afbeelding 3 van 3
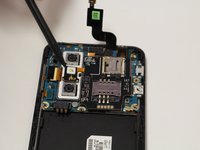
    • Gently pry the board up to release it from the now soft adhesive. Make sure you pry up the little tab connected to the camera unit as well.

    • If the board is too difficult to separate than more heating may be required.

Conclusie

To reassemble your device, follow these instructions in reverse order.

Dale Pearson

Lid sinds: 09/22/14

784 Reputatie

6 handleidingen geschreven

Team

USF Tampa, Team 10-6, Brown Fall 2014 Lid van USF Tampa, Team 10-6, Brown Fall 2014

USFT-BROWN-F14S10G6

3 Leden

6 handleidingen geschreven

0 opmerkingen

Voeg opmerking toe

Weergavestatistieken:

Afgelopen 24 uren: 0

Afgelopen 7 dagen: 0

Afgelopen 30 dagen: 1

Altijd: 935