Inleiding
The battery, like most batteries, gives juice to the device. This guide will show you how to carefully remove it for troubleshooting purposes.
Wat je nodig hebt
-
-
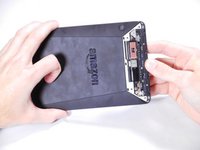
Insert a plastic opening tool between the plastic panel shown on the device.
-
Use the tool to pry the plastic away from the device.
-
-
-
-
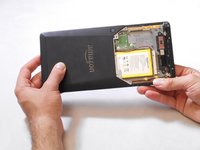
Once the screws are removed, the back panel can slide off the device.
I’ve tackled apparently more complicated jobs on iMac, MacBook and iPhone, but this one has defeated me! I can’t complete step 3 the panel simply will not slide off.
Correction, tried some more. After one and a half hours of struggling I finally managed to slide the cover off. Now tht it’s been done once, it slides on and off easily.Just putting this here in case others have the same problem - persevere. In principle the job’s an easy one.
If the old battery swells, as mine did, the board will not slide out of the case. Too much pressure exerted on the case from the swollen battery.
I had to separate the two halves of the case.
Case hard to slide off for me as well. Found that some double-sticky tape on the magnetic part overlapped the case and had to be carefully sliced. Was able to budge the case enough to give the opening tool purchase near the charge port, and pry that way. The case only needs to slide 1/2” or so and then it lifts off.
Wedge the guitar picks at the top where the two top screws where: slides off immediately like a charm.
-
-
-
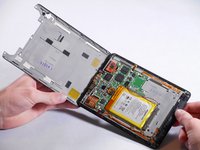
Remove the magnetic component with the magnetic head of the aluminum driver.
You can use both magnetic piece or fingers indeed, but it does respond to a magnet for easier picking up.
-
-
Gereedschap gebruikt in deze stap:Plastic Cards$2.99
-
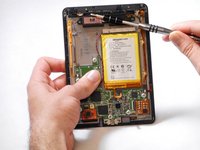
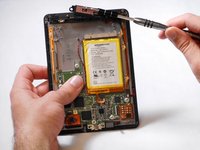
Use a plastic card to pry the battery away from the device.
-
Gently un-clip the battery plug from the device and remove the battery.
The battery in mine was VERY firmly stuck with adhesive. I had to use a lot of force to remove it, and the battery bent significantly.
I used an old credit card to carefully “cut” the battery from the base. You have to exercise some patience here, because the battery is very thin and bendable and probably dangerous to bend too much. The thin, tape-like adhesive stuck to the case as the battery itself came off, so the new battery stuck just fine to the old adhesive.
Shouldn’t you unplug the battery first, before attempting to pry the battery out of the device? That is the procedure for both the MacBook Pro and Galaxy S7 phone battery replacement.
Did not do this, although I had read that the device should be turned off before doing the battery replacement.
gring40 -
Instructions worked perfectly, just make sure you have the right tools for the job. A solid small / mobile electronics repair toolset is a must.
Once you slide the pick (or plastic card) under the battery as shown, you can use the Opening Tool to pry the edge of the battery, It releases gradually, so be patient. Had to remove some tape holding down a cable running alongside the battery. Also needed to work the card between the battery bottom cover and the sticky tape. The battery connector unlatched easily, BUT:
Reversing the process to install the new battery is tricky because the new battery connector is very hard to align with its mate on the circuit board. You can’t see what you’re doing because the top of the connector blocks your view. You just have to guess about the correct alignment, and press down (used the back of the Opening Tool) until it seems to be mated. Wasn’t sure I succeeded until the case was back on, and I could try to turn the Voyage back on. BTW, all data was still there, though the new battery was only at 12%.
-


To reassemble your device, follow these instructions in reverse order.
To reassemble your device, follow these instructions in reverse order.
Annuleren: ik heb deze handleiding niet afgemaakt.
37 andere personen hebben deze handleiding voltooid.
Team

Cal Poly, Team 19-12, Maness Winter 2015 Lid van Cal Poly, Team 19-12, Maness Winter 2015
CPSU-MANESS-W15S19G12
5 Leden
10 handleidingen geschreven
18 opmerkingen
Where to find a replacement battery for kindle voyage 3G please if any one knows
Any advance on where one can find a replacement battery for the Kindle Journal?
For those looking for the battery, I’ve found them on both amazon and eBay by searching “305070 battery”
what does the battery symbol with an “!” in it mean?
Guide worked great, thanks! Charging to 100% for calibration now. Used a credit card to slowly peel the battery up. I already had double sided sticky tape, so I was able to re-stick both the battery and the plastic cover. If anyone is curious, the two longer screws are the ones closer to the center of the device, and the shorter screws are the ones on the top edge. Long live the Voyage, Amazon’s best kindle model to date!
What adhesive is recommended to use when putting device back together? A certain size tape or the adhesive glue?
Step 3:
If the old battery swells, as mine did, the board will not slide out of the case. Too much pressure exerted on the case from the swollen battery.
I had to separate the two halves of the case.
I would not rate this repair easy, the original battery is glued like hell to the device, either you use a heat pad to heat it up or try to get it out via a plastic card, but even then you have to be very careful, the battery bends easily and does while doing so. I was sweating the entire time doing it because i could see the battery lightly bending and was prepared to rush outside and throw the device out while doing it.
Thankfully I got it out without fire, but removing the battery is not without risk in this case.
Using a heatbed, is also a good question, normal lcds are fine if you heat them up to 60c, which is usually the temperature to weaken the battery, not sure how an electronic paper display behaves, but preheating the device to 60c if the display can survive it might ease the process.
I had smartphone repairs which were less risky in the fire department!
Learned from changing battery on a MacBook , a clever Thai person used thin fishing line to cut the glue behind the battery. Just lift a bit and get the line under the battery and patiently pull side to side . It works !
Mine (after many, many years) was very gooey around the shiny plastic cap and that goo had spread all around the top edge of the sliding upper part; this made removing the plastic cap an arduous business and then required some time to clean the top e.dge of the sliding part. The rest was very simple. Thanks for the step-by-step guide, well illustrated, easy to follow, and confidence-inspiring!
This is not the best way to do this. The plastic panel snaps in on the lower/center part and slides into notches in the top. When you do as this instructs it breaks the tabs that connect on the top. If you can slide a few of the guitar picks into the lower part and get all the glue disconnected and get it to get past the snaps on the bottom you can then slide it upward and remove it without damaging the panel.
sam - Antwoord
Thank you for a very helpful hint
baggins -
Definitely agree with this, and would clarify a bit. If the piece to be removed is at the top of the Kindle, the only purchase for the Opener Tool is the seam along the top edge. Start at either corner, and pry just enough to insert a pick, and repeat the process to work your way along the slanted edge towards the bottom edge; the adhesive releases easily. Continue along the bottom edge, then lift the bottom edge clear of its retainers. The whole piece can then easily be slid off.
gring40 - Antwoord
Putting it back on was by far the hardest part of the whole process for me. The tiny tabs at the "top" are sort of hooks that fit into slots in the top of the kindle. To remove get the back part (away from the edge part) pried up, those tabs pull straight up but it's glued down so it really needs careful prying, once the back side is up it can slide up and off. Very fiddly to get back on, slide down hooking the edge first then massage into place to fit the tabs one the away-from-edge side in. I think I mushed the edge hooks down a bit, I had to use a pick in between the main part and the tiny hooks to make sure they were not mashed down before I was able to get it reassembled. Succeeded in the end, be prepared to fuss with it a lot!
Michaela - Antwoord