Inleiding
The ambient light sensor is what lets you read in less-than-ideal lighting situations. It is attached to the motherboard near the battery and again at the top where it actually can get light from outside of the device.
Wat je nodig hebt
-
-
Insert a plastic opening tool between the plastic panel shown on the device.
-
Use the tool to pry the plastic away from the device.
-
-
-
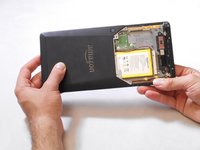
Once the screws are removed, the back panel can slide off the device.
I’ve tackled apparently more complicated jobs on iMac, MacBook and iPhone, but this one has defeated me! I can’t complete step 3 the panel simply will not slide off.
Correction, tried some more. After one and a half hours of struggling I finally managed to slide the cover off. Now tht it’s been done once, it slides on and off easily.Just putting this here in case others have the same problem - persevere. In principle the job’s an easy one.
If the old battery swells, as mine did, the board will not slide out of the case. Too much pressure exerted on the case from the swollen battery.
I had to separate the two halves of the case.
Case hard to slide off for me as well. Found that some double-sticky tape on the magnetic part overlapped the case and had to be carefully sliced. Was able to budge the case enough to give the opening tool purchase near the charge port, and pry that way. The case only needs to slide 1/2” or so and then it lifts off.
Wedge the guitar picks at the top where the two top screws where: slides off immediately like a charm.
-
-
-
-
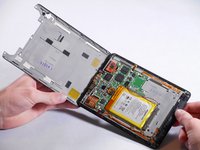
Remove the magnetic component with the magnetic head of the aluminum driver.
You can use both magnetic piece or fingers indeed, but it does respond to a magnet for easier picking up.
-
-
-
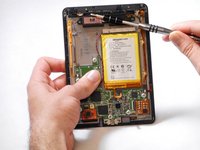
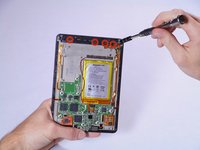
Use an aluminum driver with Phillips head #00 to remove the four 3 mm screws shown in the picture.
-
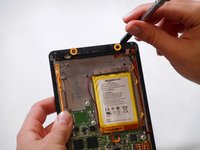
Use the same driver to remove the two 2.5 mm screws.
-
-
Gereedschap gebruikt in deze stap:Tweezers$4.99
-
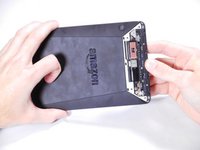
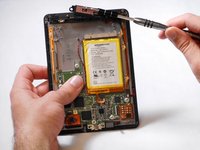
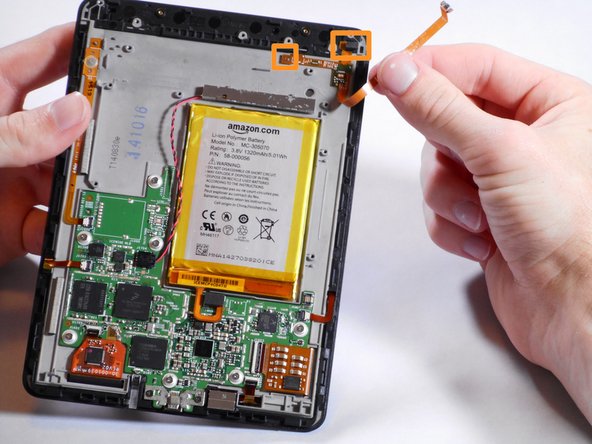
Gently remove the connector to the motherboard using tweezers.
-
Continue to carefully pull the rest of the connector from the adhesive connecting it to the Voyage.
-
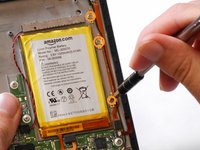
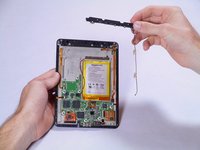
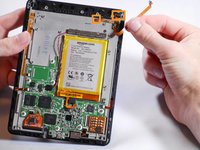
Detach sensor from the top using fingers
-


To reassemble your device, follow these instructions in reverse order.
To reassemble your device, follow these instructions in reverse order.
Annuleren: ik heb deze handleiding niet afgemaakt.
Één andere persoon heeft deze handleiding voltooid.
Team

Cal Poly, Team 19-12, Maness Winter 2015 Lid van Cal Poly, Team 19-12, Maness Winter 2015
CPSU-MANESS-W15S19G12
5 Leden
10 handleidingen geschreven
This is not the best way to do this. The plastic panel snaps in on the lower/center part and slides into notches in the top. When you do as this instructs it breaks the tabs that connect on the top. If you can slide a few of the guitar picks into the lower part and get all the glue disconnected and get it to get past the snaps on the bottom you can then slide it upward and remove it without damaging the panel.
sam - Antwoord
Thank you for a very helpful hint
baggins -
Definitely agree with this, and would clarify a bit. If the piece to be removed is at the top of the Kindle, the only purchase for the Opener Tool is the seam along the top edge. Start at either corner, and pry just enough to insert a pick, and repeat the process to work your way along the slanted edge towards the bottom edge; the adhesive releases easily. Continue along the bottom edge, then lift the bottom edge clear of its retainers. The whole piece can then easily be slid off.
gring40 - Antwoord
Putting it back on was by far the hardest part of the whole process for me. The tiny tabs at the "top" are sort of hooks that fit into slots in the top of the kindle. To remove get the back part (away from the edge part) pried up, those tabs pull straight up but it's glued down so it really needs careful prying, once the back side is up it can slide up and off. Very fiddly to get back on, slide down hooking the edge first then massage into place to fit the tabs one the away-from-edge side in. I think I mushed the edge hooks down a bit, I had to use a pick in between the main part and the tiny hooks to make sure they were not mashed down before I was able to get it reassembled. Succeeded in the end, be prepared to fuss with it a lot!
Michaela - Antwoord