Ga door naar hoofdinhoud

Jumper Angelsounds JPD-100S Volume Knob Replacement

Wat je nodig hebt

  1. Jumper Angelsounds JPD-100S Volume Knob Replacement, Motherboard: stap 1, afbeelding 1 van 1
    • Access the battery compartment

    • Remove the battery compartment lid and set it aside.

    • Disconnect the battery and set it aside.

  2. Jumper Angelsounds JPD-100S Volume Knob Replacement: stap 2, afbeelding 1 van 2 Jumper Angelsounds JPD-100S Volume Knob Replacement: stap 2, afbeelding 2 van 2
    • Puncture the sticker in the battery compartment with a spudger to access the screw beneath it.

  3. Jumper Angelsounds JPD-100S Volume Knob Replacement: stap 3, afbeelding 1 van 1
    • Remove the 7mm Phillips #1 screw from the battery compartment.

    • Place the screw in a secure place.

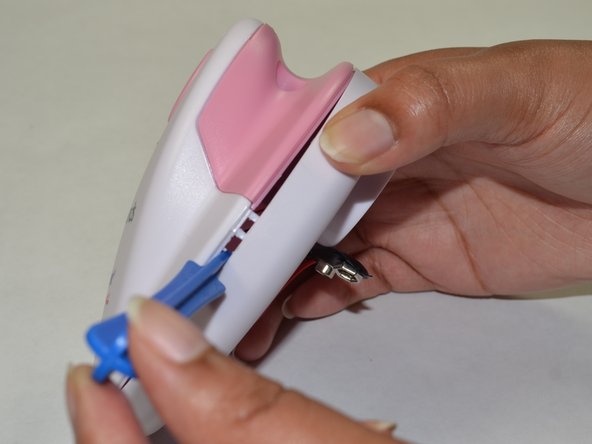
  4. Jumper Angelsounds JPD-100S Volume Knob Replacement: stap 4, afbeelding 1 van 2 Jumper Angelsounds JPD-100S Volume Knob Replacement: stap 4, afbeelding 2 van 2
    • Begin prying open the device.

    • Insert a plastic opening tool into the side groove about 2cm from the pink plastic component and pry open one side of the device.

    • Once the side is separated, leave the opening tool inside to prevent the two sides from closing.

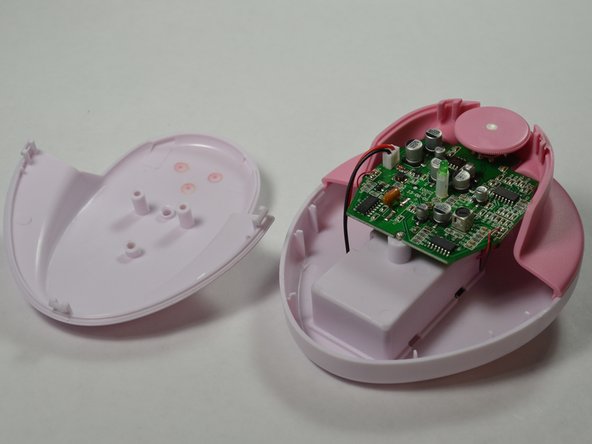
  5. Jumper Angelsounds JPD-100S Volume Knob Replacement: stap 5, afbeelding 1 van 2 Jumper Angelsounds JPD-100S Volume Knob Replacement: stap 5, afbeelding 2 van 2
    • Insert another plastic opening tool into the groove opposite to the side of the tool already inserted.

    • Create separation on that side until the white plastic component comes off entirely.

    • Place the white plastic component in a secure place.

  6. Jumper Angelsounds JPD-100S Volume Knob Replacement: stap 6, afbeelding 1 van 1
    • With your hand, remove the pink component.

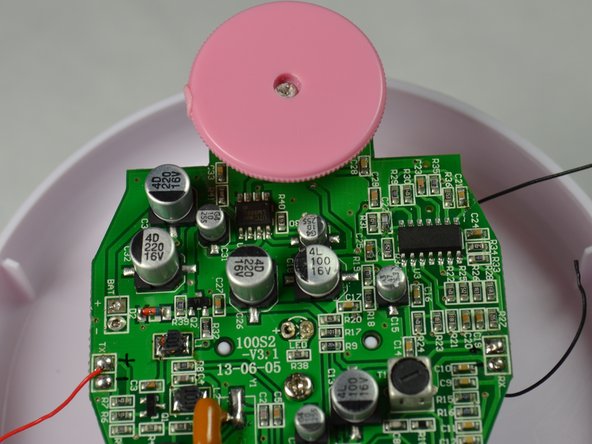
  7. Jumper Angelsounds JPD-100S Volume Knob Replacement: stap 7, afbeelding 1 van 1
    • Remove the 7mm Phillips #1 screw in the middle of the motherboard.

  8. Jumper Angelsounds JPD-100S Volume Knob Replacement, Volume Knob: stap 8, afbeelding 1 van 2 Jumper Angelsounds JPD-100S Volume Knob Replacement, Volume Knob: stap 8, afbeelding 2 van 2
    • Remove the white glue on the volume knob by peeling it off or gently using tweezers to pull it out.

    • Allow approximately 10 minutes for the soldering station to heat up before using.

  9. Jumper Angelsounds JPD-100S Volume Knob Replacement: stap 9, afbeelding 1 van 2 Jumper Angelsounds JPD-100S Volume Knob Replacement: stap 9, afbeelding 2 van 2
    • Remove the 5mm Phillips #00 screw holding the volume knob to the motherboard.

    • Place the screw and volume knob in a secure, safe place.

  10. Jumper Angelsounds JPD-100S Volume Knob Replacement: stap 10, afbeelding 1 van 3 Jumper Angelsounds JPD-100S Volume Knob Replacement: stap 10, afbeelding 2 van 3 Jumper Angelsounds JPD-100S Volume Knob Replacement: stap 10, afbeelding 3 van 3
    • Unsolder the five points holding the volume knob to the motherboard.

    • Carefully place the soldering iron down, as you will need it for reassembly.

Conclusie

To reassemble your device, follow these instructions in reverse order.

Melanie Orozco

Lid sinds: 08/31/15

143 Reputatie

1 Handleiding geschreven

Team

USF Tampa, Team 6-1, Remmell Fall 2015 Lid van USF Tampa, Team 6-1, Remmell Fall 2015

USFT-REMMELL-F15S6G1

6 Leden

6 handleidingen geschreven

0 opmerkingen

Voeg opmerking toe

Weergavestatistieken:

Afgelopen 24 uren: 0

Afgelopen 7 dagen: 2

Afgelopen 30 dagen: 4

Altijd: 166