Ga door naar hoofdinhoud

JBL Charge Micro USB / Aux Port Replacement

Wat je nodig hebt

  1. JBL Charge Micro USB / Aux Port Replacement, Disassembling JBL Charge Casing: stap 1, afbeelding 1 van 3 JBL Charge Micro USB / Aux Port Replacement, Disassembling JBL Charge Casing: stap 1, afbeelding 2 van 3 JBL Charge Micro USB / Aux Port Replacement, Disassembling JBL Charge Casing: stap 1, afbeelding 3 van 3
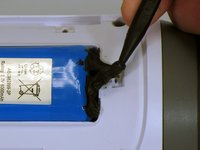
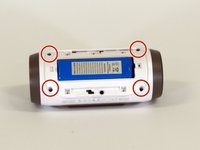
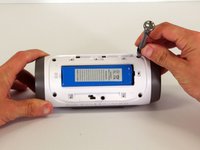
    • Make sure the device is powered off before you begin to disassemble the speaker.

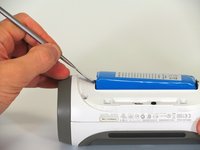
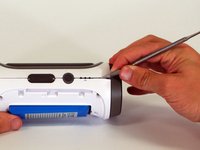
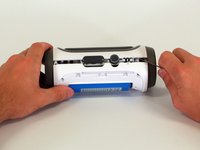
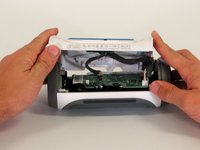
    • Remove the trim from the speaker using a jimmy or metal spudger.

  2. JBL Charge Micro USB / Aux Port Replacement: stap 2, afbeelding 1 van 2 JBL Charge Micro USB / Aux Port Replacement: stap 2, afbeelding 2 van 2
    • Use the PH1 screwdriver to remove all five of the 6 mm screws from the battery cover.

    • Remove the battery cover and set the cover aside.

  3. JBL Charge Micro USB / Aux Port Replacement: stap 3, afbeelding 1 van 2 JBL Charge Micro USB / Aux Port Replacement: stap 3, afbeelding 2 van 2
    • Use a spudger to carefully remove the liquid electrical tape that holds the battery inside the battery compartment.

    • Be careful not to puncture the battery, or damage the battery wire underneath the liquid electrical tape.

  4. JBL Charge Micro USB / Aux Port Replacement: stap 4, afbeelding 1 van 2 JBL Charge Micro USB / Aux Port Replacement: stap 4, afbeelding 2 van 2
    • Use a spudger to lift the battery out of the device.

    • Lift the end of the battery that does not have the wire connection and remove the 16 mm PH2 screw underneath the battery.

    • Notice the wire that is connecting the battery to the device. Attempting to remove the battery completely could cause damage to the wire. Do not use a metal spudger to remove the battery, this could cause damage.

  5. JBL Charge Micro USB / Aux Port Replacement: stap 5, afbeelding 1 van 2 JBL Charge Micro USB / Aux Port Replacement: stap 5, afbeelding 2 van 2
    • Remove the four 16 mm screws from the white plastic casing using the PH2 screwdriver.

  6. JBL Charge Micro USB / Aux Port Replacement: stap 6, afbeelding 1 van 2 JBL Charge Micro USB / Aux Port Replacement: stap 6, afbeelding 2 van 2
    • Starting in a corner of the device where the casing and the side meet, use a pointed metal spudger to pry the back casing off the speaker and the glue holding the seam together.

    • Slide the metal spudger along the seam to separate the back casing from the rest of the speaker.

  7. JBL Charge Micro USB / Aux Port Replacement: stap 7, afbeelding 1 van 2 JBL Charge Micro USB / Aux Port Replacement: stap 7, afbeelding 2 van 2
    • Once the back casing is open, disconnect the three white connectors from the motherboard.

    • Remove the upper casing.

  8. JBL Charge Micro USB / Aux Port Replacement, Battery: stap 8, afbeelding 1 van 1
    • Turn your attention to the back casing removed in Step 7.

  9. JBL Charge Micro USB / Aux Port Replacement: stap 9, afbeelding 1 van 1
    • Using a razor blade, remove the glue holding the battery cable in place.

    • Use multiple vertical cuts to remove pieces of the glue.

    • Be careful not to cut the battery cables.

  10. JBL Charge Micro USB / Aux Port Replacement: stap 10, afbeelding 1 van 1
    • Remove the foam surrounding the battery cable.

  11. JBL Charge Micro USB / Aux Port Replacement: stap 11, afbeelding 1 van 1
    • To remove the battery, pull the battery cable through the hole.

    • This entire white piece needs to be replaced (if replacing the aux/usb port).

  12. JBL Charge Micro USB / Aux Port Replacement, Micro USB / Aux Port: stap 12, afbeelding 1 van 2 JBL Charge Micro USB / Aux Port Replacement, Micro USB / Aux Port: stap 12, afbeelding 2 van 2
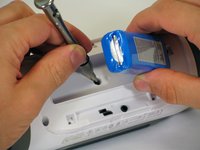
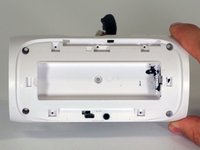
    • Place the battery into the new white casing.

    • Reassemble the device by following the steps in reverse order.

Conclusie

To reassemble your device, follow these instructions in reverse order.

14 andere personen hebben deze handleiding voltooid.

Alexander Castanares

Lid sinds: 04/01/15

870 Reputatie

2 handleidingen geschreven

Team

Cal Poly, Team 12-4, Lancaster Spring 2015 Lid van Cal Poly, Team 12-4, Lancaster Spring 2015

CPSU-LANCASTER-S15S12G4

2 Leden

18 handleidingen geschreven

21 opmerkingen

Hi. This is the problem my speaker is having, but all I need to know is where to buy the replacement back. That's certainly something you should have included in your guide.

trevormeyer - Antwoord

The purpose of a guide is to show how to fix the device, not obtain parts. I suggest eBay.

Joe Durand -

Joe Durand. Thank you for taking time out of your busy day to share such an enlightening comment.

Pete Hyde -

Yeah what was the point of this if people can't actually do it. BS

Gabriel Bohlmann - Antwoord

The point is to guide people on the replacement of parts, not obtaining parts. I suggest eBay.

Joe Durand -

Voeg opmerking toe

Weergavestatistieken:

Afgelopen 24 uren: 7

Afgelopen 7 dagen: 30

Afgelopen 30 dagen: 186

Altijd: 110,691