Inleiding
De passieve radiatoren helpen de luidspreker de bas te verbeteren en maken deel uit van de behuizing waardoor de luidspreker waterdicht is. Het verwijderen van de passieve radiator is een van de eerste stappen bij het openen van de JBL Charge 3. U kunt de binnenkant van de luidsprekers via de zijkanten blootleggen.
Wat je nodig hebt
-
-
Verwijder de twee 8 mm Phillips #1-schroeven.
-
OPMERKING: Er kan maar één schroef zijn.
-
-
-
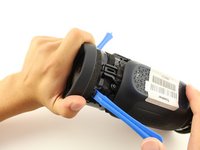
Plaats het plastic openingsgereedschap onder beide lipjes.
I believe this is unnecessary, just turn the passive radiator counter clockwise and pull outward. I tried to use the pry tool and broke a plastic tab.
Tip— when you get to this part lightly tap the edge of the speaker on a hard surface— like you’re tapping a jar before opening it.
Muchas gracias a todos, me dieron cada uno la guía perfecta.
My charge 3 had less screws but the process was the same. Thanks for the instructions!
-
-
-
-
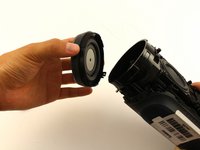
Draai en trek de passieve radiator open. De linker radiator draait met de klok mee; rechts tegen de klok in.
-
-
-
Herhaal alle voorgaande stappen voor de andere passieve radiator.
-
LET OP: voor het vervangen van de batterij hoeft alleen de rechter radiator te worden verwijderd.
right or left…. depends on how you view the Charge 3 i guess. No need to remove both radiators for a newer Charge 3. You can remove the battery cover first…find out what side the battery wires exit the battery compartment and then remove the radiator associated with that same side.
Anybody else have major problems trying to twist the radiator back into position after replacing the battery? I’m having trouble getting the screw holes to line up again on the right radiator.
To twist back I used saliva so it will slide easier against the rubber
-


Volg deze instructies in omgekeerde volgorde om uw apparaat weer in elkaar te zetten.
Volg deze instructies in omgekeerde volgorde om uw apparaat weer in elkaar te zetten.
Annuleren: ik heb deze handleiding niet afgemaakt.
5 andere personen hebben deze handleiding voltooid.
Met dank aan deze vertalers:
100%

Toon Konings helpt ons de wereld te herstellen! Wil je bijdragen?
Begin met vertalen ›
Team

Cal Poly, Team S1-G6, Zimmerman Spring 2020 Lid van Cal Poly, Team S1-G6, Zimmerman Spring 2020
CPSU-ZIMMERMAN-S20S1G6
4 Leden
27 handleidingen geschreven
4Gids Commentaar
i have a different model of the charge 3 it doesnt have screws but its hard to take out
mine has screws and was also hard to pull with one hand
Ich finde den Passivenstrahler nicht als Ersatzteil im Internet. Kann wer da helfen?
I have two of the same without screws, the process is precisely the same. Just need to do it a little bit harder
If your Charge 3 doesn’t look like the above. Do not do this step YET. Go directly to Step 7 removal of the battery. By doing the battery first it will tell you which radiator to remove and thus no need to remove both.
NOTE:
On a newer version of the Charge 3 this image will be very different. you will not find a screw. You will also notice that there are two tabs that if slightly lifted while rotating the radiator counter clockwise the radiator is easily removed. There is also no foam or breakable seal on the newer Charge 3.
john Ramirez - Antwoord