Deze versie kan foutieve bewerkingen bevatten. Schakel over naar de recentste gecontroleerde momentopname.
Wat je nodig hebt
-
-
Verwijder de volgende tien schroeven die de onderste behuizing aan de bovenste behuizing bevestigen:
-
Zeven 3 mm lange Phillips schroeven.
-
Drie 13.5 mm lange Phillips schroeven.
-
-
-
Verwijder de twee 5-punts Pentalobe schroeven langs de bovenkant van de batterij.
-
-
Deze stap is niet vertaald. Help het te vertalen
-
Hold the end of the cable retainer down with one finger while you use the tip of a spudger to slightly lift the other end and rotate it away from the camera cable connector.
-
-
Deze stap is niet vertaald. Help het te vertalen
-
Disconnect the camera cable by pulling the male end straight away from its socket.
-
-
-
Deze stap is niet vertaald. Help het te vertalen
-
Peel the camera cable off the adhesive securing it to the optical drive.
-
-
Deze stap is niet vertaald. Help het te vertalen
-
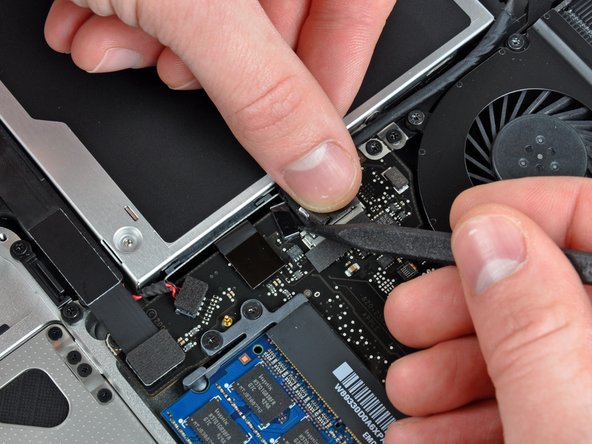
Disconnect the Bluetooth cable by pulling the male end straight away from its socket.
-
Use the flat end of a spudger to pry the Bluetooth antenna cable from its socket on the board.
-
-
Deze stap is niet vertaald. Help het te vertalen
-
Remove the two 8 mm Phillips screws securing the Bluetooth/camera cable retainer to the upper case.
-
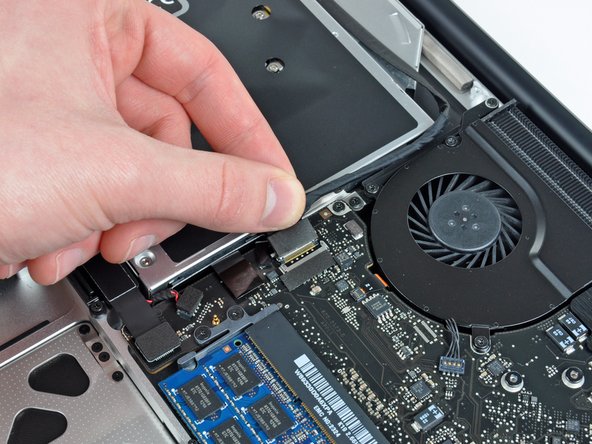
Lift the Bluetooth board/cable retainer assembly out of the upper case.
-
-
Deze stap is niet vertaald. Help het te vertalen
-
Use a spudger to pry the optical drive connector straight up off the logic board.
-
-
Deze stap is niet vertaald. Help het te vertalen
-
Remove the single 3.5 mm Phillips screw securing the inner side of the optical drive to the upper case.
-
-
Deze stap is niet vertaald. Help het te vertalen
-
Remove the two 3.5 mm Phillips screws securing the outer side of the optical drive to the upper case.
-
-
Deze stap is niet vertaald. Help het te vertalen
-
Lift the optical drive from its left edge and pull it out of the upper case.
-
-
Deze stap is niet vertaald. Help het te vertalen
-
Remove the optical drive cable by pulling it straight away from the optical drive.
-
-
Deze stap is niet vertaald. Help het te vertalen
-
Remove the two black Phillips #0 screws securing the small metal mounting bracket. Transfer this bracket to your new optical drive or hard drive enclosure.
-
-
Deze stap is niet vertaald. Help het te vertalen
-
Remove the plastic spacer from the optical bay hard drive enclosure by pressing in on one of the clips on either side and lifting it up and out of the enclosure.
-
-
Deze stap is niet vertaald. Help het te vertalen
-
Make sure that the hard drive connectors are facing down before placing it into the enclosure.
-
Gently place the hard drive into the enclosure's hard drive slot.
-
While firmly holding the enclosure in place with one hand, use your other hand to press the hard drive into the enclosure connectors.
-
-
Deze stap is niet vertaald. Help het te vertalen
-
Once the hard drive is snug, reinsert the plastic spacer while holding the hard drive against the bottom of the enclosure.
-
-
Deze stap is niet vertaald. Help het te vertalen
-
Use two Phillips #1 screws to secure the drive to its enclosure.
-
-
Deze stap is niet vertaald. Help het te vertalen
-
Attach the optical drive bracket to the new enclosure with two Phillips #0 screws.
-
Reconnect any cables you have removed from the original optical drive onto the optical bay enclosure.
-
-
Deze stap is niet vertaald. Help het te vertalen
-
Align the cable's SATA connector with the drive's port and plug in securely.
-
Plug the USB connector into your laptop and your optical drive is ready for use.
-


Annuleren: ik heb deze handleiding niet afgemaakt.
85 andere personen hebben deze handleiding voltooid.


6 opmerkingen
I have just gotten my second hard drive up and running after a few false starts. The main piece of advice I'd give you if you are going to do the same is, format the new hard drive via USB BEFORE you install it!
Physically installing the second hard drive was no trouble at all. The problem I had was formatting it inside the computer. This gave me multiple failed attempts using Disk Utility. When I tried to erase or partition the drive, after a long hang, I always got the error: "File system formatter failed."
I thought something might be wrong with the hard drive, and was about to return it. But then I thought I'd take it out of the computer and plug it in using the Silicone 2.5" Hard Drive Enclosure with USB 2.0 Cable. I ran erase in Disk Utility again and it worked! Now it's showing up in finder and I can start storing files on it.
Also, I must say the customer support from ifixit is great. I messaged them about this and some other issues I was having and I got a detailed response from them within a couple of days. Thanks guys!
After doing this for the first time and starting my computer it worked like a charm but after taking the drive back out to swap primary and secondary drives (so i could have my os installed on the bigger drive) it quit working. Now my secondary drive won't work at all. It won't show up in finder or DU. I'm fairly confident that i didn't break anything on the logic board. Any ideas?
I am struggling with this on a 15 in. Have done this same thing on three 13 in MacBook pros and one iMac.
Fan running, camera gone and bluetooth and wifi not installed. Have done SMC reset and checked cables numerous times. Please provide guidance -