Ga door naar hoofdinhoud

Deze versie kan foutieve bewerkingen bevatten. Schakel over naar de recentste gecontroleerde momentopname.

Wat je nodig hebt

  1. , Onderste behuizing: stap 1, afbeelding 1 van 1
    • Verwijder de volgende tien schroeven die de onderste behuizing aan de bovenste behuizing bevestigen:

    • Zeven 3 mm lange Phillips schroeven.

    • Drie 13.5 mm lange Phillips schroeven.

  2. : stap 2, afbeelding 1 van 1
    • Til de onderste behuizing, met beide handen, omhoog vanaf ongeveer de ventilatieopening om deze zodoende vrij te maken uit de twee klemmen die de behuizing aan de bovenste behuizing bevestigen.

    • Verwijder de onderste behuizing en leg deze weg.

  3. , Batterij: stap 3, afbeelding 1 van 1
    Gereedschap gebruikt in deze stap:
    P6 Pentalobe Screwdriver 2009 15" MacBook Pro Battery
    $5.49
    Koop
    • Drie Pentalobe schroeven bevestigen de batterij aan de bovenste behuizing. Deze kunnen worden verwijderd met deze speciale schroevendraaier.

    • Als je geen Pentalobe-schroevendraaier hebt, kun je als alternatief ook een 1.5 mm brede platkopschroevendraaier gebruiken. Zorg hierbij dat het einde van je platkopschroevendraaier precies in twee van de vijf punten van de schroef past voordat je begint met schroeven, aangezien je anders het risico loopt de schroef door te draaien.

    • Als je schroevendraaier niet helemaal past, zorg je dat je een maatje groter pakt en deze vijlt totdat deze vrijwel precies past.

    • Je hoeft de stappen 3-7, die laten zien hoe je de batterij verwijdert, niet per se te volgen om de harde schijf te vervangen. Echter, het wordt altijd aangeraden om alle stroombronnen van een apparaat te verwijderen voordat je begint met enige reparatie.

  4. : stap 4, afbeelding 1 van 1
    • Verwijder de twee vijfpunts-Pentalobe schroeven langs de bovenkant van de batterij.

  5. : stap 5, afbeelding 1 van 1
    • Gebruik de punt van een spudger om de vinger van de sticker met "Warning: Do not remove the battery" naar achteren te buigen, zodat je de vijfpunts-Pentalobe schroef eronder kunt verwijderen.

  6. : stap 6, afbeelding 1 van 2 : stap 6, afbeelding 2 van 2
    • Til de batterij door middel van de plastic treklip omhoog en schuif deze weg van de lange kant van de bovenste behuizing.

    • Probeer de batterij nog niet volledig te verwijderen.

  7. : stap 7, afbeelding 1 van 1
    • Kantel de batterij ver genoeg naar achteren om de kabelaansluiting van de batterij te kunnen bereiken.

    • Trek de kabelaansluiting van de batterij weg uit het contact op het logic board en verwijder de batterij vervolgens uit de bovenste behuizing.

    • Zorg dat je, als je een nieuwe batterij installeert, je nieuwe batterij ook kalibreert!

  8. Deze stap is niet vertaald. Help het te vertalen

    : stap 8, afbeelding 1 van 1
    • Apple sticks a small strip of clear plastic with adhesive applied to one side to the logic board behind the camera cable connector to keep it in its socket. When moving it out of the way, be sure not to break any surface-mount components off the logic board.

    • Hold the end of the cable retainer down with one finger while you use the tip of a spudger to slightly lift the other end and rotate it away from the camera cable connector.

  9. Deze stap is niet vertaald. Help het te vertalen

    : stap 9, afbeelding 1 van 1
    • Disconnect the camera cable by pulling the male end straight away from its socket.

    • Pull the connector parallel to the face of the logic board, not straight up.

  10. Deze stap is niet vertaald. Help het te vertalen

    : stap 10, afbeelding 1 van 1
    • Peel the camera cable off the adhesive securing it to the optical drive.

  11. Deze stap is niet vertaald. Help het te vertalen

    : stap 11, afbeelding 1 van 2 : stap 11, afbeelding 2 van 2
    • This step is only required if you have an anti-glare display. If you have a glossy display, skip this step.

    • Disconnect the Bluetooth cable by pulling the male end straight away from its socket.

    • Pull the connector parallel to the face of the logic board, not straight up.

    • Use the flat end of a spudger to pry the Bluetooth antenna cable from its socket on the board.

  12. Deze stap is niet vertaald. Help het te vertalen

    : stap 12, afbeelding 1 van 2 : stap 12, afbeelding 2 van 2
    • This step is only required if you have an anti-glare display.

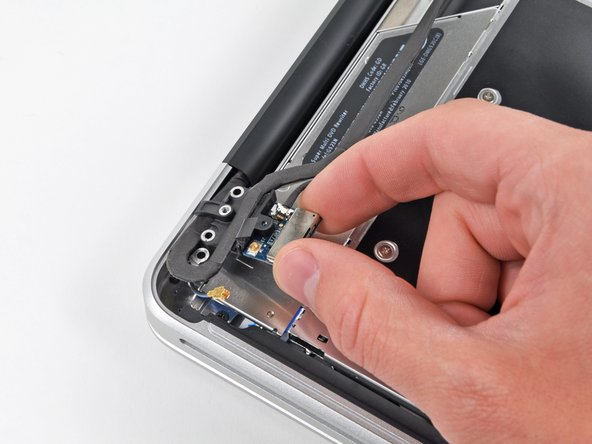
    • Remove the two 8 mm Phillips screws securing the Bluetooth/camera cable retainer to the upper case.

    • One of the screws may remain captive in the Bluetooth/camera cable ground loop. If replacing the display, be sure to transfer this screw to the new unit.

    • Lift the Bluetooth board/cable retainer assembly out of the upper case.

  13. Deze stap is niet vertaald. Help het te vertalen

    : stap 13, afbeelding 1 van 1
    • Use a spudger to pry the optical drive connector straight up off the logic board.

  14. Deze stap is niet vertaald. Help het te vertalen

    : stap 14, afbeelding 1 van 1
    • Remove three 3.5 mm Phillips screws securing the optical drive to the upper case.

  15. Deze stap is niet vertaald. Help het te vertalen

    : stap 15, afbeelding 1 van 2 : stap 15, afbeelding 2 van 2
    • Lift the optical drive from its left edge and pull it out of the computer.

    • When reassembling, be careful that the SATA cable doesn't get stuck underneath the logic board.

  16. Deze stap is niet vertaald. Help het te vertalen

    : stap 16, afbeelding 1 van 1
    • Débranchez le connecteur du câble du lecteur optique de celui-ci.

  17. Deze stap is niet vertaald. Help het te vertalen

    : stap 17, afbeelding 1 van 1
    • Remove the optical drive cable by pulling it straight away from the optical drive.

    • If you have a CD or any other object jammed in your optical drive, we have an optical drive repair guide.

  18. Deze stap is niet vertaald. Help het te vertalen

    : stap 18, afbeelding 1 van 1
    • Remove the two black Phillips #0 screws securing the small metal mounting bracket. Transfer this bracket to your new optical drive or hard drive enclosure.

  19. Deze stap is niet vertaald. Help het te vertalen

    : stap 19, afbeelding 1 van 2 : stap 19, afbeelding 2 van 2
    • Remove the plastic spacer from the optical bay hard drive enclosure by pressing in on one of the clips on either side and lifting it up and out of the enclosure.

  20. Deze stap is niet vertaald. Help het te vertalen

    : stap 20, afbeelding 1 van 3 : stap 20, afbeelding 2 van 3 : stap 20, afbeelding 3 van 3
    • Make sure that the hard drive connectors are facing down before placing it into the enclosure.

    • Gently place the hard drive into the enclosure's hard drive slot.

    • While firmly holding the enclosure in place with one hand, use your other hand to press the hard drive into the enclosure connectors.

  21. Deze stap is niet vertaald. Help het te vertalen

    : stap 21, afbeelding 1 van 2 : stap 21, afbeelding 2 van 2
    • Once the hard drive is snug, reinsert the plastic spacer while holding the hard drive against the bottom of the enclosure.

  22. Deze stap is niet vertaald. Help het te vertalen

    : stap 22, afbeelding 1 van 2 : stap 22, afbeelding 2 van 2
    • Use two Phillips #1 screws to secure the drive to its enclosure.

  23. Deze stap is niet vertaald. Help het te vertalen

    : stap 23, afbeelding 1 van 1
    • Attach the optical drive bracket to the new enclosure with two Phillips #0 screws.

    • Reconnect any cables you have removed from the original optical drive onto the optical bay enclosure.

  24. Deze stap is niet vertaald. Help het te vertalen

    : stap 24, afbeelding 1 van 3 : stap 24, afbeelding 2 van 3 : stap 24, afbeelding 3 van 3
    • Don't ditch that drive! You can still use your optical drive externally with the help of our SATA Optical Drive USB Cable.

    • Align the cable's SATA connector with the drive's port and plug in securely.

    • Plug the USB connector into your laptop and your optical drive is ready for use.

Eindstreep

51 andere personen hebben deze handleiding voltooid.

Brittany McCrigler

Lid sinds: 03/05/12

89.017 Reputatie

131 handleidingen geschreven

Team

iFixit Lid van iFixit

Staff

135 Leden

17.147 handleidingen geschreven

Één opmerking

Well, actually a question.

Reading the parts list for this project, I find FOUR different drives -- 2 hybrid, 2 SSD -- that I will be installing. Is that correct, or have I misinterpreted something about these components?

Nicky - Antwoord

Voeg opmerking toe

Weergavestatistieken:

Afgelopen 24 uren: 3

Afgelopen 7 dagen: 15

Afgelopen 30 dagen: 26

Altijd: 23,501