Ga door naar hoofdinhoud

InFocus X2 Lamp Replacement

Wat je nodig hebt

  1. InFocus X2 Lamp Replacement, Open the Lamp Door: stap 1, afbeelding 1 van 3 InFocus X2 Lamp Replacement, Open the Lamp Door: stap 1, afbeelding 2 van 3 InFocus X2 Lamp Replacement, Open the Lamp Door: stap 1, afbeelding 3 van 3
    • Be sure that the projector is turned off, unplugged, and has cooled for at least 30 seconds.

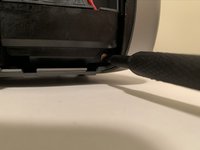
    • Insert the Jimmy into one of the two notches on the lamp door's top edge.

    • Then use light force on the Jimmy to pry the latch away from the door.

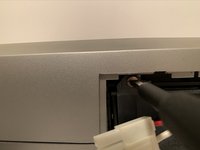
    • If necessary, insert the Jimmy into the second latch and separate it from the projector.

    • Remove the door away from the projector by hand.

  2. InFocus X2 Lamp Replacement, Disconnect the Lamp: stap 2, afbeelding 1 van 3 InFocus X2 Lamp Replacement, Disconnect the Lamp: stap 2, afbeelding 2 van 3 InFocus X2 Lamp Replacement, Disconnect the Lamp: stap 2, afbeelding 3 van 3
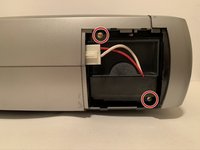
    • Gently disconnect the lamp from the projector by using your thumb and forefinger to pinch on the white tab on the plug.

    • Then pull the plug away from the projector.

  3. InFocus X2 Lamp Replacement, Unscrew the Lamp from the Projector: stap 3, afbeelding 1 van 3 InFocus X2 Lamp Replacement, Unscrew the Lamp from the Projector: stap 3, afbeelding 2 van 3 InFocus X2 Lamp Replacement, Unscrew the Lamp from the Projector: stap 3, afbeelding 3 van 3
    • Use a Phillips #4 screwdriver or driver with the Phillips #4 head to unscrew the two 0.6 mm diameter brass screws from the lamp's housing.

    • For the lower screw, ensure it remains in the hole in the lamp assembly and it does not fall into the projector. If it falls in the projector, use a magnetized screw bit or a small magnet to pick it up and remove it.

  4. InFocus X2 Lamp Replacement, Remove the Old Lamp: stap 4, afbeelding 1 van 1
    • Pull on the bottom plastic tab and remove the lamp by hand.

  5. InFocus X2 Lamp Replacement, Insert the New Lamp: stap 5, afbeelding 1 van 1
    • Insert the replacement lamp into the projector.

Conclusie

To reassemble your device, follow these instructions in reverse order.

Caution: The old bulb contains mercury. Please recycle it in a safe and appropriate manner. Look for your local recycling information at https://earth911.com/

Bijgevoegde documenten

Paulina Duarte

Lid sinds: 09/19/13

553 Reputatie

4 handleidingen geschreven

Team

UMass Dartmouth, Team 1-3, Gulbrandsen Fall 2013 Lid van UMass Dartmouth, Team 1-3, Gulbrandsen Fall 2013

UMASSD-GULBRANDSEN-F13S1G3

3 Leden

10 handleidingen geschreven

0 opmerkingen

Voeg opmerking toe

Weergavestatistieken:

Afgelopen 24 uren: 0

Afgelopen 7 dagen: 5

Afgelopen 30 dagen: 13

Altijd: 712