Ga door naar hoofdinhoud
Word lid van de reparatiegemeenschap - Account aanmaken

IBM ThinkPad T41 Screen Replacement

Wat je nodig hebt

  1. IBM ThinkPad T41 Screen Replacement, Keyboard: stap 1, afbeelding 1 van 1
    • Close the screen and turn the closed laptop over.

    • Remove all 17 screws on the bottom of the computer.

    • The multiple colors (turquoise, red, blue, orange, yellow, and purple) are for organizational purposes, indicating different screws.

    • The yellow marker at the rear denotes the UltraBay device retaining screw. This screw is optional as the UltraBay mechanism will hold the drive or battery in place anyway. The yellow marker at the front denotes the hard disk caddy retaining screw.

    Vraag FixBot
  2. IBM ThinkPad T41 Screen Replacement: stap 2, afbeelding 1 van 1
    • Remove the extra RAM cover, by lifting where the screw was and pulling out.

    Vraag FixBot
  3. IBM ThinkPad T41 Screen Replacement: stap 3, afbeelding 1 van 1
    • Turn the laptop right side up and open the screen.

    • Lift the keyboard, using a spudger at the seam between the keyboard and trackpad.

    • Careful of the ribbon cable underneath, which may tear if the keyboard is lifted too vigorously.

    Vraag FixBot
  4. IBM ThinkPad T41 Screen Replacement: stap 4, afbeelding 1 van 1
    • Unplug the keyboard’s ribbon cable, by lifting up the edges of the plug.

    • Remove the keyboard.

    Vraag FixBot
  5. IBM ThinkPad T41 Screen Replacement, Trackpad: stap 5, afbeelding 1 van 1
    • Close the laptop and turn it over.

    • Remove the five plastic stickers covering the screws on the front edge of the case.

    • In order to reuse the stickers, remove them carefully.

    Vraag FixBot
  6. IBM ThinkPad T41 Screen Replacement: stap 6, afbeelding 1 van 1
    • Unscrew the five screws that were hidden by the stickers.

    Vraag FixBot
  7. IBM ThinkPad T41 Screen Replacement: stap 7, afbeelding 1 van 1
    • Turn the computer right side up and open the screen.

    • Lift the trackpad assembly by placing hands on both edges and then pull towards you till it is free of the case.

    • Be careful of the ribbon cable underneath. It may tear if the trackpad is pulled too vigorously.

    Vraag FixBot
  8. IBM ThinkPad T41 Screen Replacement: stap 8, afbeelding 1 van 1
    • Unplug the trackpad’s ribbon cable by pulling on the white plastic tab.

    Vraag FixBot
  9. IBM ThinkPad T41 Screen Replacement, Wireless Network Card: stap 9, afbeelding 1 van 1
    • Pull off the one black and one white coaxial cables by lifting the tabs labeled main and aux (for auxiliary).

    Vraag FixBot
  10. IBM ThinkPad T41 Screen Replacement: stap 10, afbeelding 1 van 1
    • Push apart the retaining clips.

    • Note: The card should pop up a little bit.

    Vraag FixBot
  11. IBM ThinkPad T41 Screen Replacement: stap 11, afbeelding 1 van 1
    • Pull the wireless network card out.

    Vraag FixBot
  12. IBM ThinkPad T41 Screen Replacement, Screen: stap 12, afbeelding 1 van 1
    • Close the computer screen.

    • Remove the four screws on the back of the laptop, near the right and left hinges.

    Vraag FixBot
  13. IBM ThinkPad T41 Screen Replacement: stap 13, afbeelding 1 van 1
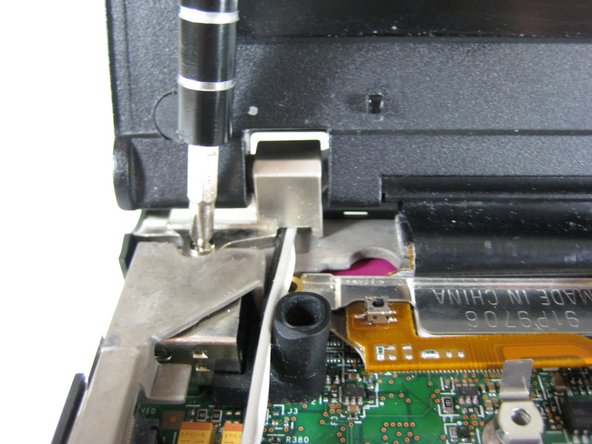
    • Open the laptop screen.

    • Remove the single screw that secures the left hinge to top of the computer.

    Vraag FixBot
  14. IBM ThinkPad T41 Screen Replacement: stap 14, afbeelding 1 van 1
    • Remove a single screw from the metal plate that secures the display cable.

    Vraag FixBot
  15. IBM ThinkPad T41 Screen Replacement: stap 15, afbeelding 1 van 1
    • Pull the metal plate away from the display cable.

    Vraag FixBot
  16. IBM ThinkPad T41 Screen Replacement: stap 16, afbeelding 1 van 1
    • Disconnect the display cable.

    Vraag FixBot
  17. IBM ThinkPad T41 Screen Replacement: stap 17, afbeelding 1 van 1
    • Carefully pull up the long antenna cables that were attached to the wireless network card.

    Vraag FixBot
  18. IBM ThinkPad T41 Screen Replacement: stap 18, afbeelding 1 van 1
    • Lift out the screen.

    Vraag FixBot
Conclusie

To reassemble your device, follow these instructions in reverse order.

5 andere personen hebben deze handleiding voltooid.

Marissa Blustein

Lid sinds: 04/16/10

543 Reputatie

12 handleidingen geschreven

Team

Cal Poly, Team 7-8, Maness Spring 2010 Lid van Cal Poly, Team 7-8, Maness Spring 2010

CPSU-MANESS-S10S7G8

4 Leden

29 handleidingen geschreven

0Gids Commentaar

Voeg opmerking toe

Weergavestatistieken:

Afgelopen 24 uren: 0

Afgelopen 7 dagen: 9

Afgelopen 30 dagen: 86

Altijd: 19,098