Ga door naar hoofdinhoud

HP Stream 7 Motherboard Replacement

Wat je nodig hebt

  1. HP Stream 7  Motherboard Replacement, Battery: stap 1, afbeelding 1 van 2 HP Stream 7  Motherboard Replacement, Battery: stap 1, afbeelding 2 van 2
    • Make sure the tablet is powered off before beginning.

    • Gently run the plastic opening tool or your fingernails around the tablet to pry the Back Cover from the tablet.

  2. HP Stream 7  Motherboard Replacement: stap 2, afbeelding 1 van 2 HP Stream 7  Motherboard Replacement: stap 2, afbeelding 2 van 2
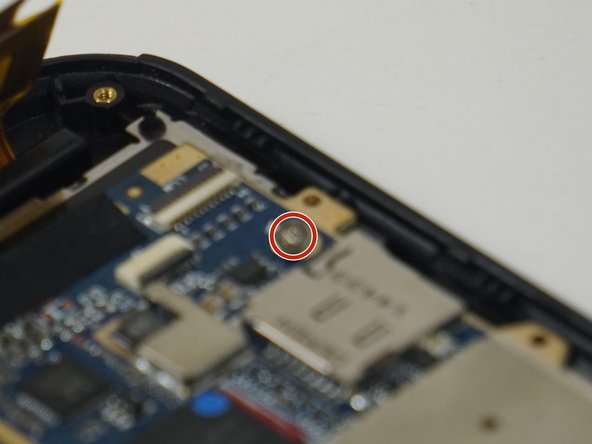
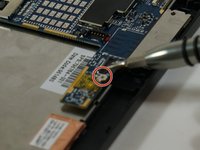
    • Remove the eight 5 mm Phillips 000 screws.

    • Gently run the plastic opening tool around the seam to pry the mid back cover from the tablet.

  3. HP Stream 7  Motherboard Replacement: stap 3, afbeelding 1 van 2 HP Stream 7  Motherboard Replacement: stap 3, afbeelding 2 van 2
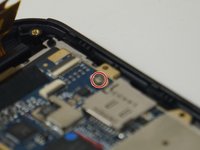
    • Using tweezers, gently pull the battery connector towards the battery to remove it from the System Board.

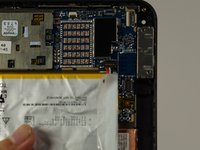
    • Pull the blue tabs (Not Shown) out from the tablet at an angle to remove the tape underneath the Battery.

    • If you broke both tabs, scrape the tape and Battery off.

    • Scraping off the Battery will damage it. If you are replacing another part, leave the Battery on the display panel.

  4. HP Stream 7  Motherboard Replacement, Motherboard Replacement: stap 4, afbeelding 1 van 1
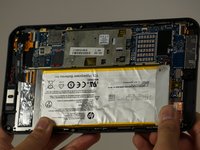
    • Disconnect the battery from the motherboard, but leave the battery on the display panel (unless you have already taken it off).

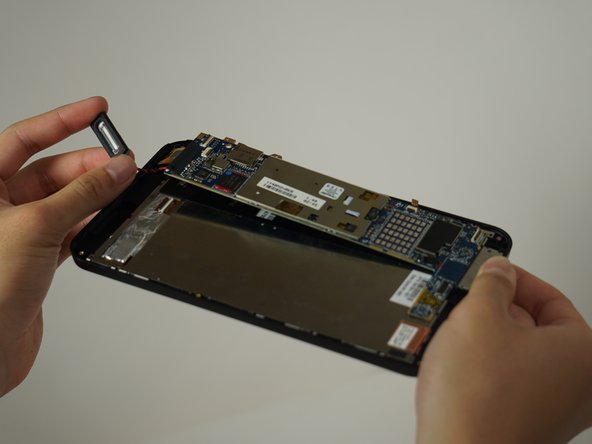
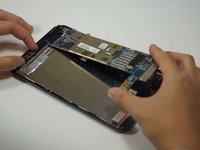
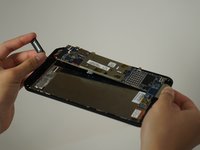
    • Disconnect the motherboard from the rear-facing camera, the front-facing camera, the antenna, the power button board, the screen, and the display panel using your spudger.

    • The cable connected to the display is adhered to the panel, so be careful when removing the cable (like most things here).

    • If you are inexperienced with disconnecting everything, "Recognizing and Disconnecting Cable Connectors" is a helpful ifixit guide.

  5. HP Stream 7  Motherboard Replacement: stap 5, afbeelding 1 van 2 HP Stream 7  Motherboard Replacement: stap 5, afbeelding 2 van 2
    • Remove the two 2 mm Phillips 000 screws from the motherboard.

  6. HP Stream 7  Motherboard Replacement: stap 6, afbeelding 1 van 2 HP Stream 7  Motherboard Replacement: stap 6, afbeelding 2 van 2
    • Once unscrewed, the motherboard separates from the rest of the device.

    • The speaker is soldered to the motherboard, but it comes off easily.

    • Forced separation may result in a damaged motherboard and/or personal injury.

Conclusie

To reassemble your device, follow these instructions in reverse order.

Één andere persoon heeft deze handleiding voltooid.

Justin Schnorf

Lid sinds: 10/03/16

252 Reputatie

2 handleidingen geschreven

Team

Cal Poly, Team 18-5, Forte Fall 2016 Lid van Cal Poly, Team 18-5, Forte Fall 2016

CPSU-FORTE-F16S18G5

4 Leden

6 handleidingen geschreven

0 opmerkingen

Voeg opmerking toe

Weergavestatistieken:

Afgelopen 24 uren: 0

Afgelopen 7 dagen: 2

Afgelopen 30 dagen: 8

Altijd: 1,566