Ga door naar hoofdinhoud

HP G72 Keyboard Replacement

Wat je nodig hebt

  1. HP G72 Keyboard Replacement, Keyboard: stap 1, afbeelding 1 van 3 HP G72 Keyboard Replacement, Keyboard: stap 1, afbeelding 2 van 3 HP G72 Keyboard Replacement, Keyboard: stap 1, afbeelding 3 van 3
    • Shut down the computer. Disconnect all external devices connected to the computer. Disconnect the power from the computer by first disconnecting the power cord from the AC outlet and then disconnecting the AC adapter from the computer.

    • Turn the computer so that it faces upside down. Position the computer with the front toward you.

    • Slide the battery release latch to release the battery. Pivot the battery to remove it.

  2. HP G72 Keyboard Replacement: stap 2, afbeelding 1 van 2 HP G72 Keyboard Replacement: stap 2, afbeelding 2 van 2
    • Remove the three Phillips PM2.5×6.5 screws that secure the keyboard to the computer.

    • Loosen the three Phillips M2.5×6.0 captive screws that secure the memory module compartment cover

  3. HP G72 Keyboard Replacement: stap 3, afbeelding 1 van 2 HP G72 Keyboard Replacement: stap 3, afbeelding 2 van 2
    • Use a plastic opening tool (or equivalent) to lift the back side of the cover. Small tabs hold the cover in place. Firmly pull up on the cover to release the tabs.

    • Remove the memory module compartment cover, remove the Phillips M2.5X5.0 screw

  4. HP G72 Keyboard Replacement: stap 4, afbeelding 1 van 3 HP G72 Keyboard Replacement: stap 4, afbeelding 2 van 3 HP G72 Keyboard Replacement: stap 4, afbeelding 3 van 3
    • Loosen the two Phillips 2.5×6.0 captive screws that secure the hard drive cover to the computer.

    • The cover is snapped in by some clips. Use a plastic opening tool on both sides to remove the cover.

    • Remove the hard drive cover. Remove one Phillips M2.5X6.5 screw

  5. HP G72 Keyboard Replacement: stap 5, afbeelding 1 van 2 HP G72 Keyboard Replacement: stap 5, afbeelding 2 van 2
    • Turn the computer right side up. Use a plastic opening tool (or similar) and slide it along the top

    • as well as the sides. This will release the plastic tabs that hold the keyboard down.

    • Do not use anything to pry on the bottom of the keyboard. This is where solid plastic tabs are located; those may break off. The keyboard needs to be tilted to the bottom to remove it

  6. HP G72 Keyboard Replacement: stap 6, afbeelding 1 van 3 HP G72 Keyboard Replacement: stap 6, afbeelding 2 van 3 HP G72 Keyboard Replacement: stap 6, afbeelding 3 van 3
    • With the tabs on top released, flip the keyboard upside down.

    • Open the ribbon cable connector by simply flipping the clasp upward.

    • Remove the cable

  7. HP G72 Keyboard Replacement: stap 7, afbeelding 1 van 1
    • Finally remove the Keyboard.

Conclusie

To reassemble your device, follow these instructions in reverse order.

11 andere personen hebben deze handleiding voltooid.

oldturkey03

Lid sinds: 09/29/10

778.207 Reputatie

118 handleidingen geschreven

Team

Global Fixers Lid van Global Fixers

Community

31 Leden

520 handleidingen geschreven

Één opmerking

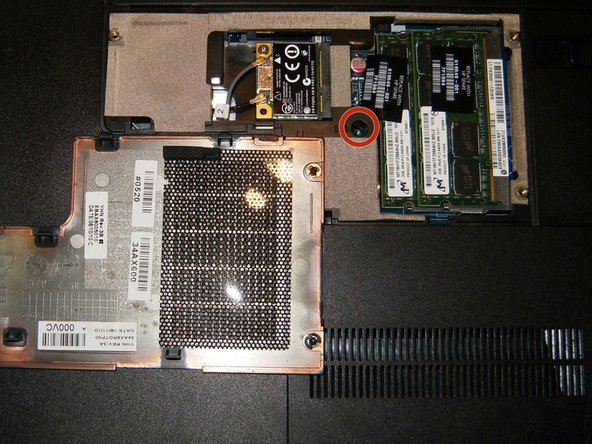
Use a #1 Phillips, #0 in a pinch - #00 is too small. Also my G72 has different screw locations holding on the memory and hard drive covers. Mine also does not require removing the hard drive cover. The necessary screw locations are marked with a little keyboard icon.

Apart from the variations, good article with decent illustrations. Anyone willing to tackle the job should be able to do it in fifteen minutes or less.

Alan - Antwoord

Voeg opmerking toe

Weergavestatistieken:

Afgelopen 24 uren: 1

Afgelopen 7 dagen: 2

Afgelopen 30 dagen: 18

Altijd: 10,066