Ga door naar hoofdinhoud

HP Chromebook 14 LCD Screen Replacement

Wat je nodig hebt

  1. HP Chromebook 14 LCD Screen Replacement, Nylon Covers: stap 1, afbeelding 1 van 3 HP Chromebook 14 LCD Screen Replacement, Nylon Covers: stap 1, afbeelding 2 van 3 HP Chromebook 14 LCD Screen Replacement, Nylon Covers: stap 1, afbeelding 3 van 3
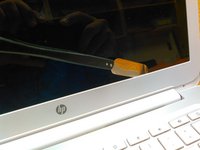
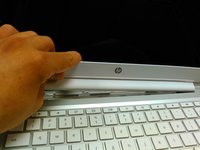
    • Pry up the nylon covers at the lower left and right of the display to reveal two Phillips head screws.

  2. HP Chromebook 14 LCD Screen Replacement, Remove The Screws. That we Just Exposed.: stap 2, afbeelding 1 van 2 HP Chromebook 14 LCD Screen Replacement, Remove The Screws. That we Just Exposed.: stap 2, afbeelding 2 van 2
    • Remove the two screws.

  3. HP Chromebook 14 LCD Screen Replacement, Pry & Remove Sceen: stap 3, afbeelding 1 van 3 HP Chromebook 14 LCD Screen Replacement, Pry & Remove Sceen: stap 3, afbeelding 2 van 3 HP Chromebook 14 LCD Screen Replacement, Pry & Remove Sceen: stap 3, afbeelding 3 van 3
    • Be careful when prying not to damage the bezel.

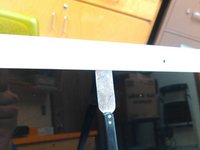
    • Use a spudger or other pry tool to pry up the bezel from all sides.

    • Once all the clips are free, pull the bezel from the bottom.

  4. HP Chromebook 14 LCD Screen Replacement, Remove Four Phillips Screws Holding LCD Panel: stap 4, afbeelding 1 van 1
    • Remove the four screws securing the display panel.

  5. HP Chromebook 14 LCD Screen Replacement, Disconnect Connector/Ribbon From LCD Panel: stap 5, afbeelding 1 van 1
    • Let the display panel rest on the keyboard.

    • The highlighted area is taped to the back of the display panel. Pry up to free it.

    • Be careful not to damage the connector—pull it back gently to disconnect.

Conclusie

To reassemble your device, follow these instructions in reverse order.

23 andere personen hebben deze handleiding voltooid.

Mario

Lid sinds: 03/24/14

652 Reputatie

1 Handleiding geschreven

Team

TechTucson WeFixThat Lid van TechTucson WeFixThat

Community

2 Leden

4 handleidingen geschreven

8 opmerkingen

Nylon covers are hard to see, they cover the entire area and peel off like a sticker, I didn't think mine had any and I pulled the screw socket out, not disastrous but I would have liked to have not done this.

madornetto - Antwoord

Any idea where I can buy some replacement ones?

mcaddie7 -

I was able to complete it successfully though right now I can't get the bezel quite flush down on the bottom left. One clip doesn't seem to want to go in so I'm not sure if the display cable is in the way or not. Will have to give it another look here after work but otherwise easy enough!

Aysha Springston - Antwoord

So what's the screen model used in this video?, I have the same laptop

seunoresegun - Antwoord

Where could I find a replacement part for the 2 nylon screw covers?

mcaddie7 - Antwoord

Voeg opmerking toe

Weergavestatistieken:

Afgelopen 24 uren: 0

Afgelopen 7 dagen: 7

Afgelopen 30 dagen: 30

Altijd: 16,031