Ga door naar hoofdinhoud

Fujitsu LIFEBOOK P7010D Hard Drive Replacement

Wat je nodig hebt

  1. Fujitsu LIFEBOOK P7010D Hard Drive Replacement, Battery: stap 1, afbeelding 1 van 1
    • Place the laptop upside down on a table.

  2. Fujitsu LIFEBOOK P7010D Hard Drive Replacement: stap 2, afbeelding 1 van 1
    • Locate the battery (the grey block). Find the two tabs on one end of the battery near the side of the laptop.

    • Using your fingers, press both tabs down at once until they are fully depressed.

  3. Fujitsu LIFEBOOK P7010D Hard Drive Replacement: stap 3, afbeelding 1 van 1
    • While holding the tabs down, slowly pivot the battery up.

    • The battery is now free and safe to pull out.

  4. Fujitsu LIFEBOOK P7010D Hard Drive Replacement, Disc Drive: stap 4, afbeelding 1 van 3 Fujitsu LIFEBOOK P7010D Hard Drive Replacement, Disc Drive: stap 4, afbeelding 2 van 3 Fujitsu LIFEBOOK P7010D Hard Drive Replacement, Disc Drive: stap 4, afbeelding 3 van 3
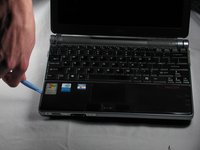
    • Push the tab down as far as possible using your finger or plastic opening tool to unlock the disc drive.

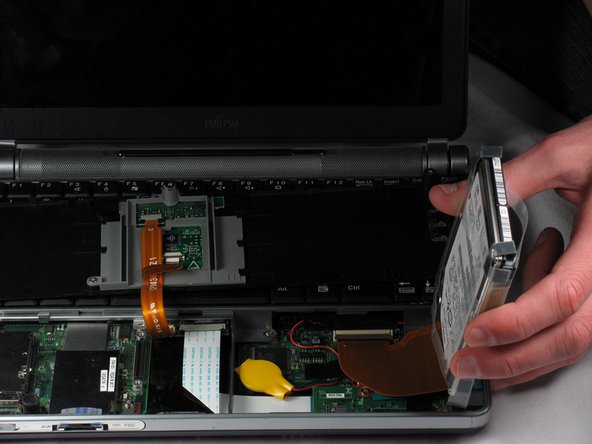
    • While still holding the tab down, use your other hand to pull out the disc drive straight out of its place.
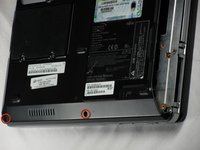
  5. Fujitsu LIFEBOOK P7010D Hard Drive Replacement, Hard Drive: stap 5, afbeelding 1 van 2 Fujitsu LIFEBOOK P7010D Hard Drive Replacement, Hard Drive: stap 5, afbeelding 2 van 2
    • On the bottom of the laptop, find the bottom-plate screw holes. They are located near the disc drive. Parallel to them is a 2.4mm screw.

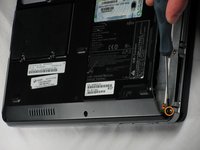
    • After locating the 2.4mm screw, use a Phillips #0 screwdriver to unscrew.

  6. Fujitsu LIFEBOOK P7010D Hard Drive Replacement: stap 6, afbeelding 1 van 2 Fujitsu LIFEBOOK P7010D Hard Drive Replacement: stap 6, afbeelding 2 van 2
    Gereedschap gebruikt in deze stap:
    Anti-Static Wrist Strap
    $7.95
    Koop
    • Flip the laptop over and open it facing you.

    • Use a spudger to lift the bottom black cover on both sides.

    • The cover is connected to an aluminum strip, so be careful lifting it.

    • For the proceeding steps, put on an anti-static wrist strap and clip it to something metal. Ensure that it's clipped to a grounded metal in order to protect the delicate circuitry inside the computer.

  7. Fujitsu LIFEBOOK P7010D Hard Drive Replacement: stap 7, afbeelding 1 van 3 Fujitsu LIFEBOOK P7010D Hard Drive Replacement: stap 7, afbeelding 2 van 3 Fujitsu LIFEBOOK P7010D Hard Drive Replacement: stap 7, afbeelding 3 van 3
    • Once the black cover is lifted, flip it and set it on the keyboard.

    • Locate the hardware disc on the right side and gently lift it out. Place it on the side of the laptop.

    • The hard drive is connected with a strip, so be careful when lifting it out.

  8. Fujitsu LIFEBOOK P7010D Hard Drive Replacement: stap 8, afbeelding 1 van 3 Fujitsu LIFEBOOK P7010D Hard Drive Replacement: stap 8, afbeelding 2 van 3 Fujitsu LIFEBOOK P7010D Hard Drive Replacement: stap 8, afbeelding 3 van 3
    • Flip the hard drive on its side.

    • The pins connected to the hard drive are extremely fragile. Take care in handling the next few steps.

    • Hold the hard drive and use a spudger, preferably a wider one, to remove the black pin holder on the side where it touches the hard drive.

    • Gently wiggle the black pin holder back and forth, on each side, until the holder comes off.

Conclusie

To reassemble your device, follow these instructions in reverse order.

3 andere personen hebben deze handleiding voltooid.

Nicholas Ross

Lid sinds: 01/20/12

186 Reputatie

7 handleidingen geschreven

Team

Cal Poly, Team 10-31, Amido Winter 2012 Lid van Cal Poly, Team 10-31, Amido Winter 2012

CPSU-AMIDO-W12S10G31

5 Leden

18 handleidingen geschreven

0 opmerkingen

Voeg opmerking toe

Weergavestatistieken:

Afgelopen 24 uren: 1

Afgelopen 7 dagen: 4

Afgelopen 30 dagen: 20

Altijd: 5,319