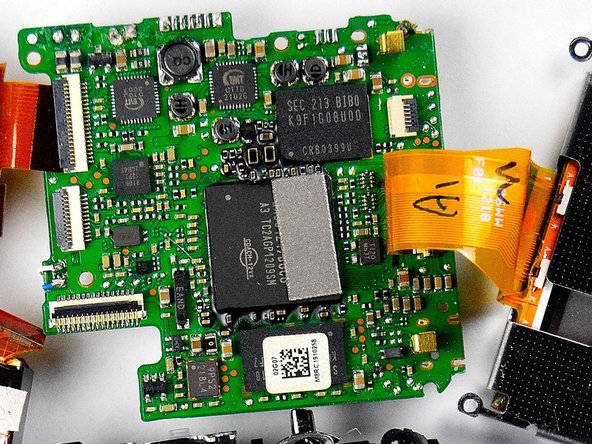
Ga door naar hoofdinhoud

FujiFilm FinePix XP50 Motherboard Replacement

Wat je nodig hebt

  1. FujiFilm FinePix XP50 Motherboard  Replacement, Rear Case: stap 1, afbeelding 1 van 3 FujiFilm FinePix XP50 Motherboard  Replacement, Rear Case: stap 1, afbeelding 2 van 3 FujiFilm FinePix XP50 Motherboard  Replacement, Rear Case: stap 1, afbeelding 3 van 3
    • Using 1.5mm Hex Screwdriver, remove two 3.0 mm hex screws on the front of the camera.

    • Using Phillips #00 screwdriver, remove two 3.0 mm screws on the bottom of the front face.

  2. FujiFilm FinePix XP50 Motherboard  Replacement: stap 2, afbeelding 1 van 3 FujiFilm FinePix XP50 Motherboard  Replacement: stap 2, afbeelding 2 van 3 FujiFilm FinePix XP50 Motherboard  Replacement: stap 2, afbeelding 3 van 3
    • Using Phillips #00 screwdriver, remove 3.0 mm screws on the bottom of the camera closer to the back.

    • Using Phillips #00 screwdriver remove two 3.0 mm screws on the back of the camera. This will remove the eyelet for the camera strap and the rear cover.

  3. FujiFilm FinePix XP50 Motherboard  Replacement: stap 3, afbeelding 1 van 1
    • Using Phillips #00 screwdriver, remove the two 3.0 mm screws.

  4. FujiFilm FinePix XP50 Motherboard  Replacement: stap 4, afbeelding 1 van 3 FujiFilm FinePix XP50 Motherboard  Replacement: stap 4, afbeelding 2 van 3 FujiFilm FinePix XP50 Motherboard  Replacement: stap 4, afbeelding 3 van 3
    • Using 1.5mm Hex screwdriver, remove 3.0 mm hex screw on top edge of silver panel.

    • Using Phillips #00 screwdriver, remove 3.0 mm screw on bottom edge.

    • Once both screws are removed the silver side casing will slide off.

  5. FujiFilm FinePix XP50 Motherboard  Replacement: stap 5, afbeelding 1 van 3 FujiFilm FinePix XP50 Motherboard  Replacement: stap 5, afbeelding 2 van 3 FujiFilm FinePix XP50 Motherboard  Replacement: stap 5, afbeelding 3 van 3
  6. FujiFilm FinePix XP50 Motherboard  Replacement: stap 6, afbeelding 1 van 3 FujiFilm FinePix XP50 Motherboard  Replacement: stap 6, afbeelding 2 van 3 FujiFilm FinePix XP50 Motherboard  Replacement: stap 6, afbeelding 3 van 3
    • Using Phillips #00 screwdriver, remove seven 3.0 mm screws.

    • Remove the remaining five 3.0 mm screws which hold the rear case and the control panel together.

    • The rear panel is now free from the camera.

  7. FujiFilm FinePix XP50 Motherboard  Replacement, Motherboard: stap 7, afbeelding 1 van 1
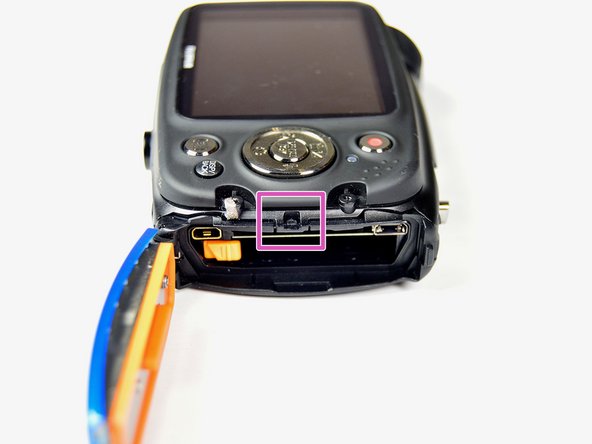
    • Using Phillips #00 screwdriver, remove four 3.0 mm screws holding motherboard in place.

  8. FujiFilm FinePix XP50 Motherboard  Replacement: stap 8, afbeelding 1 van 1
    • Insert the spudger in between the side case pannel and the motherboard.

    • Move the spudger in an upward motion to pry the motherboard out of the plastic housing. Work all the way around the motherboard until the motherboard is free.

  9. FujiFilm FinePix XP50 Motherboard  Replacement: stap 9, afbeelding 1 van 2 FujiFilm FinePix XP50 Motherboard  Replacement: stap 9, afbeelding 2 van 2
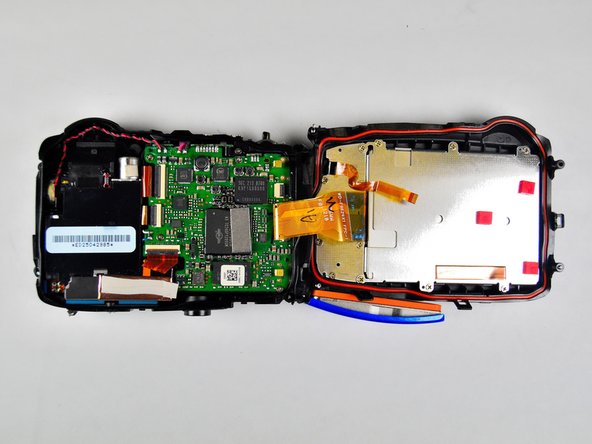
    • There are four wires that are soldered to the motherboard. Detach these wires from the motherboard by desoldering them.This will free the motherboard.

    • For instructions on desoldering see Hoe moet je (de-)solderen?

Conclusie

To reassemble your device, follow these instructions in reverse order.

2 andere personen hebben deze handleiding voltooid.

Catherine Daniel

Lid sinds: 03/20/15

396 Reputatie

3 handleidingen geschreven

Team

Baylor, Team 2-4, Grigsby Spring 2015 Lid van Baylor, Team 2-4, Grigsby Spring 2015

BU-GRIGSBY-S15S2G4

4 Leden

8 handleidingen geschreven

0 opmerkingen

Voeg opmerking toe

Weergavestatistieken:

Afgelopen 24 uren: 0

Afgelopen 7 dagen: 0

Afgelopen 30 dagen: 3

Altijd: 1,505