Inleiding
This guide will help you replace a Fitbit Alta battery. If you have let your Fitbit die for long period of time, have not been following proper charging practices, or have owned your Fitbit for multiple years, the battery may be at the end of its life. In this case, the battery may not turn on, hold a long charge, or stay on when unplugged.
This process involves exposing the internal components of the Fitbit, desoldering and disconnecting the old battery, and soldering in a new battery.
Caution: Fitbit can become dysfunctional if soldering is done incorrectly, and will not work if the wires are attached to the wrong ends or if the motherboard is exposed to excessive, prolonged heat.
The process will require a T2 Torx Screwdriver, tweezers, razor blade, soldering iron, and solder.
Wat je nodig hebt
-
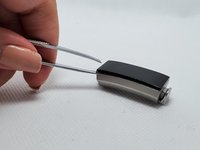
Gereedschap gebruikt in deze stap:Tweezers$4.99
-
At one of the corners, push the tweezers in between the metal casing and screen cover. Use the tweezers to wedge the two pieces apart. Repeat on all four corners.
-
Once the screen is removed, the Fitbit should look like the third image.
-
-
-
-
Once the motherboard is lifted, you will use the tweezers to detach the old battery (located in the bottom left) from the casing. Note that the clear yellow section is a part of the battery.
-
Once the battery is removed, lift the motherboard and attached components completely out of the casing.
-


Your Fitbit should now hold a charge.
Annuleren: ik heb deze handleiding niet afgemaakt.
30 andere personen hebben deze handleiding voltooid.

Team

Embry-Riddle Aeronautical University, Team S4-G8, Ives Fall 2019 Lid van Embry-Riddle Aeronautical University, Team S4-G8, Ives Fall 2019
ERAU-IVES-F19S4G8
3 Leden
5 handleidingen geschreven
17Gids Commentaar
How about screen replacement? Is there a replacement part for that?
Hi, Tom.
I haven’t seen anything about replacement screens online. To the best of my knowledge, Fitbit doesn’t offer replacement parts for any of their devices.
My Fitbit Alta HR has no center screw. The battery connects from the end of the mother board and there are two very small screws on the other end. It is virtually impossible to solder the new battery in without shorting to the two hold down clamps. Virtually Junk…
Maybe try getting a few really small pieces of electrical tape to cover the clamps?
Keith,
Your Fitbit may be an Alta HR, rather than an Alta. I have the same situation you do. The PCB in the HR is different, and in the center has a very small flat-flex cable to the HR sensor below. If you are very careful, you can fold back a small piece of tape holding the flex flex in place (look closely, it is very hard to see), and then you can gently disconnect the HR sensor. The connector lifts straight up, perpendicular to the surface of the PCB. After you have disconnected, you can remove the two screws and slide out the screen, PCB, and battery assembly as a single unit. The HR sensor will remain behind in the case. I would recommend using a plastic tweezers for this process rather than metal, as if the PCB is powered you could damage it in the process.
I took some photos, but I don’t believe I can post them here.