Ga door naar hoofdinhoud

Farberware FSTO100 Indicator Light Replacement

Wat je nodig hebt

  1. Farberware FSTO100 Indicator Light Replacement, Indicator Light: stap 1, afbeelding 1 van 1
    • Make sure toaster is unplugged.

    • Turn toaster upside down so screws on bottom side are facing toward the ceiling and the door is facing towards you.

  2. Farberware FSTO100 Indicator Light Replacement: stap 2, afbeelding 1 van 1
    • On the left hand side, unscrew the middle screw.

  3. Farberware FSTO100 Indicator Light Replacement: stap 3, afbeelding 1 van 1
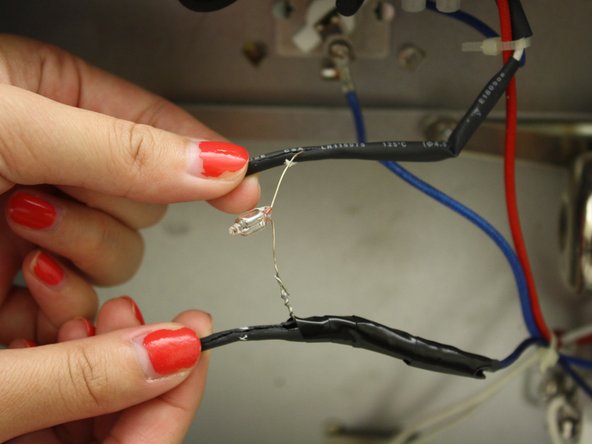
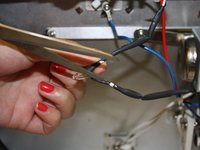
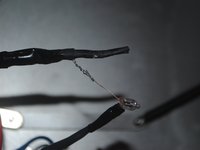
    • Remove the panel on the left hand side. The indicator light is located in the red tube that has wires covered by black tubing coming out.

  4. Farberware FSTO100 Indicator Light Replacement: stap 4, afbeelding 1 van 1
    • Pull the black wires to remove the indicator light from the red tube.

  5. Farberware FSTO100 Indicator Light Replacement: stap 5, afbeelding 1 van 2 Farberware FSTO100 Indicator Light Replacement: stap 5, afbeelding 2 van 2
    • Use scissors to cut open cord sheathing and peel back.

  6. Farberware FSTO100 Indicator Light Replacement: stap 6, afbeelding 1 van 1
    • Use the wire-cutters to remove the light bulb.

  7. Farberware FSTO100 Indicator Light Replacement: stap 7, afbeelding 1 van 2 Farberware FSTO100 Indicator Light Replacement: stap 7, afbeelding 2 van 2
    • Solder the replacement light bulb back onto its original position.

  8. Farberware FSTO100 Indicator Light Replacement: stap 8, afbeelding 1 van 1
    • Use electrical tape to reseal the sheathing.

  9. Farberware FSTO100 Indicator Light Replacement: stap 9, afbeelding 1 van 1
    • Reinsert the indicator light back into the red tube.

  10. Farberware FSTO100 Indicator Light Replacement: stap 10, afbeelding 1 van 1
    • Turn toaster upside down so screws on bottom side are facing toward the ceiling and the door is facing towards you.

  11. Farberware FSTO100 Indicator Light Replacement: stap 11, afbeelding 1 van 1
    • On the left hand side, screw the middle screw back in.

Conclusie

To reassemble your device, follow these instructions in reverse order.

Één andere persoon heeft deze handleiding voltooid.

Tony Wang

Lid sinds: 10/05/12

103 Reputatie

5 handleidingen geschreven

Team

Cal Poly, Team 6-35, Regan Fall 2012 Lid van Cal Poly, Team 6-35, Regan Fall 2012

CPSU-REGAN-F12S6G35

4 Leden

6 handleidingen geschreven

0 opmerkingen

Voeg opmerking toe

Weergavestatistieken:

Afgelopen 24 uren: 0

Afgelopen 7 dagen: 0

Afgelopen 30 dagen: 0

Altijd: 840