Ga door naar hoofdinhoud

Fan Replacement

Wat je nodig hebt

  1. Fan Replacement, Battery: stap 1, afbeelding 1 van 3 Fan Replacement, Battery: stap 1, afbeelding 2 van 3 Fan Replacement, Battery: stap 1, afbeelding 3 van 3
    • Unlock the battery latch on the right.

    • Unlock the battery lock on the left.

    • Remove the battery pack from its slot.

  2. Fan Replacement, Access to Components 2: stap 2, afbeelding 1 van 3 Fan Replacement, Access to Components 2: stap 2, afbeelding 2 van 3 Fan Replacement, Access to Components 2: stap 2, afbeelding 3 van 3
    • Using the Philips # 0 screwdriver, unscrew the 2 screws of the top cover

    • Check the marks indicating the direction in which the cover must be removed.

    • Remove the bottom cover by removing it in the direction of the markers.
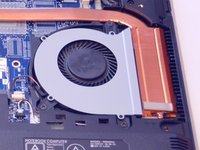
  3. Fan Replacement: stap 3, afbeelding 1 van 1
    • Then appear the other components of the Laptop.

  4. Fan Replacement, Fan: stap 4, afbeelding 1 van 3 Fan Replacement, Fan: stap 4, afbeelding 2 van 3 Fan Replacement, Fan: stap 4, afbeelding 3 van 3
    • Here is the fan.

    • Disconnect the power cable from this one.

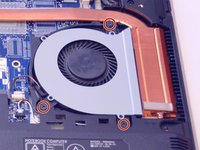
    • Unscrew the screws that hold it in place.

  5. Fan Replacement: stap 5, afbeelding 1 van 1
    • Gently lift the fan out of its slot.

Conclusie

To reassemble your device follow the following instructions in reverse order

Met dank aan deze vertalers:

fr en

100%

irlanda helpt ons de wereld te herstellen! Wil je bijdragen?
Begin met vertalen ›

Felice Suglia

Lid sinds: 06/15/13

30.908 Reputatie

264 handleidingen geschreven

0 opmerkingen

Voeg opmerking toe

Weergavestatistieken:

Afgelopen 24 uren: 2

Afgelopen 7 dagen: 8

Afgelopen 30 dagen: 18

Altijd: 828