Ga door naar hoofdinhoud

Dyson DC58 Main Body Replacement

Wat je nodig hebt

Video overzicht

  1. Dyson DC58 Main Body Replacement, Bin: stap 1, afbeelding 1 van 1
    • Make sure your vacuum is unplugged.

    • Avoid pressing the red trigger on the vacuum handle; this will power on the vacuum.

  2. Dyson DC58 Main Body Replacement: stap 2, afbeelding 1 van 1
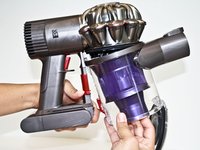
    • Locate the red lever parallel to the red trigger and on the side of the clear bin.

  3. Dyson DC58 Main Body Replacement: stap 3, afbeelding 1 van 1
    • Push the red lever downward to open the clear bin. You may need to do this over a trash bin if there is debris in the clear bin.

  4. Dyson DC58 Main Body Replacement: stap 4, afbeelding 1 van 2 Dyson DC58 Main Body Replacement: stap 4, afbeelding 2 van 2
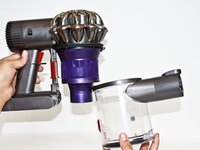
    • Push the red lever downward again while pulling the clear bin away from the main body of the Dyson vacuum.

  5. Dyson DC58 Main Body Replacement, Main Body: stap 5, afbeelding 1 van 1
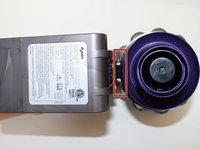
    • Flip the vacuum over so that the silver cyclone part of the vacuum is now at the base.

  6. Dyson DC58 Main Body Replacement: stap 6, afbeelding 1 van 2 Dyson DC58 Main Body Replacement: stap 6, afbeelding 2 van 2
    • Locate the two visible white clips seen between the main body and the purple cyclone of the vacuum.

    • Use tweezers to pinch the two visible white clips together.

    • It may require a few tries to pinch the clips since the space between the main body and cyclone is small.

  7. Dyson DC58 Main Body Replacement: stap 7, afbeelding 1 van 1
    • Tilt and pull the main body away from the purple cyclone of the vacuum.

    • You may hear a loud snap when the cyclone is released from the main body, this is to be expected.

Conclusie

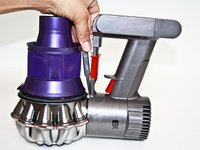
To reassemble your device, follow these instructions in reverse order.

12 andere personen hebben deze handleiding voltooid.

Krista St Onge

Lid sinds: 09/17/15

2.188 Reputatie

2 handleidingen geschreven

Team

CSU Fullerton, Team 2-4, Bruce Fall 2015 Lid van CSU Fullerton, Team 2-4, Bruce Fall 2015

CSUF-BRUCE-F15S2G4

4 Leden

19 handleidingen geschreven

4 opmerkingen

Mine ended up dismantled after it had been dropped. Couldn't get it back together until I read the bit about the tweezers /(pliers) and the white clips. It does not push in with out squeezing them first

Jason - Antwoord

Has anyone replaced the red release catch?

chrisashton1 - Antwoord

The white C-ring with clips must be pushed down in order to reassemble device. Takes some time to practice.

Anton Simonov - Antwoord

I'm trying to figure out how to put spring and plastic pieces back in on the inside of red lever on motor body?? Any help I'd really appreciate ?

t_picano - Antwoord

Voeg opmerking toe

Weergavestatistieken:

Afgelopen 24 uren: 1

Afgelopen 7 dagen: 13

Afgelopen 30 dagen: 51

Altijd: 12,928