Ga door naar hoofdinhoud

DR.J Professional HI-04 Lamp Replacement

Wat je nodig hebt

  1. DR.J Professional HI-04 Lamp Replacement, Motherboard: stap 1, afbeelding 1 van 3 DR.J Professional HI-04 Lamp Replacement, Motherboard: stap 1, afbeelding 2 van 3 DR.J Professional HI-04 Lamp Replacement, Motherboard: stap 1, afbeelding 3 van 3
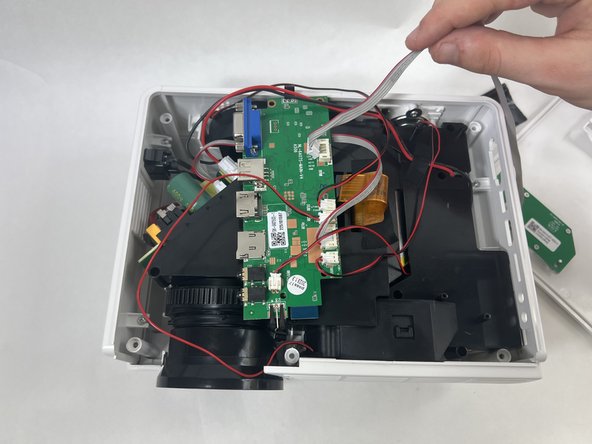
    • Flip the projector so that the bottom is facing up.

    • Remove the eight 10.0 mm screws with a Phillips #0 screwdriver.

    • The screws are set deep in the holes. Be careful not to drop the screws.

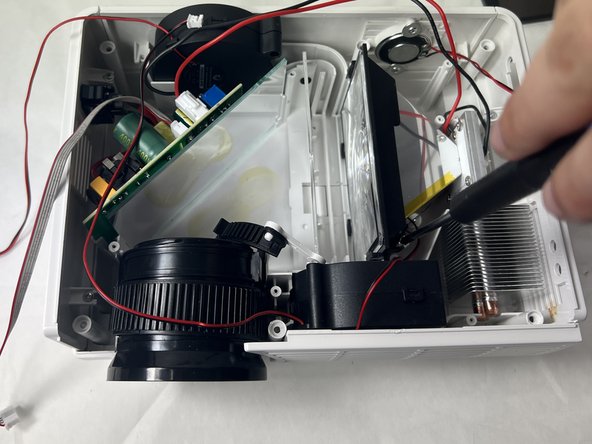
    • Remove the two 20.0 mm screws with a Phillips #0 screwdriver.

  2. DR.J Professional HI-04 Lamp Replacement: stap 2, afbeelding 1 van 3 DR.J Professional HI-04 Lamp Replacement: stap 2, afbeelding 2 van 3 DR.J Professional HI-04 Lamp Replacement: stap 2, afbeelding 3 van 3
    • Flip the projector so it is upright.

    • Remove the top case of the projector.

    • The top case should come off fairly easily but be gentle while removing it.

    • Don't yank the top case off as there are cables attached to the motherboard and the top case.

  3. DR.J Professional HI-04 Lamp Replacement: stap 3, afbeelding 1 van 2 DR.J Professional HI-04 Lamp Replacement: stap 3, afbeelding 2 van 2
    • Remove the three pieces of tape securing cables.

    • Keep the tape for reassembly.

  4. DR.J Professional HI-04 Lamp Replacement: stap 4, afbeelding 1 van 2 DR.J Professional HI-04 Lamp Replacement: stap 4, afbeelding 2 van 2
    • Use a Phillips #0 screwdriver to remove the four 15.0 mm screws from the motherboard.

    • Be sure to not drop the screws in the device as they can be difficult to recover.

  5. DR.J Professional HI-04 Lamp Replacement: stap 5, afbeelding 1 van 2 DR.J Professional HI-04 Lamp Replacement: stap 5, afbeelding 2 van 2
    • Squeeze the tab against the connector, and pull the connector straight out from the socket.

    • The cable will come out easily so do not pull too hard.

  6. DR.J Professional HI-04 Lamp Replacement: stap 6, afbeelding 1 van 2 DR.J Professional HI-04 Lamp Replacement: stap 6, afbeelding 2 van 2
    • Lift the motherboard from the device.

    • Use the tip of a spudger or your fingernail to flip up the small locking flap of the ZIF connector.

    • Pull the cable from the connector.

  7. DR.J Professional HI-04 Lamp Replacement: stap 7, afbeelding 1 van 2 DR.J Professional HI-04 Lamp Replacement: stap 7, afbeelding 2 van 2
    • Set down the motherboard safely.

  8. DR.J Professional HI-04 Lamp Replacement, Lamp: stap 8, afbeelding 1 van 2 DR.J Professional HI-04 Lamp Replacement, Lamp: stap 8, afbeelding 2 van 2
    • Use a Phillips #0 screwdriver to remove the three 15.0 mm screws from the black cover.

    • The screws are set deep in the holes, so be careful to not drop the screws, as they can be difficult to recover.

  9. DR.J Professional HI-04 Lamp Replacement: stap 9, afbeelding 1 van 2 DR.J Professional HI-04 Lamp Replacement: stap 9, afbeelding 2 van 2
    • Gently remove the black cover.

  10. DR.J Professional HI-04 Lamp Replacement: stap 10, afbeelding 1 van 2 DR.J Professional HI-04 Lamp Replacement: stap 10, afbeelding 2 van 2
    • Remove the single piece of black tape.

    • Save the tape for reassembly.

  11. DR.J Professional HI-04 Lamp Replacement: stap 11, afbeelding 1 van 2 DR.J Professional HI-04 Lamp Replacement: stap 11, afbeelding 2 van 2
    • Use a Phillips #0 screwdriver to remove five 10.0 mm screws.

  12. DR.J Professional HI-04 Lamp Replacement: stap 12, afbeelding 1 van 3 DR.J Professional HI-04 Lamp Replacement: stap 12, afbeelding 2 van 3 DR.J Professional HI-04 Lamp Replacement: stap 12, afbeelding 3 van 3
    • Gently remove the black cover.

  13. DR.J Professional HI-04 Lamp Replacement: stap 13, afbeelding 1 van 2 DR.J Professional HI-04 Lamp Replacement: stap 13, afbeelding 2 van 2
    • Remove the glass object with the orange ribbon cable connector.

    • Be careful removing object as it is fragile and can easily break.

  14. DR.J Professional HI-04 Lamp Replacement: stap 14, afbeelding 1 van 2 DR.J Professional HI-04 Lamp Replacement: stap 14, afbeelding 2 van 2
    • Use a Phillips #0 to remove four 10.0 mm screws from the lamp.

  15. DR.J Professional HI-04 Lamp Replacement: stap 15, afbeelding 1 van 2 DR.J Professional HI-04 Lamp Replacement: stap 15, afbeelding 2 van 2
    • Gently slide the lamp out from the projector case.

Conclusie

To reassemble your device, follow these instructions in reverse order.

Baron Dutra

Lid sinds: 11/01/23

825 Reputatie

4 handleidingen geschreven

Team

UMass Dartmouth, Team 1-5, Petersen Fall 2023 Lid van UMass Dartmouth, Team 1-5, Petersen Fall 2023

UMASSD-PETERSEN-F23S1G5

4 Leden

5 handleidingen geschreven

0 opmerkingen

Voeg opmerking toe

Weergavestatistieken:

Afgelopen 24 uren: 3

Afgelopen 7 dagen: 6

Afgelopen 30 dagen: 31

Altijd: 183