Ga door naar hoofdinhoud

Cuisinart Smart Stick CSB-75 Power Switch Board Replacement

Wat je nodig hebt

  1. Cuisinart Smart Stick CSB-75 Power Switch Board Replacement, Power Switch Board: stap 1, afbeelding 1 van 3 Cuisinart Smart Stick CSB-75 Power Switch Board Replacement, Power Switch Board: stap 1, afbeelding 2 van 3 Cuisinart Smart Stick CSB-75 Power Switch Board Replacement, Power Switch Board: stap 1, afbeelding 3 van 3
    • Located on the back of the motor body are three screw covers. To remove the three grey screw covers, use a Flat Head Screwdriver (1.0mm or 1.5mm).

    • After prying these off, the screws will be exposed.

  2. Cuisinart Smart Stick CSB-75 Power Switch Board Replacement: stap 2, afbeelding 1 van 2 Cuisinart Smart Stick CSB-75 Power Switch Board Replacement: stap 2, afbeelding 2 van 2
    • Remove three 13.3 mm Phillips PH#2 screws.

  3. Cuisinart Smart Stick CSB-75 Power Switch Board Replacement: stap 3, afbeelding 1 van 3 Cuisinart Smart Stick CSB-75 Power Switch Board Replacement: stap 3, afbeelding 2 van 3 Cuisinart Smart Stick CSB-75 Power Switch Board Replacement: stap 3, afbeelding 3 van 3
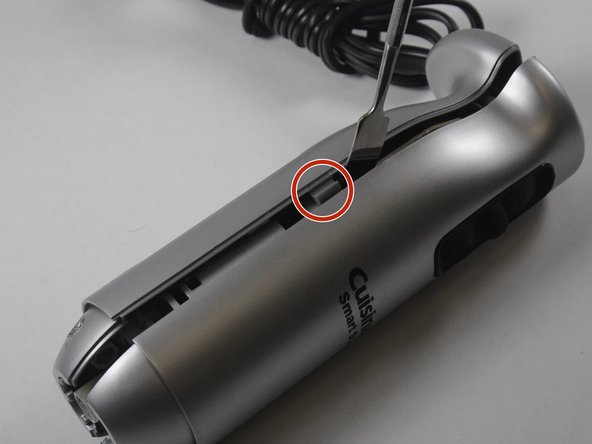
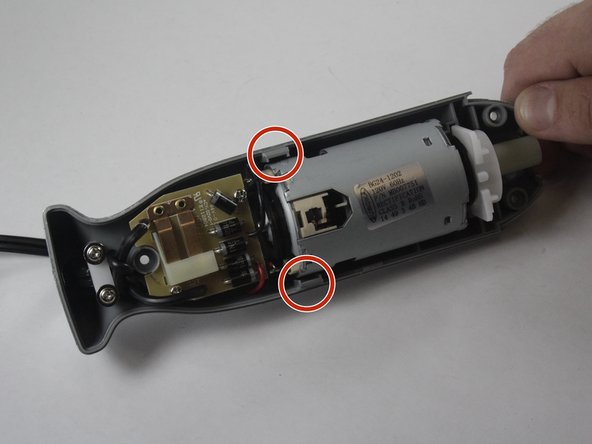
    • Pry open Cuisinart using a plastic opening tool.

    • The metal spudger is great when you need serious prying power, but the regular black nylon spudger or a plastic opening tool should be used whenever possible.

    • Make sure to pry open near the clips of the smart stick for easy opening.

  4. Cuisinart Smart Stick CSB-75 Power Switch Board Replacement: stap 4, afbeelding 1 van 3 Cuisinart Smart Stick CSB-75 Power Switch Board Replacement: stap 4, afbeelding 2 van 3 Cuisinart Smart Stick CSB-75 Power Switch Board Replacement: stap 4, afbeelding 3 van 3
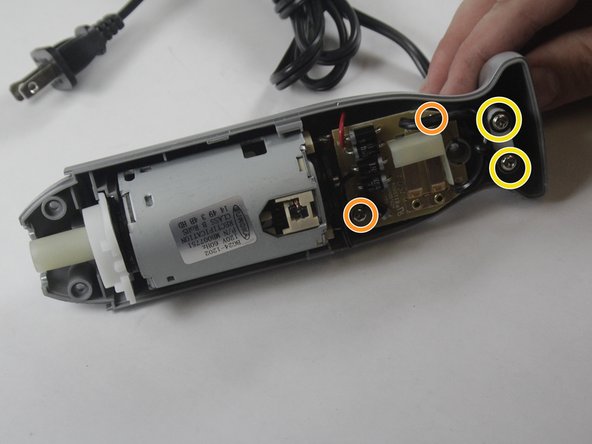
    • Unscrew the 4 screws on the inside.

    • Remove 2 13.3mm Phillips PH#2 screws.

    • Remove 2 17.5 mm Phillips PH#2 screws.

    • Unscrewing these screws will isolate the switch board.

  5. Cuisinart Smart Stick CSB-75 Power Switch Board Replacement: stap 5, afbeelding 1 van 2 Cuisinart Smart Stick CSB-75 Power Switch Board Replacement: stap 5, afbeelding 2 van 2
    • Refer to these steps on Soldering to replace the switch board in the smart stick.

    • Be careful when soldering. Metal components will become very hot.

Conclusie

To reassemble your device, follow these instructions in reverse order.

Één andere persoon heeft deze handleiding voltooid.

Jordan Robinson

Lid sinds: 09/02/15

557 Reputatie

4 handleidingen geschreven

Team

USF Tampa, Team 16-2, Wollert Fall 2015 Lid van USF Tampa, Team 16-2, Wollert Fall 2015

USFT-WOLLERT-F15S16G2

4 Leden

4 handleidingen geschreven

0 opmerkingen

Voeg opmerking toe

Weergavestatistieken:

Afgelopen 24 uren: 4

Afgelopen 7 dagen: 29

Afgelopen 30 dagen: 85

Altijd: 1,507