Ga door naar hoofdinhoud
Word lid van de reparatiegemeenschap - Account aanmaken

Cobra SPX 5300 Audio Dial Replacement

Wat je nodig hebt

    1. Cobra SPX 5300 Audio Dial Replacement, Windshield Bracket Mount: stap 1, afbeelding 1 van 2 Cobra SPX 5300 Audio Dial Replacement, Windshield Bracket Mount: stap 1, afbeelding 2 van 2
      • Remove the four 9.5 mm Phillips #0 screws from the back of the device.

      Vraag FixBot

      Voeg opmerking toe

    2. Cobra SPX 5300 Audio Dial Replacement: stap 2, afbeelding 1 van 2 Cobra SPX 5300 Audio Dial Replacement: stap 2, afbeelding 2 van 2
      • Pull the black plastic back case off of the device.

      Vraag FixBot

      Voeg opmerking toe

    3. Cobra SPX 5300 Audio Dial Replacement: stap 3, afbeelding 1 van 1
      • Lift up the motherboard and lay it flat next to the device.

      • Be careful not to sever the wires. The buttonboard is connected to the motherboard by the wires.

      Vraag FixBot

      Voeg opmerking toe

    4. Cobra SPX 5300 Audio Dial Replacement: stap 4, afbeelding 1 van 1
      • Remove the windshield bracket mount.

      Vraag FixBot

      Voeg opmerking toe

    1. Cobra SPX 5300 Audio Dial Replacement, Audio Dial: stap 5, afbeelding 1 van 1
      • Remove the one 4.8 mm Phillips #00 screw from the center of the audio dial.

      Vraag FixBot

      Voeg opmerking toe

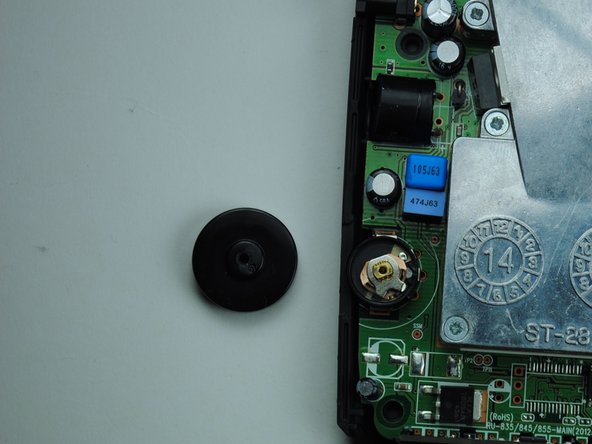
    2. Cobra SPX 5300 Audio Dial Replacement: stap 6, afbeelding 1 van 2 Cobra SPX 5300 Audio Dial Replacement: stap 6, afbeelding 2 van 2
      • Remove audio dial.

      Vraag FixBot

      Voeg opmerking toe

Conclusie

To reassemble your device, follow these instructions in reverse order.

Annuleren: ik heb deze handleiding niet afgemaakt.

Één andere persoon heeft deze handleiding voltooid.

Samantha Delle

Lid sinds: 09/25/15

122 Reputatie

1 Handleiding geschreven

Team

0Gids Commentaar

Voeg opmerking toe

Weergavestatistieken:

Afgelopen 24 uren: 4

Afgelopen 7 dagen: 11

Afgelopen 30 dagen: 37

Altijd: 1,136