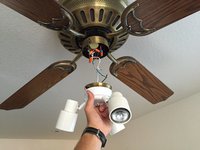
Ga door naar hoofdinhoud

Ceiling Fan Light Fixture Replacement

Wat je nodig hebt

  1. Ceiling Fan Light  Fixture Replacement, Light Fixture: stap 1, afbeelding 1 van 3 Ceiling Fan Light  Fixture Replacement, Light Fixture: stap 1, afbeelding 2 van 3 Ceiling Fan Light  Fixture Replacement, Light Fixture: stap 1, afbeelding 3 van 3
    • Working with electrical wires could lead to electrocution.

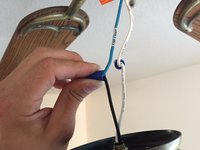
    • Find your circuit breaker panel and turn off the breaker that corresponds to your ceiling lights.

    • Do this by pushing it to the right.

    • Also flip your light switch to off.

  2. Ceiling Fan Light  Fixture Replacement: stap 2, afbeelding 1 van 2 Ceiling Fan Light  Fixture Replacement: stap 2, afbeelding 2 van 2
    • Remove the two 1.4 mm Phillips head screws that hold the fixture to the fan itself.

    • Once loose, pull down to expose the two connecting wires.

  3. Ceiling Fan Light  Fixture Replacement: stap 3, afbeelding 1 van 3 Ceiling Fan Light  Fixture Replacement: stap 3, afbeelding 2 van 3 Ceiling Fan Light  Fixture Replacement: stap 3, afbeelding 3 van 3
    • Disconnect these wires by twisting the caps in a counter-clockwise direction.

    • You only need to disconnect the wires coming from the lighting fixture.

    • Once both caps are removed, simply pull the wires apart to remove the fixture.

  4. Ceiling Fan Light  Fixture Replacement: stap 4, afbeelding 1 van 2 Ceiling Fan Light  Fixture Replacement: stap 4, afbeelding 2 van 2
    • Loosen the nut holding the ceiling fan piece to the lighting fixture.

    • This step may require a crescent wrench if finger force is not enough.

  5. Ceiling Fan Light  Fixture Replacement: stap 5, afbeelding 1 van 1
    • Pull upwards to remove the fan piece that holds the light fixture.

    • Your model may require you to twist this piece in a counter-clockwise motion to remove.

  6. Ceiling Fan Light  Fixture Replacement: stap 6, afbeelding 1 van 1
    • Switch out the old fixture with your new fixture by doing the last two steps in reverse order.

  7. Ceiling Fan Light  Fixture Replacement: stap 7, afbeelding 1 van 2 Ceiling Fan Light  Fixture Replacement: stap 7, afbeelding 2 van 2
    • To connect your new fixture, locate the black wire from your light and the colored wire from the fan.

    • Be sure to attached the colored wires to each other, and white wires to each other. (Positive-Positive, Negative-Negative)

    • Twist these together. Do the same with the two white wires.

  8. Ceiling Fan Light  Fixture Replacement: stap 8, afbeelding 1 van 2 Ceiling Fan Light  Fixture Replacement: stap 8, afbeelding 2 van 2
    • Your new light fixture should come with replacement caps. Twist these in a clockwise motion over your wire ends to ensure connection.

    • The old caps work just as well for this if you were not given new ones.

  9. Ceiling Fan Light  Fixture Replacement: stap 9, afbeelding 1 van 1
    • Be sure to neatly tuck in all wires when re-attaching the fixture.

    • Failure to do this will result in not being able to correctly close the gap and put in the screws.

  10. Ceiling Fan Light  Fixture Replacement: stap 10, afbeelding 1 van 1
    • Flip your breaker back on, turn on your light switch, and enjoy your new lights!

Conclusie

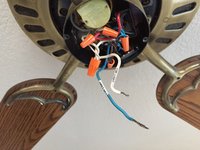
To reassemble your device, follow these instructions in reverse order.

12 andere personen hebben deze handleiding voltooid.

Garrett Janetzky

Lid sinds: 09/29/15

613 Reputatie

1 Handleiding geschreven

Team

Cal Poly, Team 14-1, Green Fall 2015 Lid van Cal Poly, Team 14-1, Green Fall 2015

CPSU-GREEN-F15S14G1

4 Leden

4 handleidingen geschreven

11 opmerkingen

Amazingly instructive, informative and concise. Brilliant.

Jeanie Bolin-Moore - Antwoord

Just what I needed. Thanks.

bob.mohler - Antwoord

Could someone provide the name of the light fixture used in the demonstration?

THOMAS DUFF - Antwoord

Hello, I have a single light fixture, can I replace it with multiple-light fixture.

Praveen Rao - Antwoord

Great, information. Thanks

Gloria Carrillo - Antwoord

Magnific is the leading Manufacturer and Supplier of Vintage Wooden Fans in India.

magnific - Antwoord

Magnific design and manufacture of different variants of Ceiling fans.

magnific - Antwoord

How do you measure for the replacement fixture? How do I know it will fit?

Rhonda Rone - Antwoord

I recently had the pleasure of upgrading my ceiling fan with the amazing Harbor Breeze ceiling fan light kit, and I must say, it has transformed the ambience of my space. The quality of illumination it provides is simply fantastic, making it the perfect addition to any room.

If you're looking to enhance your home's lighting and cooling efficiency, I highly recommend checking out the Harbor Breeze ceiling fan light kit. It's not only energy-efficient but also incredibly stylish.

Muhammad Tayyab - Antwoord

Voeg opmerking toe

Weergavestatistieken:

Afgelopen 24 uren: 2

Afgelopen 7 dagen: 28

Afgelopen 30 dagen: 129

Altijd: 34,584