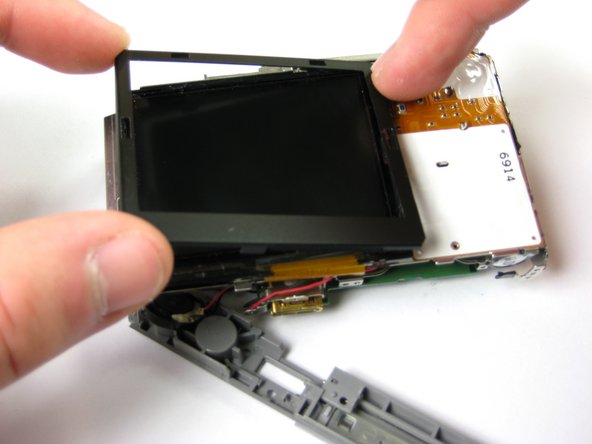
Ga door naar hoofdinhoud

Casio Exilim EX-Z70 LCD Screen Replacement

Wat je nodig hebt

  1. Casio Exilim EX-Z70 LCD Screen Replacement, Camera Casing: stap 1, afbeelding 1 van 3 Casio Exilim EX-Z70 LCD Screen Replacement, Camera Casing: stap 1, afbeelding 2 van 3 Casio Exilim EX-Z70 LCD Screen Replacement, Camera Casing: stap 1, afbeelding 3 van 3
    • Remove the strap from the camera by pulling the thin cord out, creating a small loop, then pushing the thicker cord back through this loop.

  2. Casio Exilim EX-Z70 LCD Screen Replacement: stap 2, afbeelding 1 van 3 Casio Exilim EX-Z70 LCD Screen Replacement: stap 2, afbeelding 2 van 3 Casio Exilim EX-Z70 LCD Screen Replacement: stap 2, afbeelding 3 van 3
    • Remove the two Phillips screws (2.83 mm) from the left side panel of the camera casing.

    • The left panel can now be removed. However, one piece of tape attaches it to the camera, so a spudger may be required to ease the panels off.

    • Repeat for the right side panel of the camera.

    • Keep track of which screws go where. There are a couple sets of screws to take out and they are all small and look the same.

  3. Casio Exilim EX-Z70 LCD Screen Replacement: stap 3, afbeelding 1 van 3 Casio Exilim EX-Z70 LCD Screen Replacement: stap 3, afbeelding 2 van 3 Casio Exilim EX-Z70 LCD Screen Replacement: stap 3, afbeelding 3 van 3
    • Remove the six Phillips screws (3.69 mm) from the bottom of the camera casing.

  4. Casio Exilim EX-Z70 LCD Screen Replacement: stap 4, afbeelding 1 van 3 Casio Exilim EX-Z70 LCD Screen Replacement: stap 4, afbeelding 2 van 3 Casio Exilim EX-Z70 LCD Screen Replacement: stap 4, afbeelding 3 van 3
    • Remove the two Phillips screws (2.79 mm) on the left side of the camera where the metal panel used to be.

    • Repeat for the two Phillips screws (2.79 mm) right side of the camera.

  5. Casio Exilim EX-Z70 LCD Screen Replacement: stap 5, afbeelding 1 van 2 Casio Exilim EX-Z70 LCD Screen Replacement: stap 5, afbeelding 2 van 2
    • With the LCD screen facing up towards you, start at the bottom of the camera and gently pull off the back of the casing.

  6. Casio Exilim EX-Z70 LCD Screen Replacement: stap 6, afbeelding 1 van 3 Casio Exilim EX-Z70 LCD Screen Replacement: stap 6, afbeelding 2 van 3 Casio Exilim EX-Z70 LCD Screen Replacement: stap 6, afbeelding 3 van 3
    • With the front side (with the lens) facing up towards you, start at the bottom of the camera and gently pull off the front of the casing.

    • The nob that previously held the camera strap will no longer be attached to the camera once you remove the camera casing. When putting the camera back together, remember to put the nob back into position before replacing the casing.

  7. Casio Exilim EX-Z70 LCD Screen Replacement: stap 7, afbeelding 1 van 2 Casio Exilim EX-Z70 LCD Screen Replacement: stap 7, afbeelding 2 van 2
    • Slide the labeled piece toward the LCD screen and release.

    • The tab will spring open.

  8. Casio Exilim EX-Z70 LCD Screen Replacement: stap 8, afbeelding 1 van 2 Casio Exilim EX-Z70 LCD Screen Replacement: stap 8, afbeelding 2 van 2
    • Look at the bottom of the camera. Take out the Phillips screw (1.77 mm) holding on the bottom plastic piece.

    • The bottom plastic piece is held on to the main frame of the camera only by two thin wires.

  9. Casio Exilim EX-Z70 LCD Screen Replacement, LCD Screen: stap 9, afbeelding 1 van 2 Casio Exilim EX-Z70 LCD Screen Replacement, LCD Screen: stap 9, afbeelding 2 van 2
    • Orient the camera with the lens facing up and the flash towards you for the clearest visibility.

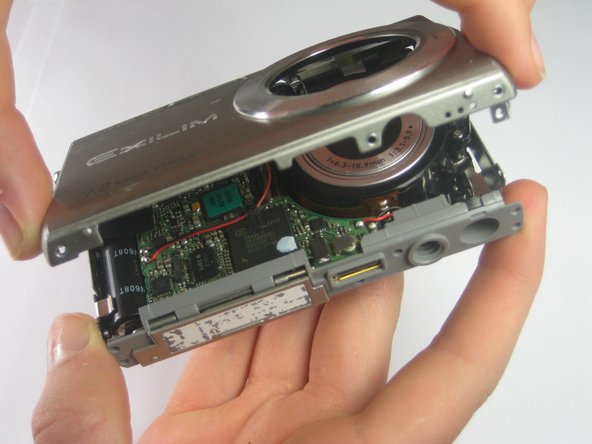
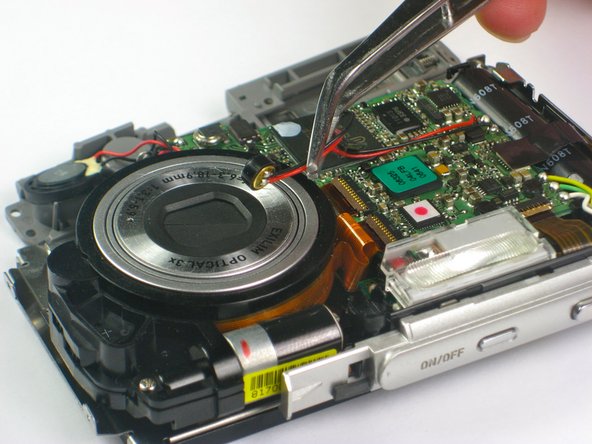
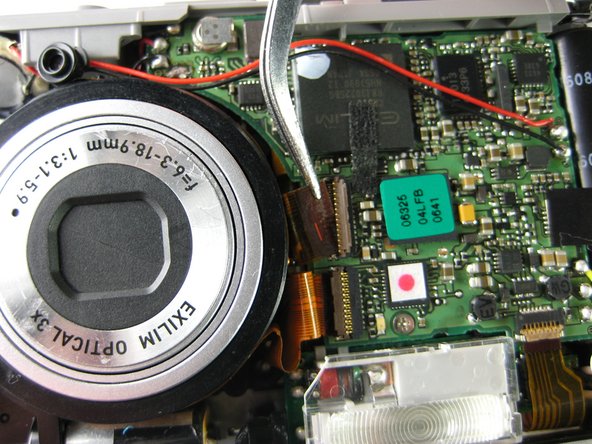
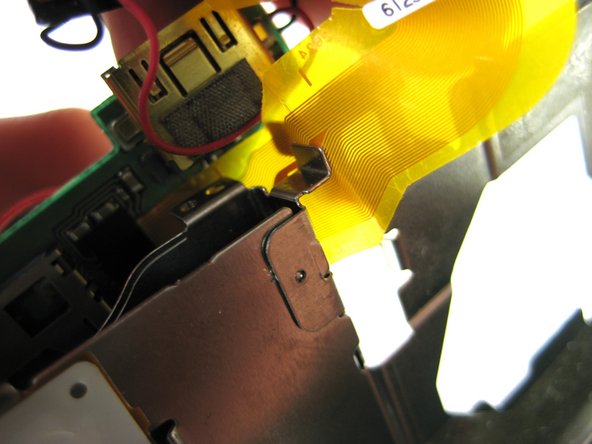
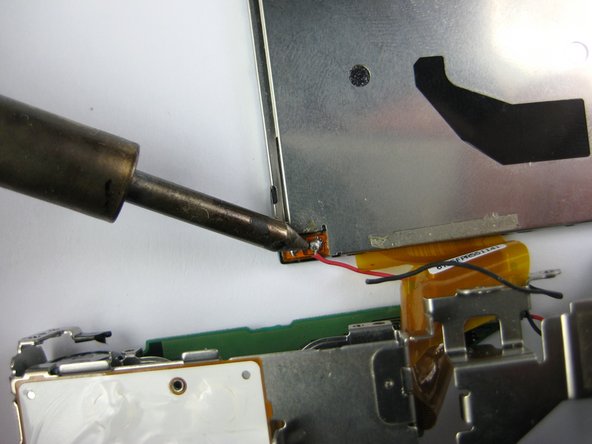
    • Using a pair of tweezers, gently move the red and black wires away from the lens.

  10. Casio Exilim EX-Z70 LCD Screen Replacement: stap 10, afbeelding 1 van 3 Casio Exilim EX-Z70 LCD Screen Replacement: stap 10, afbeelding 2 van 3 Casio Exilim EX-Z70 LCD Screen Replacement: stap 10, afbeelding 3 van 3
    • Using tweezers or your finger nails, pull up the brown flaps where the three orange film strips meet the circuit board.

    • Use the tweezers to pull all three orange film strips out of each port. The strips should come out easily.

  11. Casio Exilim EX-Z70 LCD Screen Replacement: stap 11, afbeelding 1 van 3 Casio Exilim EX-Z70 LCD Screen Replacement: stap 11, afbeelding 2 van 3 Casio Exilim EX-Z70 LCD Screen Replacement: stap 11, afbeelding 3 van 3
    • Flip the camera over to the side with the LCD screen.

    • Gently remove the plastic cover that borders the LCD screen starting with the top left corner, then the bottom left corner, and finally the bottom and top right corners.

    • The LCD screen is now loose from the camera; it should only be connected by a gold strip that attaches to the circuit board.

  12. Casio Exilim EX-Z70 LCD Screen Replacement: stap 12, afbeelding 1 van 1
    • Turn the camera back to the front side, with the lens facing up and the LCD facing down.

    • Remove the Phillips screw (3.30 mm) located below the flash on the circuit board.

  13. Casio Exilim EX-Z70 LCD Screen Replacement: stap 13, afbeelding 1 van 3 Casio Exilim EX-Z70 LCD Screen Replacement: stap 13, afbeelding 2 van 3 Casio Exilim EX-Z70 LCD Screen Replacement: stap 13, afbeelding 3 van 3
    • At this point, the LCD screen and the circuit board are only attached to the camera by a thin gold strip on the far left of the circuit board.

    • Slide the gold strip that connects the LCD screen to the circuit board through the small gap at the bottom of the camera.

  14. Casio Exilim EX-Z70 LCD Screen Replacement: stap 14, afbeelding 1 van 2 Casio Exilim EX-Z70 LCD Screen Replacement: stap 14, afbeelding 2 van 2
    • Using a soldering station and solder wick or other solder removing instrument, remove the solder holding the two wires of the LCD screen to the circuit board.

    • You have now completely removed your LCD screen. It can now be replaced or cleaned.

Conclusie

To reassemble your device, follow these instructions in reverse order.

Één andere persoon heeft deze handleiding voltooid.

Paul Fallon

Lid sinds: 04/10/12

141 Reputatie

6 handleidingen geschreven

Team

Cal Poly, Team 17-28, Amido Spring 2012 Lid van Cal Poly, Team 17-28, Amido Spring 2012

CPSU-AMIDO-S12S17G28

4 Leden

14 handleidingen geschreven

0 opmerkingen

Voeg opmerking toe

Weergavestatistieken:

Afgelopen 24 uren: 0

Afgelopen 7 dagen: 1

Afgelopen 30 dagen: 12

Altijd: 1,919