Ga door naar hoofdinhoud
Word lid van de reparatiegemeenschap - Account aanmaken

Canon PowerShot SX520 HS Lens Replacement

Wat je nodig hebt

    1. Canon PowerShot SX520 HS Lens Replacement, Battery: stap 1, afbeelding 1 van 1
      • Using your fingers, slide the battery compartment door to the right until it unlocks.

      Vraag FixBot

      Voeg opmerking toe

    2. Canon PowerShot SX520 HS Lens Replacement: stap 2, afbeelding 1 van 1
      • Rotate the door along hinges to open.

      • Take out the battery with your fingers.

      Vraag FixBot

      Voeg opmerking toe

    1. Canon PowerShot SX520 HS Lens Replacement, Back Face: stap 3, afbeelding 1 van 3 Canon PowerShot SX520 HS Lens Replacement, Back Face: stap 3, afbeelding 2 van 3 Canon PowerShot SX520 HS Lens Replacement, Back Face: stap 3, afbeelding 3 van 3
      • Remove 2-3.4 mm screws that secure the back panel using a Phillips #000 screwdriver.

      • Remove 4-4 mm screws on the left and right sides of the camera using a Phillips #000 screwdriver.

      Vraag FixBot

      Voeg opmerking toe

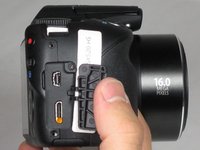
    2. Canon PowerShot SX520 HS Lens Replacement: stap 4, afbeelding 1 van 1
      • Remove 2-4 mm screws that secure the bottom of the camera using a Phillips #000 screwdriver.

      Vraag FixBot

      Voeg opmerking toe

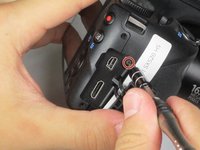
    3. Canon PowerShot SX520 HS Lens Replacement: stap 5, afbeelding 1 van 2 Canon PowerShot SX520 HS Lens Replacement: stap 5, afbeelding 2 van 2
      • Pull back the rubber facing to access the A/V and HDMI output compartment.

      • Remove 1-3.4mm screw inside the compartment using a Phillips #000 screwdriver.

      Vraag FixBot

      Voeg opmerking toe

    4. Canon PowerShot SX520 HS Lens Replacement: stap 6, afbeelding 1 van 1
      • Once all screws are removed, pull the back facing off with your fingers.

      Vraag FixBot

      Voeg opmerking toe

    1. Canon PowerShot SX520 HS Lens Replacement, LCD Screen: stap 7, afbeelding 1 van 1
      • Remove 3-4.4 mm screws that secure the small metal plate using a Phillips #000 screwdriver.

      Vraag FixBot

      Voeg opmerking toe

    2. Canon PowerShot SX520 HS Lens Replacement: stap 8, afbeelding 1 van 1
      • Carefully pop out the LCD screen with your fingers.

      Vraag FixBot

      Voeg opmerking toe

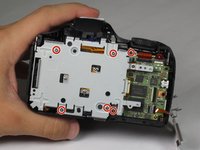
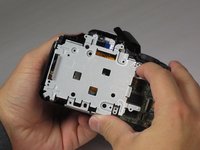
    1. Canon PowerShot SX520 HS Lens Replacement, Metal Plate: stap 9, afbeelding 1 van 3 Canon PowerShot SX520 HS Lens Replacement, Metal Plate: stap 9, afbeelding 2 van 3 Canon PowerShot SX520 HS Lens Replacement, Metal Plate: stap 9, afbeelding 3 van 3
      • Remove 6-4.4 mm screws that secure the metal cover using a Phillips #000 screwdriver.

      • Remove 2-2.5 mm screws that secure the back panel using a Phillips #000 screwdriver.

      • After all 8 screws are removed, pull the metal plate out with your fingers.

      Vraag FixBot

      Voeg opmerking toe

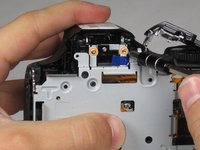
    1. Canon PowerShot SX520 HS Lens Replacement, Lens: stap 10, afbeelding 1 van 1
      • Unlcip the large cable by pulling up on the metal part with your finger.

      • Slide out the 2 smaller cables with your fingers.

      Vraag FixBot

      Voeg opmerking toe

    2. Canon PowerShot SX520 HS Lens Replacement: stap 11, afbeelding 1 van 1
      • Lift up the lens by grabbing the sides with your fingers.

      Vraag FixBot

      Voeg opmerking toe

Conclusie

To reassemble your device, follow these instructions in reverse order.

Annuleren: ik heb deze handleiding niet afgemaakt.

6 andere personen hebben deze handleiding voltooid.

Lisa Choe

Lid sinds: 09/22/15

460 Reputatie

3 handleidingen geschreven

Team

Baylor, Team 4-4, Williams Fall 2015 Lid van Baylor, Team 4-4, Williams Fall 2015

BU-WILLIAMS-F15S4G4

4 Leden

6 handleidingen geschreven

1Gids Commentaar

guide is unfinished; dropping to the point of lens group extraction without going on further. I found it, useless.

SimoneGallina - Antwoord Deel

Voeg opmerking toe

Weergavestatistieken:

Afgelopen 24 uren: 0

Afgelopen 7 dagen: 11

Afgelopen 30 dagen: 46

Altijd: 3,793