Ga door naar hoofdinhoud

Canon PowerShot SD200 Buttons Replacement

Wat je nodig hebt

  1. Canon PowerShot SD200 Buttons Replacement, Battery: stap 1, afbeelding 1 van 3 Canon PowerShot SD200 Buttons Replacement, Battery: stap 1, afbeelding 2 van 3 Canon PowerShot SD200 Buttons Replacement, Battery: stap 1, afbeelding 3 van 3
    • The camera used to create these repair guides had a broken lens assembly. As a result, the lens is sticking out in all of the photos, but it is important to note that this should not be the case with your camera. The lens should retract itself back into the camera when it is turned off.

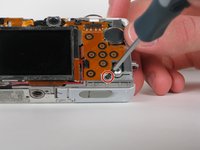
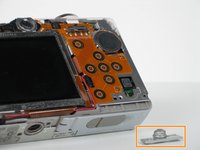
    • Use your fingernail to slide the dark gray tab located on the bottom of the device towards the edge of camera.

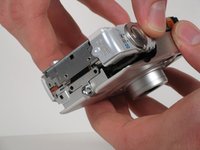
    • Slide the light gray door away from the LCD screen and pull up to open the door.

    • Both battery and memory card should now be visible.

  2. Canon PowerShot SD200 Buttons Replacement: stap 2, afbeelding 1 van 2 Canon PowerShot SD200 Buttons Replacement: stap 2, afbeelding 2 van 2
    • Rotate the small brown tab towards the edge of the camera.

    • The battery should pop up.

  3. Canon PowerShot SD200 Buttons Replacement: stap 3, afbeelding 1 van 1
    • Pull the battery straight out of the battery holder.

    • When putting the battery back in, make sure it is oriented the same as it was before.

  4. Canon PowerShot SD200 Buttons Replacement, Buttons: stap 4, afbeelding 1 van 3 Canon PowerShot SD200 Buttons Replacement, Buttons: stap 4, afbeelding 2 van 3 Canon PowerShot SD200 Buttons Replacement, Buttons: stap 4, afbeelding 3 van 3
    • Close the light gray battery compartment door.

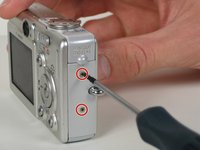
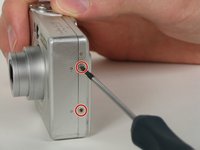
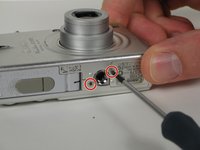
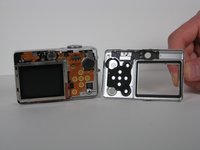
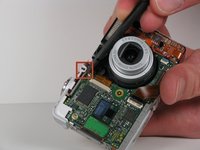
    • Remove the six 2.8 mm Phillips screws on the outside of the case. Two screws are found on each side of the camera, and the final two are found on the bottom.

  5. Canon PowerShot SD200 Buttons Replacement: stap 5, afbeelding 1 van 2 Canon PowerShot SD200 Buttons Replacement: stap 5, afbeelding 2 van 2
    • Use your fingers to carefully pry off the back casing from the camera assembly.

  6. Canon PowerShot SD200 Buttons Replacement: stap 6, afbeelding 1 van 3 Canon PowerShot SD200 Buttons Replacement: stap 6, afbeelding 2 van 3 Canon PowerShot SD200 Buttons Replacement: stap 6, afbeelding 3 van 3
    • Push the buttons out with your finger if they did not fall out while removing the casing.

    • Pull off the white plastic side piece if it did not fall out while removing the casing.

  7. Canon PowerShot SD200 Buttons Replacement: stap 7, afbeelding 1 van 2 Canon PowerShot SD200 Buttons Replacement: stap 7, afbeelding 2 van 2
    • Remove the one 2.2 mm Phillips screw from the bottom of the camera.

    • Take off the print button.

  8. Canon PowerShot SD200 Buttons Replacement: stap 8, afbeelding 1 van 2 Canon PowerShot SD200 Buttons Replacement: stap 8, afbeelding 2 van 2
    • Use your fingers to carefully pry off the front casing of the camera. The front casing should pull straight off.

  9. Canon PowerShot SD200 Buttons Replacement: stap 9, afbeelding 1 van 2 Canon PowerShot SD200 Buttons Replacement: stap 9, afbeelding 2 van 2
    • Use the flat end of the spudger to lift open the white plastic latch on the front of the camera. Once the latch is lifted up, move the latch up towards the top edge of the camera.

    • Remove the top button assembly by pulling straight up.

Conclusie

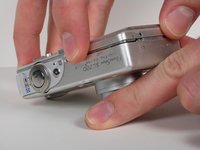
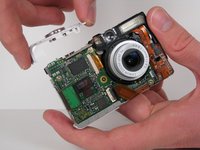
To reassemble your device, follow these instructions in reverse order.

James Loy

Lid sinds: 10/06/10

103 Reputatie

7 handleidingen geschreven

Team

Cal Poly, Team 5-12, Maness Fall 2010 Lid van Cal Poly, Team 5-12, Maness Fall 2010

CPSU-MANESS-F10S5G12

4 Leden

7 handleidingen geschreven

0 opmerkingen

Voeg opmerking toe

Weergavestatistieken:

Afgelopen 24 uren: 0

Afgelopen 7 dagen: 0

Afgelopen 30 dagen: 4

Altijd: 1,439