Ga door naar hoofdinhoud
Word lid van de reparatiegemeenschap - Account aanmaken

Canon PowerShot A460 Front Lens Replacement

Wat je nodig hebt

  1. Canon PowerShot A460 Front Lens Replacement, Battery: stap 1, afbeelding 1 van 1
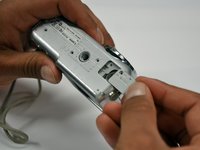
    • Slide the switch on the battery cover labeled "CARD/BATT. OPEN." to the right.

    • While still holding the switch, pull the cover down, allowing it to release and open.

    Vraag FixBot

    Voeg opmerking toe

  2. Canon PowerShot A460 Front Lens Replacement: stap 2, afbeelding 1 van 1
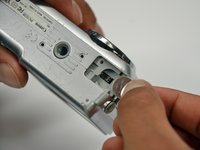
    • Tilt the camera slightly to allow the batteries to fall out.

    Vraag FixBot

    Voeg opmerking toe

  3. Canon PowerShot A460 Front Lens Replacement: stap 3, afbeelding 1 van 1
    • Press on and release the memory card to eject it.

    Vraag FixBot

    Voeg opmerking toe

  4. Canon PowerShot A460 Front Lens Replacement, Front Casing: stap 4, afbeelding 1 van 1
    • Unscrew the 5mm Phillips #00 screw from the bottom of the camera.

    • Make sure to keep the different size screws organized to make reassembling the camera simpler.

    Vraag FixBot

    Voeg opmerking toe

  5. Canon PowerShot A460 Front Lens Replacement: stap 5, afbeelding 1 van 1
    • Unscrew the three 2mm Phillips #00 screws that are located on the bottom of the camera.

    Vraag FixBot

    Voeg opmerking toe

  6. Canon PowerShot A460 Front Lens Replacement: stap 6, afbeelding 1 van 1
    • Remove the 4mm Phillips #00 screw that is located on the left side of the camera, if the display screen is facing you.

    Vraag FixBot

    Voeg opmerking toe

  7. Canon PowerShot A460 Front Lens Replacement: stap 7, afbeelding 1 van 1
    • Take out the 4mm Phillips #00 screw under the rubber flap on the right end of the camera.

    Vraag FixBot

    Voeg opmerking toe

  8. Canon PowerShot A460 Front Lens Replacement: stap 8, afbeelding 1 van 2 Canon PowerShot A460 Front Lens Replacement: stap 8, afbeelding 2 van 2
    • Remove the second battery cover on the bottom of camera.

    • Take the silver battery out of the camera.

    Vraag FixBot

    Voeg opmerking toe

  9. Canon PowerShot A460 Front Lens Replacement: stap 9, afbeelding 1 van 3 Canon PowerShot A460 Front Lens Replacement: stap 9, afbeelding 2 van 3 Canon PowerShot A460 Front Lens Replacement: stap 9, afbeelding 3 van 3
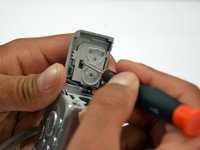
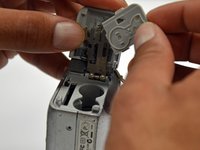
    • Remove the 4mm Phillips #00 screw on the inside of the flap that hides the battery and memory card slots.

    • Remove the light grey, plastic piece.

    • Remove the plastic portion of the battery flap cover. The metal piece will remain attached.

    Vraag FixBot

    Voeg opmerking toe

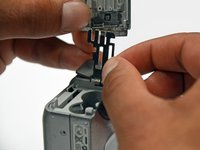
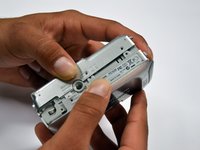
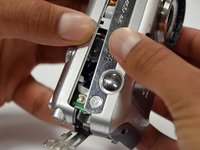
  10. Canon PowerShot A460 Front Lens Replacement: stap 10, afbeelding 1 van 3 Canon PowerShot A460 Front Lens Replacement: stap 10, afbeelding 2 van 3 Canon PowerShot A460 Front Lens Replacement: stap 10, afbeelding 3 van 3
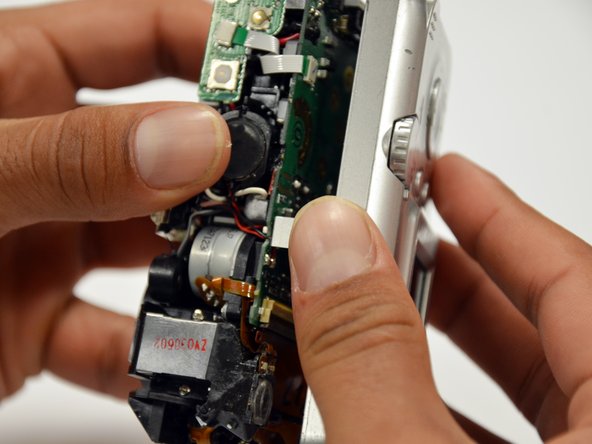
    • Slightly pull on each side of the camera. It should loosen up and come apart.

    • If it does not pull apart right away, use a little more force.

    • Do not give up!

    Vraag FixBot

    Voeg opmerking toe

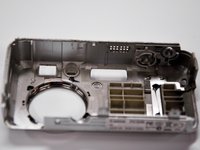
  11. Canon PowerShot A460 Front Lens Replacement, Back Casing: stap 11, afbeelding 1 van 1
    • Remove the back case of the camera by pulling from the top.

    • Be careful when pulling off the case. There is a delicate gold ribbon connecting the bottom of the camera to the back case.

    Vraag FixBot

    Voeg opmerking toe

  12. Canon PowerShot A460 Front Lens Replacement, LCD Screen: stap 12, afbeelding 1 van 1
    • Remove the 4mm Phillips #00 screw from above the ribbon.

    Vraag FixBot

    Voeg opmerking toe

  13. Canon PowerShot A460 Front Lens Replacement: stap 13, afbeelding 1 van 1
    • Gently peel off the blue tape on the top of the LCD screen.

    Vraag FixBot

    Voeg opmerking toe

  14. Canon PowerShot A460 Front Lens Replacement: stap 14, afbeelding 1 van 1
    • Remove the 4mm Phillips #00 screw previously concealed by the blue tape.

    Vraag FixBot

    Voeg opmerking toe

  15. Canon PowerShot A460 Front Lens Replacement: stap 15, afbeelding 1 van 1
    • Gently lift the LCD screen off of the front casing by pulling up a tab on the side of the camera.

    Vraag FixBot

    Voeg opmerking toe

  16. Canon PowerShot A460 Front Lens Replacement: stap 16, afbeelding 1 van 1
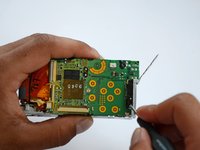
    • Using a spudger, lift the grey tabs to allow the ribbon to slide out.

    Vraag FixBot

    Voeg opmerking toe

  17. Canon PowerShot A460 Front Lens Replacement: stap 17, afbeelding 1 van 1
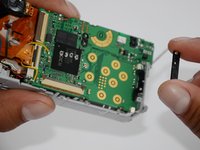
    • Since the tabs have been lifted, the ribbon should now slide out out easily.

    • Be careful not to distort the ribbon in any way.

    Vraag FixBot

    Voeg opmerking toe

  18. Canon PowerShot A460 Front Lens Replacement, Motherboard: stap 18, afbeelding 1 van 1
    • Remove the 5mm Phillips #00 screw located above the small black piece on the right side of the mother board.

    Vraag FixBot

    Voeg opmerking toe

  19. Canon PowerShot A460 Front Lens Replacement: stap 19, afbeelding 1 van 2 Canon PowerShot A460 Front Lens Replacement: stap 19, afbeelding 2 van 2
    • Remove the 4mm Phillips #00 screw at the bottom of the black piece.

    • Detach the black piece that the screws previously held in place.

    Vraag FixBot

    Voeg opmerking toe

  20. Canon PowerShot A460 Front Lens Replacement: stap 20, afbeelding 1 van 1
    • Remove the 5mm Phillips #00 screw in the middle of the motherboard.

    Vraag FixBot

    Voeg opmerking toe

  21. Canon PowerShot A460 Front Lens Replacement: stap 21, afbeelding 1 van 1
    • Remove the 5mm Phillips #00 screw that holds the metal piece to the bottom of the camera .

    Vraag FixBot

    Voeg opmerking toe

  22. Canon PowerShot A460 Front Lens Replacement: stap 22, afbeelding 1 van 1
    • Remove the 5mm Phillips #00 screw that is located on the top of camera.

    Vraag FixBot

    Voeg opmerking toe

  23. Canon PowerShot A460 Front Lens Replacement: stap 23, afbeelding 1 van 1
    • Remove the 2mm Phillips #00 screw that is located on the far left of the motherboard.

    • Be careful not to damage the multiple adjacent orange ribbons.

    Vraag FixBot

    Voeg opmerking toe

  24. Canon PowerShot A460 Front Lens Replacement: stap 24, afbeelding 1 van 1
    • Remove the 5mm Phillips #00 screw near the bottom left of the motherboard.

    Vraag FixBot

    Voeg opmerking toe

  25. Canon PowerShot A460 Front Lens Replacement: stap 25, afbeelding 1 van 2 Canon PowerShot A460 Front Lens Replacement: stap 25, afbeelding 2 van 2
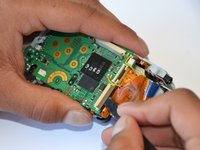
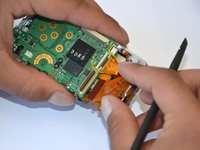
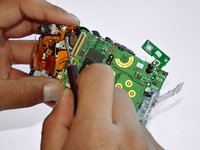
    • Using a spudger, unlock the locking mechanism that holds the lower orange ribbon in place.

    • Once unlocked, slide out the ribbon.

    Vraag FixBot

    Voeg opmerking toe

  26. Canon PowerShot A460 Front Lens Replacement: stap 26, afbeelding 1 van 1
    • Using a spudger, unlock the locking mechanism that holds the upper orange ribbon in place.

    • Once unlocked, slide out the ribbon.

    Vraag FixBot

    Voeg opmerking toe

  27. Canon PowerShot A460 Front Lens Replacement: stap 27, afbeelding 1 van 1
    • All that is required is to unsolder the few remaining wires. Then, the motherboard will be ready to be replaced!

    Vraag FixBot

    Voeg opmerking toe

  28. Canon PowerShot A460 Front Lens Replacement, Front Lens: stap 28, afbeelding 1 van 1
    • Remove the six 2mm Phillips #00 screws that are located under the motherboard.

    Vraag FixBot

    Voeg opmerking toe

  29. Canon PowerShot A460 Front Lens Replacement: stap 29, afbeelding 1 van 2 Canon PowerShot A460 Front Lens Replacement: stap 29, afbeelding 2 van 2
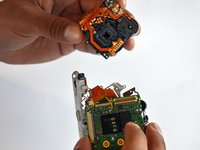
    • Remove the 4mm Phillips #00 screw that is located under the now disconnected top orange ribbon.

    • The lens piece can now be removed from the camera.

    Vraag FixBot

    Voeg opmerking toe

  30. Canon PowerShot A460 Front Lens Replacement: stap 30, afbeelding 1 van 1
    • Remove the 5mm Phillips #00 screw on the back of the lens piece.

    Vraag FixBot

    Voeg opmerking toe

  31. Canon PowerShot A460 Front Lens Replacement: stap 31, afbeelding 1 van 1
    • Remove the 2mm Phillips #00 screw on the bottom of the lens piece.

    Vraag FixBot

    Voeg opmerking toe

  32. Canon PowerShot A460 Front Lens Replacement: stap 32, afbeelding 1 van 1
    • Remove the two 2mm Phillips #00 screws on the top of the lens piece.

    Vraag FixBot

    Voeg opmerking toe

  33. Canon PowerShot A460 Front Lens Replacement: stap 33, afbeelding 1 van 1
    • Gently slide off the black piece surrounding the lens. The lens is now disassembled!

    Vraag FixBot

    Voeg opmerking toe

Conclusie

To reassemble your device, follow these instructions in reverse order.

Annuleren: ik heb deze handleiding niet afgemaakt.

4 andere personen hebben deze handleiding voltooid.

Tanner Coleman

Lid sinds: 01/18/13

61 Reputatie

2 handleidingen geschreven

Team

Cal Poly, Team 19-42, Regan Winter 2013 Lid van Cal Poly, Team 19-42, Regan Winter 2013

CPSU-REGAN-W13S19G42

4 Leden

12 handleidingen geschreven

1Gids Commentaar

please put a big warning note on the step after removing the blue tape from the lens. and the next on is where you lift something on the mother board with a spluger..something like that. well i used a screwdriver and got such a big electrical shock.... scared the crapola out of me. please make a note .... can get electrical shock....

Gaby - Antwoord Deel

Voeg opmerking toe

Weergavestatistieken:

Afgelopen 24 uren: 3

Afgelopen 7 dagen: 19

Afgelopen 30 dagen: 83

Altijd: 5,613