Ga door naar hoofdinhoud
Word lid van de reparatiegemeenschap - Account aanmaken

Canon EOS A2 Front Cover Replacement

Wat je nodig hebt

    1. Canon EOS A2 Front Cover Replacement, Battery: stap 1, afbeelding 1 van 1
      • Locate the battery door/camera grip on the left side of the camera and lift the rotating removal tab.

      Vraag FixBot

      Voeg opmerking toe

    2. Canon EOS A2 Front Cover Replacement: stap 2, afbeelding 1 van 1
      • Twist the tab clockwise to unlock the door, then pull outward from the camera to remove it.

      Vraag FixBot

      Voeg opmerking toe

    3. Canon EOS A2 Front Cover Replacement: stap 3, afbeelding 1 van 1
      • Remove the battery from inside the battery housing and set the cover aside.

      Vraag FixBot

      Voeg opmerking toe

    1. Canon EOS A2 Front Cover Replacement, Front Cover: stap 4, afbeelding 1 van 1
      • Remove the two 6.4mm screws above the lens aperture using a phillips #00 screw driver.

      Vraag FixBot

      Voeg opmerking toe

    2. Canon EOS A2 Front Cover Replacement: stap 5, afbeelding 1 van 1
      • Remove the 6.4mm screw from the inside of the flash bezel.

      • If the flash is locked down, insert the battery, then with the help of a pencil turn the rotary (CW or CCW) switch until the "125" is displayed in the LCD. Press the Flash symbol button. You should hear the latch from the flash, then you can manually lift the flash. If OK, then remove the battery from the camera

      Vraag FixBot

      Voeg opmerking toe

    3. Canon EOS A2 Front Cover Replacement: stap 6, afbeelding 1 van 1
      • Flip the camera upside down and remove the 5.4mm screw below the lens bezel on the front of the camera.

      Vraag FixBot

      Voeg opmerking toe

    4. Canon EOS A2 Front Cover Replacement: stap 7, afbeelding 1 van 1
      • Remove the 5.6mm screws behind the battery cover.

      Vraag FixBot

      Voeg opmerking toe

    5. Canon EOS A2 Front Cover Replacement: stap 8, afbeelding 1 van 1
      • Remove two 6.4mm screws on the latch mechanism on the right side of the camera.

      Vraag FixBot

      Voeg opmerking toe

    6. Canon EOS A2 Front Cover Replacement: stap 9, afbeelding 1 van 1
      • Remove the 6.4mm screw on the top of the inside edge of the battery hole.

      Vraag FixBot

      Voeg opmerking toe

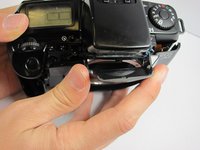
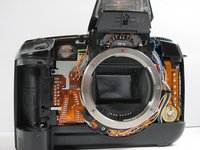
    7. Canon EOS A2 Front Cover Replacement: stap 10, afbeelding 1 van 2 Canon EOS A2 Front Cover Replacement: stap 10, afbeelding 2 van 2
      • Starting at the flash, carefully pull the front cover away from the camera.

      Vraag FixBot

      Voeg opmerking toe

Conclusie

To reassemble your device, follow these instructions in reverse order.

Annuleren: ik heb deze handleiding niet afgemaakt.

Mark

Lid sinds: 04/20/11

197 Reputatie

5 handleidingen geschreven

Team

Cal Poly, Team 8-9, Regan Spring 2011 Lid van Cal Poly, Team 8-9, Regan Spring 2011

CPSU-REGAN-S11S8G9

4 Leden

25 handleidingen geschreven

0Gids Commentaar

Voeg opmerking toe

Weergavestatistieken:

Afgelopen 24 uren: 3

Afgelopen 7 dagen: 13

Afgelopen 30 dagen: 41

Altijd: 3,225