Ga door naar hoofdinhoud
Word lid van de reparatiegemeenschap - Account aanmaken

Canon EOS A2 Control Dial Replacement

Wat je nodig hebt

  1. Canon EOS A2 Control Dial Replacement, Battery: stap 1, afbeelding 1 van 1
    • Locate the battery door/camera grip on the left side of the camera and lift the rotating removal tab.

    Vraag FixBot

    Voeg opmerking toe

  2. Canon EOS A2 Control Dial Replacement: stap 2, afbeelding 1 van 1
    • Twist the tab clockwise to unlock the door, then pull outward from the camera to remove it.

    Vraag FixBot

    Voeg opmerking toe

  3. Canon EOS A2 Control Dial Replacement: stap 3, afbeelding 1 van 1
    • Remove the battery from inside the battery housing and set the cover aside.

    Vraag FixBot

    Voeg opmerking toe

  4. Canon EOS A2 Control Dial Replacement, Front Cover: stap 4, afbeelding 1 van 1
    • Remove the two 6.4mm screws above the lens aperture using a phillips #00 screw driver.

    Vraag FixBot

    Voeg opmerking toe

  5. Canon EOS A2 Control Dial Replacement: stap 5, afbeelding 1 van 1
    • Remove the 6.4mm screw from the inside of the flash bezel.

    • If the flash is locked down, insert the battery, then with the help of a pencil turn the rotary (CW or CCW) switch until the "125" is displayed in the LCD. Press the Flash symbol button. You should hear the latch from the flash, then you can manually lift the flash. If OK, then remove the battery from the camera

    Vraag FixBot

    Voeg opmerking toe

  6. Canon EOS A2 Control Dial Replacement: stap 6, afbeelding 1 van 1
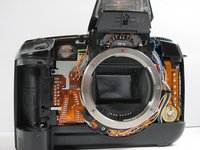
    • Flip the camera upside down and remove the 5.4mm screw below the lens bezel on the front of the camera.

    Vraag FixBot

    Voeg opmerking toe

  7. Canon EOS A2 Control Dial Replacement: stap 7, afbeelding 1 van 1
    • Remove the 5.6mm screws behind the battery cover.

    Vraag FixBot

    Voeg opmerking toe

  8. Canon EOS A2 Control Dial Replacement: stap 8, afbeelding 1 van 1
    • Remove two 6.4mm screws on the latch mechanism on the right side of the camera.

    Vraag FixBot

    Voeg opmerking toe

  9. Canon EOS A2 Control Dial Replacement: stap 9, afbeelding 1 van 1
    • Remove the 6.4mm screw on the top of the inside edge of the battery hole.

    Vraag FixBot

    Voeg opmerking toe

  10. Canon EOS A2 Control Dial Replacement: stap 10, afbeelding 1 van 2 Canon EOS A2 Control Dial Replacement: stap 10, afbeelding 2 van 2
    • Starting at the flash, carefully pull the front cover away from the camera.

    Vraag FixBot

    Voeg opmerking toe

  11. Canon EOS A2 Control Dial Replacement, Top Cover: stap 11, afbeelding 1 van 1
    • Remove the 4.3mm screw below the camera strap ring.

    Vraag FixBot

    Voeg opmerking toe

  12. Canon EOS A2 Control Dial Replacement: stap 12, afbeelding 1 van 1
    • Remove two 4.8mm screws located on both sides of the eyepiece.

    Vraag FixBot

    Voeg opmerking toe

  13. Canon EOS A2 Control Dial Replacement: stap 13, afbeelding 1 van 1
    • Pull the top cover up slowly.

    • A ribbon cable is attached to the bottom of the top cover and the camera. Pull up very carefully to avoid damaging this.

    Vraag FixBot

    Voeg opmerking toe

  14. Canon EOS A2 Control Dial Replacement: stap 14, afbeelding 1 van 1
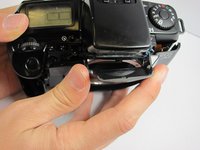
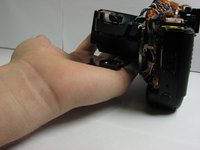
    • Once you have revealed the ribbon cable, gently let the top cover hang off the front of the camera. Use the plastic opening tool to gently pull the white tabs on the ribbon cable, releasing the ribbon cable.

    • If you pull the white tabs all the way out, just insert them back in to avoid losing them.

    Vraag FixBot

    Voeg opmerking toe

  15. Canon EOS A2 Control Dial Replacement, Control Dial: stap 15, afbeelding 1 van 3 Canon EOS A2 Control Dial Replacement, Control Dial: stap 15, afbeelding 2 van 3 Canon EOS A2 Control Dial Replacement, Control Dial: stap 15, afbeelding 3 van 3
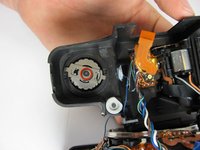
    • Remove the 3mm screw from the back of the control dial while holding the front of the control dial.

    • Be ready to catch the control dial, button, and spring that will fall out with your hand.

    Vraag FixBot

    Voeg opmerking toe

  16. Canon EOS A2 Control Dial Replacement: stap 16, afbeelding 1 van 1
    • On the bottom side of the top bezel, remove the ring, detent ball and spring. Your control dial is now ready to be replaced with a working unit.

    Vraag FixBot

    Voeg opmerking toe

Conclusie

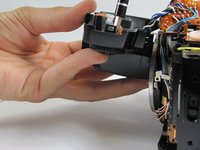
To reassemble your device, follow these instructions in reverse order.

Annuleren: ik heb deze handleiding niet afgemaakt.

7 andere personen hebben deze handleiding voltooid.

Jessica

Lid sinds: 04/20/11

52 Reputatie

1 Handleiding geschreven

Team

Cal Poly, Team 8-9, Regan Spring 2011 Lid van Cal Poly, Team 8-9, Regan Spring 2011

CPSU-REGAN-S11S8G9

4 Leden

13 handleidingen geschreven

9Gids Commentaar

Is it safe to do this procedure while a film is inside the camera?

Giovanni Murru - Antwoord Deel

I was wondering if anyone could help me were I could possibly get the new parts?

I've looked around but found nothing relevant so far.

Thanks in advance,

Agoston Horanyi

horanyiagoston - Antwoord Deel

Did you find the parts ? If no go to eBay.

as exemple : https://www.ebay.com/itm/Canon-EOS-A2E-R...

gilberto - Antwoord Deel

I'm wondering if there is someone who can fix the mode selector for a reasonable price

zekesrule - Antwoord Deel

How can I open the flash to get to the screw that needs to be removed in order to fix the rotary dial when the rotary dial is moving freely and the camera does not turn on?

Lucas - Antwoord Deel

Voeg opmerking toe

Weergavestatistieken:

Afgelopen 24 uren: 3

Afgelopen 7 dagen: 16

Afgelopen 30 dagen: 103

Altijd: 10,649