Ga door naar hoofdinhoud
Word lid van de reparatiegemeenschap - Account aanmaken

Cambridge SoundWorks OontZ Angle Plus Motherboard Replacement

Wat je nodig hebt

  1. Cambridge SoundWorks OontZ Angle Plus Motherboard  Replacement, Lower Casing: stap 1, afbeelding 1 van 2 Cambridge SoundWorks OontZ Angle Plus Motherboard  Replacement, Lower Casing: stap 1, afbeelding 2 van 2
    • Pull back the six screw covers on the bottom of the device.

    • Starting from the screw covers, peel the casing away from the bottom plate.

    Vraag FixBot
  2. Cambridge SoundWorks OontZ Angle Plus Motherboard  Replacement, Battery: stap 2, afbeelding 1 van 1
    • Unscrew the five 11.5mm Phillips screws on the bottom plate.

    Vraag FixBot
  3. Cambridge SoundWorks OontZ Angle Plus Motherboard  Replacement: stap 3, afbeelding 1 van 1
    • Carefully pull apart the bottom plate and the top plate, using the blue plastic opening tool.

    Vraag FixBot
  4. Cambridge SoundWorks OontZ Angle Plus Motherboard  Replacement: stap 4, afbeelding 1 van 1
    • Once the bottom plate and the top plate are separated, slowly pull the back plate away from the top plate.

    • There are wires connected to both plates so do this step with care.

    Vraag FixBot
  5. Cambridge SoundWorks OontZ Angle Plus Motherboard  Replacement: stap 5, afbeelding 1 van 1
    • Unscrew the two 10 mm Phillips screws on the brace holding down the battery.

    • Remove the brace that holds the battery in place.

    Vraag FixBot
  6. Cambridge SoundWorks OontZ Angle Plus Motherboard  Replacement: stap 6, afbeelding 1 van 1
    • Separate the battery from the bottom plate and set the bottom plate aside.

    Vraag FixBot
  7. Cambridge SoundWorks OontZ Angle Plus Motherboard  Replacement: stap 7, afbeelding 1 van 1
    • With some force, push the motherboard straight in toward the center of the device.

    Vraag FixBot
  8. Cambridge SoundWorks OontZ Angle Plus Motherboard  Replacement: stap 8, afbeelding 1 van 1
    • Pull the motherboard straight out of the device.

    • There is some adhesive on the motherboard that holds it in place. This make the motherboard fit in the groove rather tight.

    Vraag FixBot
  9. Cambridge SoundWorks OontZ Angle Plus Motherboard  Replacement: stap 9, afbeelding 1 van 1
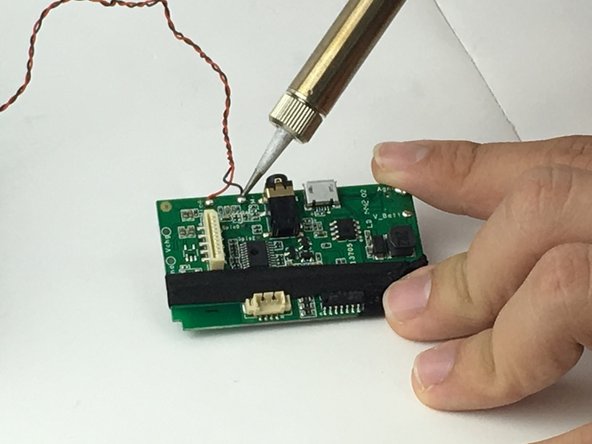
    • Desolder the wires that connect the battery to the motherboard, negative (black wire) and positive (red wire).

    Vraag FixBot
  10. Cambridge SoundWorks OontZ Angle Plus Motherboard  Replacement, Motherboard: stap 10, afbeelding 1 van 1
    • Unplug the wires that connect the speakers to the motherboard.

    Vraag FixBot
  11. Cambridge SoundWorks OontZ Angle Plus Motherboard  Replacement: stap 11, afbeelding 1 van 1
    • Unplug the thin white cable connected to the buttons.

    Vraag FixBot
  12. Cambridge SoundWorks OontZ Angle Plus Motherboard  Replacement: stap 12, afbeelding 1 van 2 Cambridge SoundWorks OontZ Angle Plus Motherboard  Replacement: stap 12, afbeelding 2 van 2
    • Desolder the wires that connect the LED to the motherboard.

    Vraag FixBot
Conclusie

To reassemble your device, follow these instructions in reverse order.

Farshad Mohebban

Lid sinds: 02/10/16

524 Reputatie

4 handleidingen geschreven

Team

USF Tampa, Team 1-1, Nance Spring 2016 Lid van USF Tampa, Team 1-1, Nance Spring 2016

USFT-NANCE-S16S1G1

4 Leden

6 handleidingen geschreven

0Gids Commentaar

Voeg opmerking toe

Weergavestatistieken:

Afgelopen 24 uren: 0

Afgelopen 7 dagen: 2

Afgelopen 30 dagen: 16

Altijd: 2,060