Ga door naar hoofdinhoud
Word lid van de reparatiegemeenschap - Account aanmaken

Brother XR-40 Lightbulb Replacement

Wat je nodig hebt

    1. Brother XR-40 Lightbulb Replacement, Back Panel: stap 1, afbeelding 1 van 1
      • Place the machine on a solid surface.

      • Remove the 14mm Phillips #2 screw holding on the face cover.

      Vraag FixBot

      Voeg opmerking toe

    2. Brother XR-40 Lightbulb Replacement: stap 2, afbeelding 1 van 1
      • Remove the two 14mm Phillips #2 screws and two 22mm Phillips #2 screws that secure the rear casing.

      Vraag FixBot

      Voeg opmerking toe

    3. Brother XR-40 Lightbulb Replacement: stap 3, afbeelding 1 van 1
      • Lay the machine on its side.

      • Remove the four 10mm Phillips #2 screws that hold the bottom panel in place.

      • The feet will come off with the screws.

      Vraag FixBot

      Voeg opmerking toe

    4. Brother XR-40 Lightbulb Replacement: stap 4, afbeelding 1 van 1
      • Remove the bottom panel.

      Vraag FixBot

      Voeg opmerking toe

    5. Brother XR-40 Lightbulb Replacement: stap 5, afbeelding 1 van 1
      • Place the machine upright.

      • Remove the rear casing.

      • You may have to wiggle the panel and pull at the same time.

      Vraag FixBot

      Voeg opmerking toe

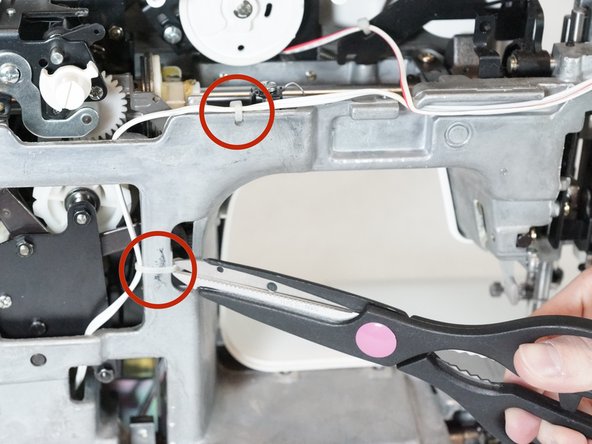
    1. Brother XR-40 Lightbulb Replacement, Lightbulb: stap 6, afbeelding 1 van 1
      • Using scissors, clip the two zip ties securing the lightbulb wire.

      Vraag FixBot

      Voeg opmerking toe

    2. Brother XR-40 Lightbulb Replacement: stap 7, afbeelding 1 van 1
      • Place the machine on its side, with access to the bottom.

      • Gently pull out the white wire connecting the bulb to the machine.

      Vraag FixBot

      Voeg opmerking toe

    3. Brother XR-40 Lightbulb Replacement: stap 8, afbeelding 1 van 1
      • Move the wire out from under the plastic hook.

      Vraag FixBot

      Voeg opmerking toe

    4. Brother XR-40 Lightbulb Replacement: stap 9, afbeelding 1 van 1
      • Place the machine upright.

      • Using the flathead screwdriver, remove the 5mm Flathead screw holding on the lightbulb bracket.

      Vraag FixBot

      Voeg opmerking toe

    5. Brother XR-40 Lightbulb Replacement: stap 10, afbeelding 1 van 1
      • Remove the lightbulb assembly.

      Vraag FixBot

      Voeg opmerking toe

Conclusie

To reassemble your device, follow these instructions in reverse order.

Annuleren: ik heb deze handleiding niet afgemaakt.

Één andere persoon heeft deze handleiding voltooid.

Kevin Bickers

Lid sinds: 02/05/14

673 Reputatie

4 handleidingen geschreven

Team

Cal Poly, Team 2-12, Amido Winter 2014 Lid van Cal Poly, Team 2-12, Amido Winter 2014

CPSU-AMIDO-W14S2G12

4 Leden

60 handleidingen geschreven

0Gids Commentaar

Voeg opmerking toe

Weergavestatistieken:

Afgelopen 24 uren: 0

Afgelopen 7 dagen: 10

Afgelopen 30 dagen: 40

Altijd: 3,807