Inleiding
A guide for replacing the back panel on the G3 Gamecube Controller by Gamestop.
Wat je nodig hebt
-
-
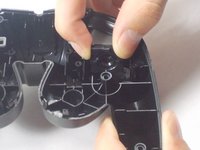
First, remove the 6 screws in the back panel and pull the back panel off.
-
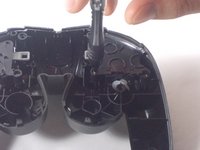
Separate the halves of the controller. However, be careful when separating due to the little wires that could get mixed up.
 Vraag FixBot
-
-
-
-
Next, remove the rumble motor by unscrewing the 2 screws connecting it.
-
-
-
Finally remove the screws holding in the right and left triggers. It's easiest to hold the trigger together as shown in the third picture. Remove both the left and right trigger, and then you have successfully removed your back panel.
-


To reassemble your device, follow these instructions in reverse order.
Annuleren: ik heb deze handleiding niet afgemaakt.
Één andere persoon heeft deze handleiding voltooid.
Team

UMass Dartmouth, Team 3-5, Isaacson Fall 2016 Lid van UMass Dartmouth, Team 3-5, Isaacson Fall 2016
UMASSD-ISAACSON-F16S3G5
3 Leden
10 handleidingen geschreven