Ga door naar hoofdinhoud
Word lid van de reparatiegemeenschap - Account aanmaken
Back Cover Removal

Back Cover Removal

Spencer Day

Spencer Day en 2 andere bijdragers

Voor het laatst geüpdatet op 14 jul. 2025

5 - 10 minuten
Gemiddeld
Alleen vereisten
Deze handleiding is alleen bedoeld als vereiste voor andere handleidingen. Het staat niet op zichzelf.

Follow this guide to remove the back cover on the Asus ROG Ally.

Wat je nodig hebt

Gereedschap

  1. Back Cover Removal, Prepare your device for disassembly: stap 1, afbeelding 1 van 3 Back Cover Removal, Prepare your device for disassembly: stap 1, afbeelding 2 van 3 Back Cover Removal, Prepare your device for disassembly: stap 1, afbeelding 3 van 3
    • Let your device's battery drain below 25% before starting this repair—a charged lithium‑ion battery may catch fire if damaged.

    • Completely power off your device and unplug all cables.

    • Consider laying your device on a soft cloth to prevent scratching or damaging the screen during your repair.

  2. Back Cover Removal, Unfasten the back cover: stap 2, afbeelding 1 van 2 Back Cover Removal, Unfasten the back cover: stap 2, afbeelding 2 van 2
    Gereedschap gebruikt in deze stap:
    FixMat
    $36.95
    • Throughout this repair, keep track of each screw and make sure it goes back exactly where it came from.

    • Use a Phillips #0 screwdriver to remove the five 17.2 mm‑long screws securing the top edge and bottom corners of the back cover.

    • Use a Phillips #0 screwdriver to fully loosen the remaining captive screw at the center of the bottom edge. This should create a small gap between the back cover and chassis.

    • Don't try to remove this screw.

  3. Back Cover Removal, Insert an opening pick: stap 3, afbeelding 1 van 3 Back Cover Removal, Insert an opening pick: stap 3, afbeelding 2 van 3 Back Cover Removal, Insert an opening pick: stap 3, afbeelding 3 van 3
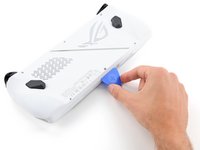
    • Insert the flat edge of an opening pick between the bottom edge of the back cover and chassis, near the captive screw.

    • Angle the pick upward and push it under the back cover.

  4. Back Cover Removal, Release the back cover's clips: stap 4, afbeelding 1 van 3 Back Cover Removal, Release the back cover's clips: stap 4, afbeelding 2 van 3 Back Cover Removal, Release the back cover's clips: stap 4, afbeelding 3 van 3
    • Plastic clips secure the perimeter of the back cover. You should feel and hear them release during this step.

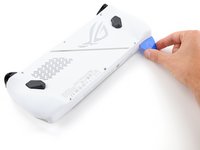
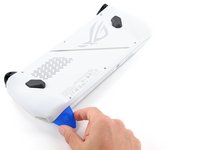
    • Slide the opening pick along the bottom edge and around the corners of the back cover to release the clips securing it.

    • Keep the pick at an upward angle under the back cover to help release the clips.

  5. Back Cover Removal, Remove the back cover: stap 5, afbeelding 1 van 3 Back Cover Removal, Remove the back cover: stap 5, afbeelding 2 van 3 Back Cover Removal, Remove the back cover: stap 5, afbeelding 3 van 3
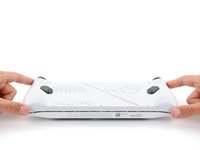
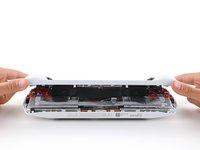
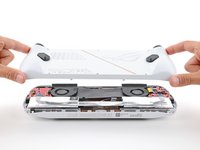
    • Lift the bottom edge of the back cover off the chassis to release the remaining clips.

    • Remove the back cover.

    • During reassembly, lay the back cover onto your device and firmly push down around the perimeter to engage the clips.

Conclusie

To reassemble your device, follow these instructions in reverse order.

Repair didn’t go as planned? Try some basic troubleshooting, or ask our Answers community for help.

Bereid je voor op toekomstige reparaties

Winkelen

Spencer Day

Lid sinds: 09/14/22

123.552 Reputatie

857 handleidingen geschreven

Team

iFixit Lid van iFixit

Staff

118 Leden

22.512 handleidingen geschreven

0Gids Commentaar

Voeg opmerking toe

Weergavestatistieken:

Afgelopen 24 uren: 0

Afgelopen 7 dagen: 0

Afgelopen 30 dagen: 4

Altijd: 67