Ga door naar hoofdinhoud

Asus ZenFone 2 Motherboard Replacement

Wat je nodig hebt

  1. Asus ZenFone 2 Motherboard Replacement, Removing the Back Cover: stap 1, afbeelding 1 van 2 Asus ZenFone 2 Motherboard Replacement, Removing the Back Cover: stap 1, afbeelding 2 van 2
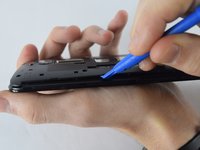
    • Use your fingernail to gently pry off the phone's back cover at the indicated location. While your fingernail is under the back cover slide your finger around the edges of the phone until the cover pops off.

  2. Asus ZenFone 2 Motherboard Replacement, Remove the Inner Cover Screws: stap 2, afbeelding 1 van 1
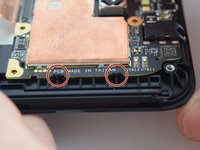
    • Remove the thirteen black screws and the single silver screw from the back of the phone with a JIS size 00 screwdriver.

    • The black screws are 2.8 mm in length.

    • The silver screw is 5.5 mm in length.

    • The black screw next to the camera and the flash is covered by a sticker. This screw can be easily removed as if there were no sticker on top of it. The point of the screwdriver should be able to pierce through the sticker easily.

  3. Asus ZenFone 2 Motherboard Replacement, Remove the Inner Cover: stap 3, afbeelding 1 van 2 Asus ZenFone 2 Motherboard Replacement, Remove the Inner Cover: stap 3, afbeelding 2 van 2
    • Use a plastic opening tool to remove the inner phone backing.

    • The parts of the inner backing held down by two strips of double sided tape can be easily loosened by inserting the plastic opening tool underneath it and gently lifting it up.

  4. Asus ZenFone 2 Motherboard Replacement, Remove the Speaker: stap 4, afbeelding 1 van 1
    • Note the position of the speaker unit so you can replace it in the correct place during reassembly.

    • Take the speaker out of the back of the phone. It should come out easily as soon as the inner back is removed because nothing is holding it down in place anymore.

  5. Asus ZenFone 2 Motherboard Replacement, Remove the Antenna: stap 5, afbeelding 1 van 2 Asus ZenFone 2 Motherboard Replacement, Remove the Antenna: stap 5, afbeelding 2 van 2
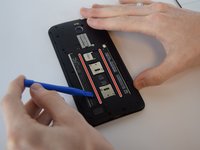
    • Use a plastic opening tool to gently pry up both ends of the antenna.

    • Carefully remove the antenna wire from the plastic keepers along the side. Note their position for reassembly.

    • The antenna connections can be easily bent out of shape. Be sure to lift from underneath the cable as shown.

  6. Asus ZenFone 2 Motherboard Replacement, Unlock Circuit Board Ribbon Cable: stap 6, afbeelding 1 van 2 Asus ZenFone 2 Motherboard Replacement, Unlock Circuit Board Ribbon Cable: stap 6, afbeelding 2 van 2
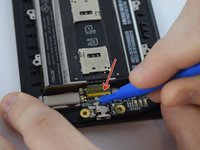
    • Using the plastic opening tool, unlock the ribbon cable attaching the battery to the circuit board by prying up the yellow tab.

  7. Asus ZenFone 2 Motherboard Replacement, Remove Vibration Motor: stap 7, afbeelding 1 van 1
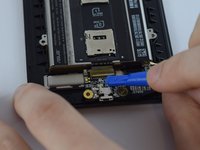
    • Using a plastic opening tool, gently pry the vibration motor from its mount.

  8. Asus ZenFone 2 Motherboard Replacement, Remove Circuit Board: stap 8, afbeelding 1 van 1
    • Gently remove the circuit board from the phone by gently pulling it away from the bottom of the phone.

  9. Asus ZenFone 2 Motherboard Replacement, Disconnect Ribbon Cables: stap 9, afbeelding 1 van 2 Asus ZenFone 2 Motherboard Replacement, Disconnect Ribbon Cables: stap 9, afbeelding 2 van 2
    • Using the plastic opening tool, disconnect the ribbon cables from their connectors by gently prying them up.

  10. Asus ZenFone 2 Motherboard Replacement, Remove the Battery: stap 10, afbeelding 1 van 1
    • Carefully remove the battery pack from the phone using your hand. The battery is glued in placed by a strip of adhesive on the top side so some force may be necessary.

    • There are fragile tabs on the left and right side of the battery, be careful not to break them off.

  11. Asus ZenFone 2 Motherboard Replacement, Lift up the Copper Heat Strip: stap 11, afbeelding 1 van 3 Asus ZenFone 2 Motherboard Replacement, Lift up the Copper Heat Strip: stap 11, afbeelding 2 van 3 Asus ZenFone 2 Motherboard Replacement, Lift up the Copper Heat Strip: stap 11, afbeelding 3 van 3
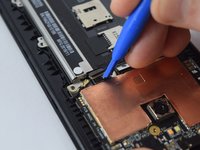
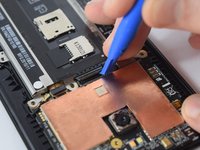
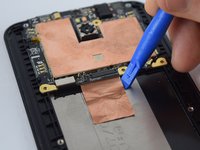
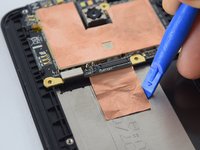
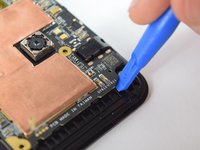
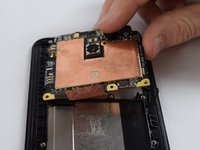
    • Using a plastic opening tool, lift the copper sheet heat strip from the body of the phone by sticking the tool into one of the upper corner of the copper sheet and slowly sliding it along the edges.

    • Be careful not to rip the copper sheet.

  12. Asus ZenFone 2 Motherboard Replacement, Detach the Motherboard Ribbon Cable: stap 12, afbeelding 1 van 2 Asus ZenFone 2 Motherboard Replacement, Detach the Motherboard Ribbon Cable: stap 12, afbeelding 2 van 2
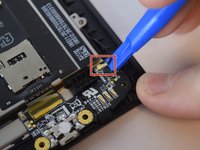
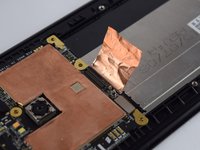
    • Using a plastic opening tool, unplug the ribbon cable indicated in the picture.

  13. Asus ZenFone 2 Motherboard Replacement, Detach the Screen Connector Ribbon Cable: stap 13, afbeelding 1 van 2 Asus ZenFone 2 Motherboard Replacement, Detach the Screen Connector Ribbon Cable: stap 13, afbeelding 2 van 2
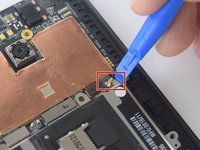
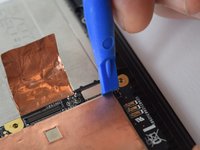
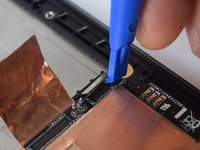
    • Using a plastic opening tool, disconnect the display cable from the side of the motherboard by carefully sticking the tool underneath the display cable and gently pulling outward.

  14. Asus ZenFone 2 Motherboard Replacement, Remove the Motherboard from the Retaining Clips: stap 14, afbeelding 1 van 3 Asus ZenFone 2 Motherboard Replacement, Remove the Motherboard from the Retaining Clips: stap 14, afbeelding 2 van 3 Asus ZenFone 2 Motherboard Replacement, Remove the Motherboard from the Retaining Clips: stap 14, afbeelding 3 van 3
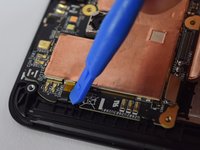
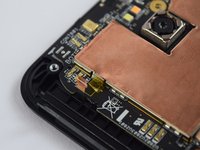
    • There are four black plastic retainers, two on each side, that keep the motherboard fix in place. To get the motherboard out, stick a plastic opening tool under one top corner of the motherboard and carefully lift upward using a small amount of force to pop this side of the motherboard out of the plastic retainers.

    • Be careful not to break the black plastic retainers as these are needed to put the motherboard back in place.

  15. Asus ZenFone 2 Motherboard Replacement, Finish Removing the Motherboard: stap 15, afbeelding 1 van 1
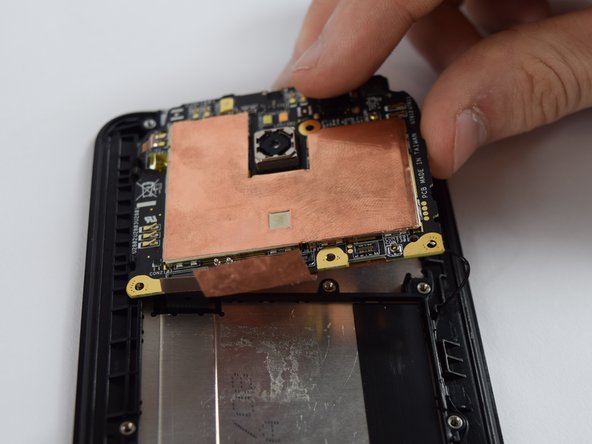
    • Once one side of the motherboard is out of the black plastic retainers, remove the whole motherboard from the phone.

    • The motherboard should come out easily once one side of it is freed from the black plastic retainers.

Conclusie

Put in a new motherboard and reassemble your device by following these instructions in reverse order.

41 andere personen hebben deze handleiding voltooid.

Eduardo Nodarse

Lid sinds: 02/10/16

4.797 Reputatie

5 handleidingen geschreven

Team

USF Tampa, Team 2-5, Sullivan Spring 2016 Lid van USF Tampa, Team 2-5, Sullivan Spring 2016

USFT-SULLIVAN-S16S2G5

4 Leden

16 handleidingen geschreven

20 opmerkingen

Hi!I

After replacing the complete appliance front but the unit turns on but nothing appears on the screen, what may have happened?

horacildo - Antwoord

Check if the screen ribbon cable is firmly attached to the motherboard. If it is you may have a faulty motherboard replaced or a faulty screen

Nathan The Neko -

Thanks this helped a lot, Download Asus full firmware here: https://www.droidtechie.com/official-ful...

Sam Peter - Antwoord

Is there any place where I can order just the audio jack?

Sergio Lapunov - Antwoord

Is there a reliable source to buy a motherboard you can suggest? I need to replace the audio jack. Thank you for the neat guide.

sriram010689 - Antwoord

Voeg opmerking toe

Weergavestatistieken:

Afgelopen 24 uren: 0

Afgelopen 7 dagen: 4

Afgelopen 30 dagen: 25

Altijd: 51,955