Inleiding
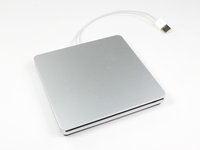
A simple guide to replacing the optical drive in the external optical drive sold by Apple for the MacBook Air. If your optical drive breaks, use this guide to replace it.
Note: Here's a method to hack the OS X configuration file for the SuperDrive to be used on the older iMac, MacBook, or MacBook Pro systems that the drive normally won't work with. Use with caution!
Open the com.apple.Boot.plist file in a text editor or in terminal use nano you will see a key <key>Kernel Flags</key>
Under it add the following line:
<string>mbasd=1</string>
Reboot your Mac.
If you have the later model A1379:
You will unfortunately need to replace the internal drive from another identical Apple external SuperDrive, as the contacts on the PCB are soldered to the USB cable directly. The model produced prior to 2012 is a standard PATA slimline drive, but any SuperDrive purchased from Apple in 2012 or later will need a soldering iron to repair.
Wat je nodig hebt
-
-
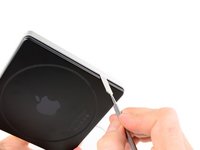
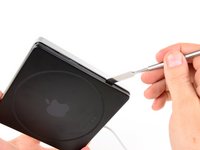
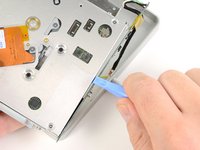
To open the SuperDrive we must remove the lower case.
-
The lower case is attached by 8 clips.
-
6 along the sides
-
2 on the back
-
-
-
-
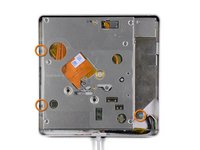
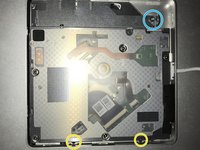
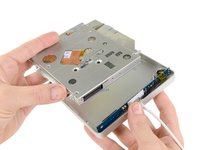
Remove the screws holding optical drive in the upper case
-
(A1270) three 3.8 mm with 1 mm deep head #00 Phillips head screws.
-
(A1379) 2 #00 Phillips head screws (I did not measure their length, sorry)
-
(A1379) 1 T9 torx screw
-
-
-
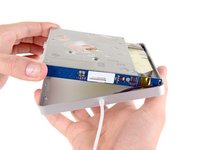
(A1270) Lift the optical drive from the thick side, then pull out.
-
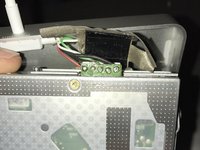
(A1379) You will need to be even more careful with this model, as there is less wiggle room. Peel back the insulation tape to see the connector.
-
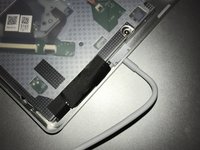
When re-installing the optical drive insert tongue in groove side first, as pictured.
-


To reassemble your device, follow these instructions in reverse order.
To reassemble your device, follow these instructions in reverse order.
Annuleren: ik heb deze handleiding niet afgemaakt.
52 andere personen hebben deze handleiding voltooid.

23 opmerkingen
After you pry open, inside there is an internal Super Drive.
Please tell me what's the markings/printed words model, name, brand, part number, etc....
Thank you.
My drive has nothing on that orange part in the middle of the drive (like you can see in the pictures here) except for two QR codes; it has absolutely no markings/printed words model, name, brand, part number, etc. on the inside, except the manufacturing date 2012 stamped inside the black aluminum bottom case cover.
Hope this helps.
Thank you. My drive from 2012 ist fastened with a six-sided star-shaped Torx screw on the right side. The ones on the left side are black Philips screws and they are so tiny that they are hard to see in normal light. All I want to do is clean the drive from dust since it won't read DVDs anymore, while it has no problems with CDs at all. So now this Torx screw is another obstacle. I will have to waste more time & money buying an extra tool, thanks to Apple.
Is it possible to replace the internal DVD drive by a Bluray? Does macOS Sierra work with external Bluray drives?
Thanks for helping.
Sincerely
Yes, but the only drive that is known to be an ATAPI (EIDE) connecting drive that supports Blu-ray is the Panasonic UJ-215-B. They were astronomically priced new in 2007-2008 when they were released. Good luck finding one today, and if you do it will still be very expensive and almost never a new one. But it seems to be a direct drop in replacement. I myself have already begun this project, and have one on the way right now. Bought it for $250 so it was pricey but considering it was new I got very lucky.
Will any drive works? Is is SATA?
Nope, it's two different models- the first model was IDE, the second model has the USB cable soldered straight to the drive. Most unfortunate.
Thanks Alex. If you want to clean the internals there are 4 screws holding the top of the drive. There is one a bit longer than the other three. Make sure you mark the hole for the longer one. Removing these screws and the top of the drive exposes all of the areas to be cleaned. Also, if anyone tinkers around with these and other computer devices even occasionally, it will make your tasks much easier if you buy the Ifixit Pro Tech Tool Kit.
Not sure why I wasn’t told till step 7 that I can not replace my optical drive because its soldered together. You can't just use another mac optical drive to replace it, they aren’t the same. Waste of time
The guide does mention that there are two different versions in the introduction, and that if you have the newer version you’ll have to use an identical drive from another 2012 or later SuperDrive. It’s a stupid decision to be sure. Sorry it didn’t work out for you!
Mine won't erase RW-DVD/CD and I was thinking in replacing the internals with a MacBook drive…
I probably will have it figured out before anyone answer but do they have the same interface?
Is there a replacement USB cable available for this unit? Bad design causes the section where it exits the case to get crunched. Need a replacement cable.
Thanks,
Andy
Hey Andy,
unfortunately I do not think a replacement cable has ever been made available. On the later revisions the cable is soldered straight to the contacts on the drive- in theory, you could desolder it and re-solder the replacement, but there is no quick fix.
Is there a way to tell what version you have without tearing it down?
Directly on the bottom of the case itself.
@swsmith1971. under the Apple (upper left hand corner) > about this Mac > System Report > SATA/SATA Express >. should be the top item
Can I replace usb A conector with usb C?
No, you can’t replace the connector, you can get an adapter which will allow the drive to connect to your USB-C Mac.
Dan -
Well, depending on your definition of "replace" you can surely solder in a USB-C cable, though one will have to figure out the best course of action with A) Removing the existing cable or B) Just soldering on a new USB-C plug (won't require disassembly).
Just use a USB-A to USB-C adapter, don't hardwire the drive.
Dan -
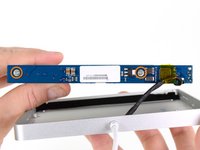
In step #6, it can help to disconnect the "tongue" part (connected by two screws to the side of the internal drive) before removing the drive. When reinserting make sure that the part is properly inserted into the grooves of the silver case, one on the side and two small ones in the roof. When screwing it back onto the drive you will have to hold the drive up a bit so the screws will line up.
Muchísimas gracias.
Me has ahorrado 89€.
Saludos.
<<Add the following>>
Note: Here's a method to hack the OS-X configuration file for the SuperDrive to be used on the older iMac, MacBook, or MacBook Pro systems that the drive normally won't work with. Use with caution!
open the com.apple.Boot.plist file in a text editor or in terminal use nano you will see a key <key>Kernel Flags</key>
under it add the following line
<string>mbasd=1</string>
reboot your Mac
Dan - Antwoord