Ga door naar hoofdinhoud
Word lid van de reparatiegemeenschap - Account aanmaken

Alienware P18G M14X R1 Optical Drive Replacement

Wat je nodig hebt

  1. Alienware P18G M14X R1 Optical Drive Replacement, Back Cover: stap 1, afbeelding 1 van 1
    • Loosen the top left and top right 6.5mm PH1 screws that hold down the back cover.

    • The screws will not be able to be removed from the back cover. They can only be loosened or tightened.

    Vraag FixBot

    Voeg opmerking toe

  2. Alienware P18G M14X R1 Optical Drive Replacement: stap 2, afbeelding 1 van 1
    • Slide back cover forward using your thumbs.

    Vraag FixBot

    Voeg opmerking toe

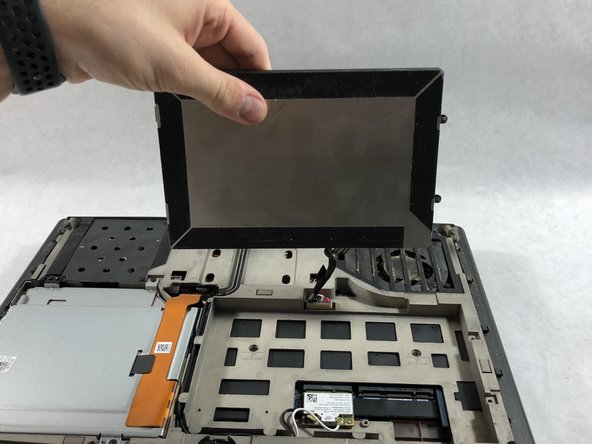
  3. Alienware P18G M14X R1 Optical Drive Replacement: stap 3, afbeelding 1 van 1
    • Lift up the cover and set aside exposing the internals of the computer.

    Vraag FixBot

    Voeg opmerking toe

  4. Alienware P18G M14X R1 Optical Drive Replacement, Battery: stap 4, afbeelding 1 van 1
    • Make sure the laptop is turned off before starting.

    • Using PH1 screwdriver loosen the two screws on the right of the battery.

    • The screws will not be able to be removed from the battery. They can only be loosened or tightened.

    Vraag FixBot

    Voeg opmerking toe

  5. Alienware P18G M14X R1 Optical Drive Replacement: stap 5, afbeelding 1 van 2 Alienware P18G M14X R1 Optical Drive Replacement: stap 5, afbeelding 2 van 2
    • Pull battery up using the tab provided.

    Vraag FixBot

    Voeg opmerking toe

  6. Alienware P18G M14X R1 Optical Drive Replacement: stap 6, afbeelding 1 van 1
    • Disconnect the clip connecting the battery to the computer.

    • Set battery aside.

    Vraag FixBot

    Voeg opmerking toe

  7. Alienware P18G M14X R1 Optical Drive Replacement, Optical Drive: stap 7, afbeelding 1 van 1
    • Unscrew the four 6.35mm screws using the PH1, that hold down the optical drive.

    Vraag FixBot

    Voeg opmerking toe

  8. Alienware P18G M14X R1 Optical Drive Replacement: stap 8, afbeelding 1 van 1
    • Using the plastic opening tool unclip the white connector holding down the orange cable.

    Vraag FixBot

    Voeg opmerking toe

  9. Alienware P18G M14X R1 Optical Drive Replacement: stap 9, afbeelding 1 van 1
    • Using the tab on the optical drive, lift the optical drive out of the computer and set it aside.

    Vraag FixBot

    Voeg opmerking toe

Conclusie

To reassemble your device, follow these instructions in reverse order.

Annuleren: ik heb deze handleiding niet afgemaakt.

Andonaq Grozdani

Lid sinds: 03/01/18

892 Reputatie

5 handleidingen geschreven

Team

UMass Dartmouth, Team S2-G2, Simcock Spring 2018 Lid van UMass Dartmouth, Team S2-G2, Simcock Spring 2018

UMASSD-SIMCOCK-S18S2G2

3 Leden

5 handleidingen geschreven

0Gids Commentaar

Voeg opmerking toe

Weergavestatistieken:

Afgelopen 24 uren: 2

Afgelopen 7 dagen: 8

Afgelopen 30 dagen: 29

Altijd: 738