Ga door naar hoofdinhoud

Akai MPK25 LCD Replacement

Wat je nodig hebt

  1. Akai MPK25 LCD Replacement, Face Plate: stap 1, afbeelding 1 van 1
    • Remove all the selector knob covers by pulling them off.

  2. Akai MPK25 LCD Replacement: stap 2, afbeelding 1 van 1
    • Using needle nose pliers, remove the washers from the four corner selector knobs.

  3. Akai MPK25 LCD Replacement: stap 3, afbeelding 1 van 1
    • Flip the device over. Using a Philips #2 screw driver, remove the fourteen 10.3 mm black screws holding the back panel in place.

  4. Akai MPK25 LCD Replacement: stap 4, afbeelding 1 van 3 Akai MPK25 LCD Replacement: stap 4, afbeelding 2 van 3 Akai MPK25 LCD Replacement: stap 4, afbeelding 3 van 3
    • Carefully flip the device to the front making sure you secure the face plate and the chassis together.

    • Please use care in following the step above to avoid ripping the ribbon cables connecting the two sides.

  5. Akai MPK25 LCD Replacement: stap 5, afbeelding 1 van 3 Akai MPK25 LCD Replacement: stap 5, afbeelding 2 van 3 Akai MPK25 LCD Replacement: stap 5, afbeelding 3 van 3
    • Rotate the device 180 degrees and carefully remove the face plate by slightly lifting the screen side towards you and then sliding the bottom out from under the keys.

    • Use care when doing the step above so that the ribbon connectors which connect the top of the chassis to the top of the face plate are not damaged.

  6. Akai MPK25 LCD Replacement, LCD: stap 6, afbeelding 1 van 1
    • Using a Phillips #00 screwdriver, remove the four 8.9 mm screws.

  7. Akai MPK25 LCD Replacement: stap 7, afbeelding 1 van 1
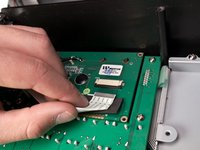
    • Using a Phillips #2 screwdriver, remove the one 9.8mm screw holding down the ground wire.

  8. Akai MPK25 LCD Replacement: stap 8, afbeelding 1 van 2 Akai MPK25 LCD Replacement: stap 8, afbeelding 2 van 2
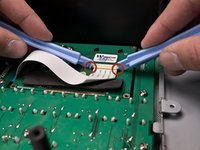
    • Using two plastic opening tools, slide the black locking mechanism on the ZIF connector towards you. This will remove the ribbon cable connecting the motherboard to the screen.

  9. Akai MPK25 LCD Replacement: stap 9, afbeelding 1 van 1
    • Lift the screen from either side, removing it from the board.

Conclusie

To reassemble the display, follow these instructions in reverse order.

2 andere personen hebben deze handleiding voltooid.

Will Saba

Lid sinds: 01/11/13

391 Reputatie

2 handleidingen geschreven

Team

Cal Poly, Team 20-6, Maness Winter 2013 Lid van Cal Poly, Team 20-6, Maness Winter 2013

CPSU-MANESS-W13S20G6

5 Leden

6 handleidingen geschreven

Één opmerking

Where can I find a new ribbon?

Wise Professor - Antwoord

Voeg opmerking toe

Weergavestatistieken:

Afgelopen 24 uren: 0

Afgelopen 7 dagen: 1

Afgelopen 30 dagen: 9

Altijd: 2,073