Ga door naar hoofdinhoud

ASUS X44H-BBR4 Keyboard Replacement

Wat je nodig hebt

  1. ASUS X44H-BBR4 Keyboard Replacement, Keyboard: stap 1, afbeelding 1 van 2 ASUS X44H-BBR4 Keyboard Replacement, Keyboard: stap 1, afbeelding 2 van 2
    • Open the laptop to show the keyboard.

  2. ASUS X44H-BBR4 Keyboard Replacement: stap 2, afbeelding 1 van 1
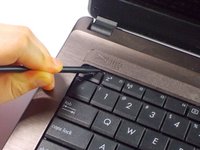
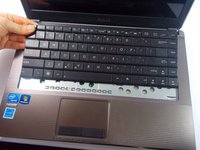
    • Look at the top row of the keyboard, you will see a space that has four latches holding the keyboard down.

    • The latches are located above the Esc key, the F5 key, between the F10 and F11 key and the Delete key.

  3. ASUS X44H-BBR4 Keyboard Replacement: stap 3, afbeelding 1 van 3 ASUS X44H-BBR4 Keyboard Replacement: stap 3, afbeelding 2 van 3 ASUS X44H-BBR4 Keyboard Replacement: stap 3, afbeelding 3 van 3
    • Don't pull too hard on the keys otherwise they may fall off.

    • Push the latch away from the keyboard using the spudger point.

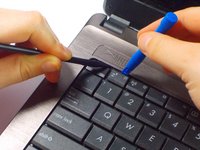
    • While pushing the latches use a plastic opening tool and pull up on a key near it.

    • Continue along the rest of the keyboard until it is released at all four latches.

  4. ASUS X44H-BBR4 Keyboard Replacement: stap 4, afbeelding 1 van 2 ASUS X44H-BBR4 Keyboard Replacement: stap 4, afbeelding 2 van 2
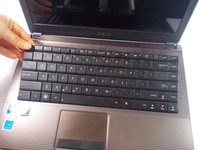
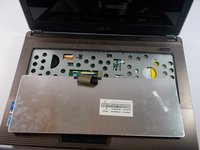
    • Push the keyboard away from the mouse track pad to unlock the bottom from the base.

    • Do not pull too hard because there is a ribbon connecting to keyboard to the motherboard.

  5. ASUS X44H-BBR4 Keyboard Replacement: stap 5, afbeelding 1 van 2 ASUS X44H-BBR4 Keyboard Replacement: stap 5, afbeelding 2 van 2
    • Flip the keyboard over to reveal the back of it and what is underneath.

  6. ASUS X44H-BBR4 Keyboard Replacement: stap 6, afbeelding 1 van 3 ASUS X44H-BBR4 Keyboard Replacement: stap 6, afbeelding 2 van 3 ASUS X44H-BBR4 Keyboard Replacement: stap 6, afbeelding 3 van 3
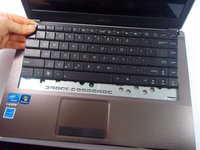
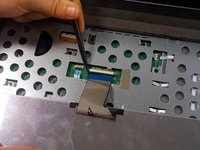
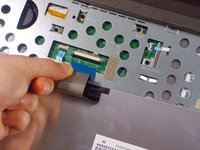
    • Pull each end of the black ribbon cable piece towards the mouse track pad to unlock the ribbon connector piece.

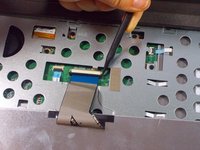
    • Gently pull out the ribbon cable from the connector piece.

  7. ASUS X44H-BBR4 Keyboard Replacement: stap 7, afbeelding 1 van 1
    • Remove the keyboard completely.

Conclusie

To reassemble your device, follow these instructions in reverse order.

4 andere personen hebben deze handleiding voltooid.

Kelly Merlo

Lid sinds: 10/14/15

500 Reputatie

2 handleidingen geschreven

Team

UMass Dartmouth, Team 4-3, Catania Fall 2015 Lid van UMass Dartmouth, Team 4-3, Catania Fall 2015

UMASSD-CATANIA-F15S4G3

4 Leden

8 handleidingen geschreven

0 opmerkingen

Voeg opmerking toe

Weergavestatistieken:

Afgelopen 24 uren: 0

Afgelopen 7 dagen: 5

Afgelopen 30 dagen: 9

Altijd: 1,147