Ga door naar hoofdinhoud

This is the HP Photosmart Premium e-All-in-One Printer. Model Number: C310a. Product Number: CN504A.

24 Vragen Bekijk alle

Paper feed rollers have stopped feeding paper?

The printer will print fine with one page at a time manual feed. The feed rollers drop down on the paper but will not turn when it touches the paper. Have looked for answers all through HP support and have only found that HP doesn't do anything about fixing this problem. Has anybody taken one of these apart yet to see how they can be repaired? Any good ideas about how to start?

Beantwoord! Bekijk het antwoord Dit probleem heb ik ook

Is dit een goede vraag?

Score 70
36 opmerkingen

I did the same thing and fixed my prroblem - thanks much!

door

It worked !! Thanks a million... we also cut out a hole under the carriage...

door

Perfect! My printer has been broken for 6 months! I was going to buy a new printer, then I found your post. It worked` thank you so much!!

door

I cut a hole in the bottom and it was very easy to see the problem and access!

I used super glue and it was dry and ready to go in an hour.

door

I cut a hole in the bottom and it was very easy to see the problem and access!

I used super glue and it was dry and ready to go in an hour.

door

31 commentaren meer tonen

Voeg een opmerking toe

5 Antwoorden

Gekozen oplossing

Same problem, fixed for now using 5 minute epoxy... Slid the gear to the side... Dabbed epoxy on the axis, slid it back in, let it dry overnight. Taking the printer appart is a pain though... All that for a 1 cent plastic part that is an engineering defect !

Mise à jour (15/01/2016)

Well had to redo it tonight after printing out a good number of pages...

Here are 2 pictures to illustrate how to do it without taking it apart but by using a mirror to see the gear.

Global view to see where to put the mirror and where the gear is.

Block Image

Zoom in on the mirror and you can see the gear and epoxy as it dries. You can use the gears to the left to rotate the axis and dab it homogeneously.

Block Image

With the mirror it was real quick... Now lets see if it worked again...

Regards

Was dit antwoord nuttig?

Score 55

35 opmerkingen:

perfect solution, but its so hard to see the 1 cent plastic from normal position.

door

Same problem with my printer

Guess I might as well tear it apart since it doesn't work the way it is!

door

My printer also has this faulty gear.

Maybe i can cut out a piece of the drawer right underneath the gear to get better access to it and fix it with some glue.

The hole will later be covered by the paper...

door

Thanks for the pictures! I was able to access with a mirror, although I'll cut an access hole if it repeats. This site is very useful!

door

Stood hp 310a on its side. Positioned small flat mirror angled on its edge to view gear train. Taped drop light to now top of printer looking at the mirror/gear train. One small plastic gear slid off the steel shaft 'spline' not engaging drive train. (can move the gear by hand back in line with the gear train and try once to see if it fixes problem). Then slid the gear down & off the spline. Bent small hook in a wire. Mixed some two part epoxy and carefully dabbed small amount on the shaft spline until about 100% coated. Very carefully slid the gear with fingers back on the shaft spline viewing that it was centered on the mating gear. Waited until next morning to try printer. Now works great! Hardest part was manipulating the dabbing of the epoxy on the spline due to working with mirror image. My printer had little use as I have a second one that I use for everyday printing, so, wanted to save the hp 310 as my good scanner/color/printer. Thanks much for steering me in the right direction.. Joe

door

30 commentaren meer tonen

Voeg een opmerking toe

Das Problem liegt daran, dass ein kleines Zahnrad auf der Zahnstange auf die Seite gerückt ist. Wie benjaminreveille geschrieben hat, kann man das Zahnrad mit einem Spiegel lokalisieren und wieder an die richtige Stelle verschieben. Wer keinen Kosmetikspiegel zur Verfügung hat, kann sich auch mit einer CD helfen.

Block Image

Was dit antwoord nuttig?

Score 11

2 opmerkingen:

Danke für den Tipp. Da wäre ich nicht drauf gekommen. Ich habe schon lange überlegt wo ich bloß einen Kosmetikspiegel herbekomme.

door

Please if u guys have any update on printer please 🙏🙏 lete know kk

door

Voeg een opmerking toe

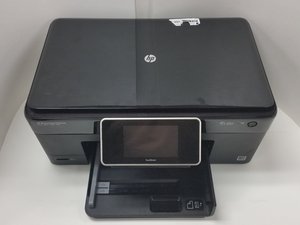
Scenario 1: the pick-up drums do not roll, you hear a grinding noise

You most likely hear a grinding noise of plastic cogwheels slipping when the printer tries to feed a sheet of paper.

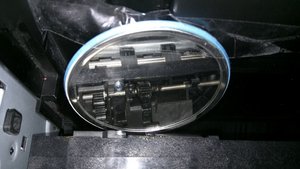
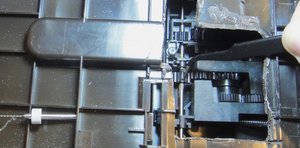
It looks like there is too much play in the paper pick-up unit (at the rightmost end inside the printer) on which both pick-up drums are mounted on a single arm. When not printing, these drums are lifted. When printing, they are dropped to the top of the paper stack and will engage to separate the topmost sheet off the stack.

When lifted, you will be able to rotate these drums in one direction. When the drums touch the paper, they simply don't rotate.

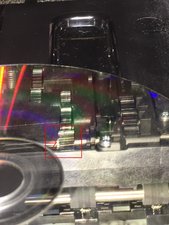
I suppose that because of excess play (programmed obsolescence?) eventually the cogwheels that drive the drums will slip. Sadly this unit is hard to reach.

Probably the entire printer must be torn down, and I don't expect you will be able to easily fix the excess play on the paper pick-up mechanism that drive the rubber rolls when pressed on the stack of paper.

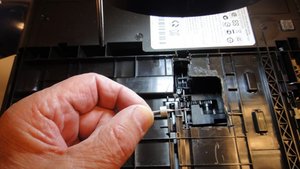
Scenario 2: the pick-up drums do roll, but they slip on the paper

There are image and video instructions available from HP. Here's a written summary based on my experience:

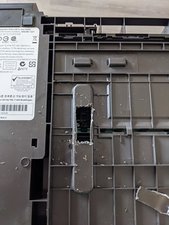
If you see the paper pick-up drums slip on the paper, then you may have better luck. Unplug the printer's power cord, detach the duplex unit at the back (push to the left and pull back to disengage the unit from the printer). You can now see 4 rubber drums on an axis. Clean these with a Q-tip moistened (not soaked) in clean water, and move from left to right. Rotate the axis upward (only possible way) to clean the next section of the 4 rubber drums. Now take another moist Q-tip and swipe the rubber-covered grooved paper pick-up drums clean in a similar fashion. This is tricky since you need to reach into the printer from the back (left). Let the water evaporate and reassemble the duplex unit. Print a test page (e.g., a blank Word document to avoid wasting ink). If the rubber pick-up drums still slip, repeat the cleansing operation.

Was dit antwoord nuttig?

Score 5

5 opmerkingen:

There is no grinding noise and have already done the HP suggestion for cleaning all the rollers.

door

But I thank you for the suggestions. I may just have to bite the bullet and take the thing apart.

door

You've got a weird shadow of your hair on the wall,

One might think you are an alien.

door

Dec 02, 2016

I realize this is an old feed but the problem I'm having is new to me. .

I've cleaned all the rollers as directed with water and lint free cloth.

I've looked at my printer and your scenarios and have come to the conclusion that I'm having scenario 1 issue. This is great to know, but how is this fixed. Also, when looking into my printer from the front, the left rubber roller is sagging on its left. I don't see this as the problem to the picking up of paper.

My question again, how is this problem fixed?

I really don't want to buy another printer if this one can be fixed for a few dollars.

Thanks!

door

I fixed mine by following this thread. If you are still trying to figure it out, I'll take a pic and show and explain what I did. I'm really busy the beginning of this week, so I don't want to spend a bunch of time if you've already got a solution, so reply and lemme know

door

Voeg een opmerking toe

Cut a hole on the bottom of the printer (with Dremel tool). Drill a whole through paper feeder driving slipping gear and its shaft (I used Dremel and 0.70 mm drill). Then put a pin in the whole (I used a solid copper wire). That is it.

P.S.Before drilling the gear move it ( on the shaft) toward the center line of a printer. So.the gear is fully engaged with the opposite gear, but potion of the gear is free of engagement . That is where you drill the gear and shaft. So , the pin/wire wont impede with the gears rotation.

Ooops, totally forgot.Before you flip your printer to cut a whole REMOVE ink cartridges!!!!!!

Update (11/10/2017)

Block Image

Block Image

Was dit antwoord nuttig?

Score 5

9 opmerkingen:

merci pour tout ce soir je me coucherais moins stupide,thanks for all this evening i go to sleep less stupid (-:

door

I followed suggestion from nickbeat76 - cut a hole in the bottom of the tray - much easier to see what you are doing and get the epoxy in the right spot - no mirror necessary.

door

Dremeled a hole, put on a bit of gorilla glue, just waiting til tomorrow to try. Thanks for the cutting hole part!

Thx @nickbeat76 too!

door

Same problem HP7520. Cut a hole in bottom using a small solder iron (didn't want to dremmel because i was afraid of debris landing inside causing more damage) and melted a small square plastic away. Slid the wheel to one side, some superglue on the metal rod, slid the wheel in place. Done.

Works perfect again. Thanks for all the smart people!

door

Seems this discussion has strayed to a number of different models; it may be a somewhat universal design however and the issue probably applies to more than one. Specifically, I’m dealing with a C309A Photosmart. I’ve used this printer for lots of photo proofing/printing (as well as regular printing), and have invested more than enough time and expense installing a CIS System and calibrating color output many years ago. I’m at about 14000 pages printed. I’d purchased another one of this model (for parts only - $25), and have used it to replace a number of components.

The gear in question, the one that slips off of the spline on the shaft, is the planned obsolescence component on this printer. The gear hub (the part between shaft hole and the bottom of the gear teeth) is undersized and can’t withstand the expansion force created by the shaft spline. I’d already made the repairs discussed in the past (relocate gear on spline with adhesive). Recently the gear spit in two parts. When I pulled the “parts” printer all the way apart to get to this shaft, I realized that one has to almost entirely disassemble the printer. And upon close inspection of the gear taken out of the “parts” printer (which only had a page count of 1500), I observed this gear had a herringbone fracture at the hub, at the base of a pair of gear teeth. It was already failed, and would have begun slipping on the spline or shifting off of it had I installed this part.

I’ve done something different; it was a bit of a learning curve and took some effort. Like others, I cut a panel out of the bottom to gain access. I used the intact (but compromised) gear from the “parts” unit and made a silicone mold of it. I then cast a replacement gear using “steel epoxy”. (I did a lot of off-unit experimenting with the mold materials and the casting materials before committing to the repair on the actual printer.) It was challenging but I successfully cast a replacement gear, on the shaft in the available space next to the spline. Once the mold was removed and the epoxy still slightly under-cured, using additional epoxy to help with adhesion to the spline, I forced the new gear into its correct position.

I’m pretty confident that this is a forever repair. Many of those having done the glue and relocate will eventually be seeing two gear halves laying in their paper feed tray, I regret. But it can be fixed permanently.

door

4 commentaren meer tonen

Voeg een opmerking toe

I had the same issue with our years-old 7520. The gear was pretty tight on the axle, and would turn most of the time, but not all... Like when it applied pressure against paper. I flipped the printer over and used a mirror to inspect.. eventually I found that the gear had a crack between two teeth.

I didn't want to take it apart and struggled to get epoxy in the right place so I ended up cutting a hole in the paper tray. Figured I'd upload the images to help someone else know where to cut if needed.

It's about 3/4” by 1 3/4”, cut with a Swiss army knife.. nothing special. Got me right where I needed to be.

Block Image

Block Image

Was dit antwoord nuttig?

Score 0

1 Opmerking:

You can remove the main paper tray (lower) on the HP B209a by lifting gently two triangle tabs. The tray slides forward. Then you can see the first gear that slid off the metal shaft and fails to feed paper. Bit of glue should fix.

door

Voeg een opmerking toe

Voeg je antwoord toe

danpage0 zal eeuwig dankbaar zijn.
Weergavestatistieken:

Afgelopen 24 uren: 7

Afgelopen 7 dagen: 48

Afgelopen 30 dagen: 205

Altijd: 178,101