Ga door naar hoofdinhoud

Wat je nodig hebt

Deze demontage is geen reparatiehandleiding. Om je Samsung T139 te repareren, gebruik onze reparatiehandleidingen.

  1. Samsung T139 Teardown, Removing the battery and back screws: stap 1, afbeelding 1 van 2 Samsung T139 Teardown, Removing the battery and back screws: stap 1, afbeelding 2 van 2
    • Start by removing the back of the phone. Once that is done you will find 4 Phillips 00 screws two on the top left and right and two on the bottom left and right

    • Take out the battery

  2. Samsung T139 Teardown, Remove the back screws: stap 2, afbeelding 1 van 1
    • You will see 4 phillips 00 screws, two on the top left and right and two on the bottom left and right. Remove them.

  3. Samsung T139 Teardown, Removing the outer border: stap 3, afbeelding 1 van 3 Samsung T139 Teardown, Removing the outer border: stap 3, afbeelding 2 van 3 Samsung T139 Teardown, Removing the outer border: stap 3, afbeelding 3 van 3
    Gereedschap gebruikt in deze stap:
    Jimmy
    $7.95
    Koop
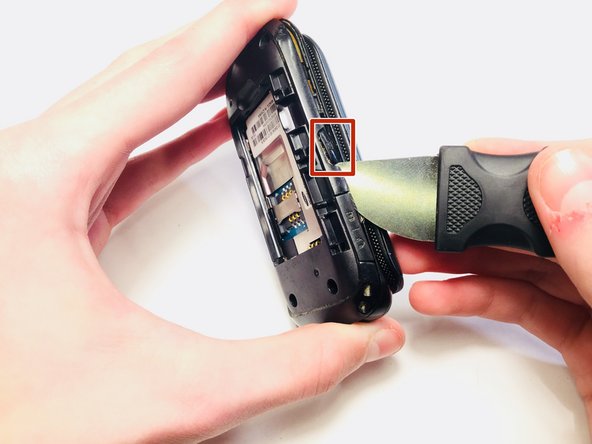
    • Take the Jimmy and go around the sides of the phone until the outer border comes off.

    • Be aware of the buttons on the side as they will fall out.

  4. Samsung T139 Teardown, Removing the logic board: stap 4, afbeelding 1 van 2 Samsung T139 Teardown, Removing the logic board: stap 4, afbeelding 2 van 2
    Gereedschap gebruikt in deze stap:
    Spudger
    $2.99
    Koop
    • Push gently on the side of the screen cable with a Spudger to release

    • Then remove the logic board.

  5. Samsung T139 Teardown, Removing the key pad: stap 5, afbeelding 1 van 1
    Gereedschap gebruikt in deze stap:
    Tweezers
    $4.99
    Koop
    • Take the keyboard out by pulling gently on the side with some tweezers

  6. Samsung T139 Teardown, Remove screws: stap 6, afbeelding 1 van 2 Samsung T139 Teardown, Remove screws: stap 6, afbeelding 2 van 2
    • Remove the two black screw covers on the bottom of the screen

    • Remove the two screws that are revealed

  7. Samsung T139 Teardown, Removing the case: stap 7, afbeelding 1 van 2 Samsung T139 Teardown, Removing the case: stap 7, afbeelding 2 van 2
    Gereedschap gebruikt in deze stap:
    Jimmy
    $7.95
    Koop
    • Take a Jimmy and go around it until the front case (the one with the smaller screen) comes off.

  8. Samsung T139 Teardown, Looking at the phone: stap 8, afbeelding 1 van 1
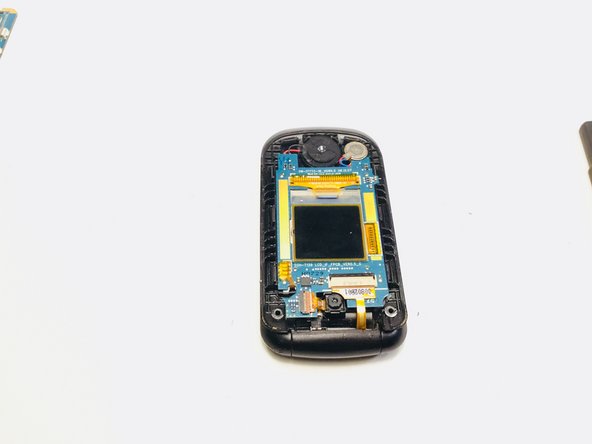
    • After you are done with step six the phone should look like this

  9. Samsung T139 Teardown, Remove the logic board to screen connection: stap 9, afbeelding 1 van 3 Samsung T139 Teardown, Remove the logic board to screen connection: stap 9, afbeelding 2 van 3 Samsung T139 Teardown, Remove the logic board to screen connection: stap 9, afbeelding 3 van 3
    Gereedschap gebruikt in deze stap:
    Spudger
    $2.99
    Koop
    • Take a Spudger and push up on the little black bar at the top end of the screen to logic board cable

  10. Samsung T139 Teardown, Remove the camera: stap 10, afbeelding 1 van 1
    Gereedschap gebruikt in deze stap:
    Spudger
    $2.99
    Koop
    • Take a Spudger and push up the little red bar over the camera cable.

    • Pull the cable out and remove the camera.

  11. Samsung T139 Teardown, Getting the screen out: stap 11, afbeelding 1 van 1
    Gereedschap gebruikt in deze stap:
    Tweezers
    $4.99
    Koop
    • Take a pair of tweezers and lift up to remove the screen.

  12. Samsung T139 Teardown, The finished product: stap 12, afbeelding 1 van 1
    • Congrats! Your done. Let's take a look at what we have.

    • Outer cases

    • Screens

    • Logic board

    • A camera

    • Some button covers

    • A battery

    • A keypad cover

Nathan

Lid sinds: 09/21/17

386 Reputatie

2 handleidingen geschreven

0 opmerkingen

Voeg opmerking toe

Weergavestatistieken:

Afgelopen 24 uren: 0

Afgelopen 7 dagen: 2

Afgelopen 30 dagen: 4

Altijd: 404