Ga door naar hoofdinhoud

Deze demontage is aan de gang – Herlaad regelmatig om de laatste wijzigingen te zien!

Wat je nodig hebt

  1. Samsung SGH-A777 Teardown, Samsung SGH-A777 Teardown: stap 1, afbeelding 1 van 1
    • The Samsung SGH A777

  2. Samsung SGH-A777 Teardown: stap 2, afbeelding 1 van 3 Samsung SGH-A777 Teardown: stap 2, afbeelding 2 van 3 Samsung SGH-A777 Teardown: stap 2, afbeelding 3 van 3
    • Remove the black cover by sliding up.

    • Remove the SIM card(not shown) and battery.

  3. Samsung SGH-A777 Teardown, Removing the back cover: stap 3, afbeelding 1 van 3 Samsung SGH-A777 Teardown, Removing the back cover: stap 3, afbeelding 2 van 3 Samsung SGH-A777 Teardown, Removing the back cover: stap 3, afbeelding 3 van 3
    • Remove the six Phillips head screws. Keep track of their position.

    • Using a SIM removal tool or other small point, remove the bottom antenna cover. See photo 2. Place the tool in the bottom right corner and pry it off.

    • Using a spudger, carefully remove the antenna cover. Remove the two screws.

  4. Samsung SGH-A777 Teardown, Remove the back cover: stap 4, afbeelding 1 van 2 Samsung SGH-A777 Teardown, Remove the back cover: stap 4, afbeelding 2 van 2
    • Using a spudger pry the back cover off carefully.

    • Using your fingers or a spudger remove the two side buttons. Note their positions. These should easily pop off.

  5. Samsung SGH-A777 Teardown, Remove more screws: stap 6, afbeelding 1 van 3 Samsung SGH-A777 Teardown, Remove more screws: stap 6, afbeelding 2 van 3 Samsung SGH-A777 Teardown, Remove more screws: stap 6, afbeelding 3 van 3
    • Remove the two screws surrounding the camera.

    • Remove the two screws around the top of the battery spot.

    • Pry the black midplate off the phone.

    • Be careful as the screen is connected still by a ribbon cable.

    • Remove the entire Samsung model number sticker.

    • Slide the metal sliding mechanism up.

    • Remove the two screws.

  6. Samsung SGH-A777 Teardown, Separating the screen assembly: stap 8, afbeelding 1 van 2 Samsung SGH-A777 Teardown, Separating the screen assembly: stap 8, afbeelding 2 van 2
    • Carefully flip the motherboard up. Flip it from bottom to top.

    • Disconnect the ribbon cable with a spudger.

  7. Samsung SGH-A777 Teardown, Removing the backplate for the screen: stap 9, afbeelding 1 van 1
    • Pry starting at the bottom with a spudger. Remove the cover. This will require some force and a guitar pick.

  8. Samsung SGH-A777 Teardown, Remove the camera assembly: stap 10, afbeelding 1 van 1
    • Remove the daughter board and lift the small blue flex cable from the back of the LCD.

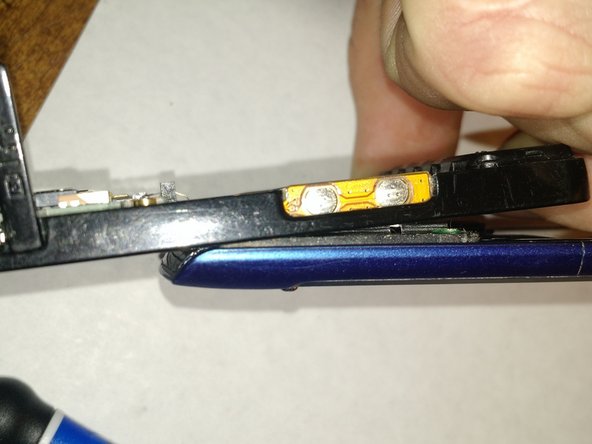
    • Remove just enough of the blue sticker to disconnect the orange flex cable. Flick the brown connector up and remove.

    • Remove the camera assembly.

  9. Samsung SGH-A777 Teardown, Remove the LCD: stap 11, afbeelding 1 van 2 Samsung SGH-A777 Teardown, Remove the LCD: stap 11, afbeelding 2 van 2
    • Using a guitar pick, carefully pry up the LCD shield plate from the sides.

    • Be careful not to crack the LCD. Don't touch the LCD!

    • Use a spudger edge around the edges of the lens. Remove carefully and use 3M to reattach.

  10. Samsung SGH-A777 Teardown, To remove motherboard:: stap 13, afbeelding 1 van 1
    • Flick the little brown connector up and remove the orange flex cable.

Josh Bacon

Lid sinds: 03/02/15

151 Reputatie

3 handleidingen geschreven

Één opmerking

My cell phone SGH a777 has lost the sound and how to correct an entry does not function.

I want to have it repaired. Where should I bring it to have it repaired?

Vicente Paladin Molar - Antwoord

Voeg opmerking toe

Weergavestatistieken:

Afgelopen 24 uren: 0

Afgelopen 7 dagen: 2

Afgelopen 30 dagen: 4

Altijd: 1,981