Ga door naar hoofdinhoud

Wat je nodig hebt

Deze demontage is geen reparatiehandleiding. Om je Samsung Galaxy S te repareren, gebruik onze reparatiehandleidingen.

  1. Samsung Galaxy S Teardown, Samsung Galaxy S Teardown: stap 1, afbeelding 1 van 1
    • The phone itself!

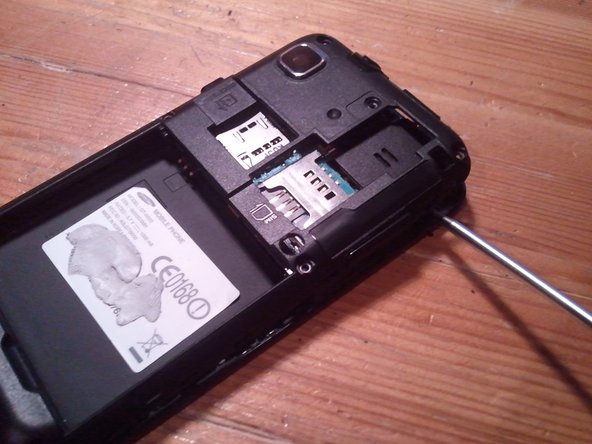
    • Notice the bad lighting, dirty phone etc. just proves how hi-tec i am.

  2. Samsung Galaxy S Teardown: stap 2, afbeelding 1 van 3 Samsung Galaxy S Teardown: stap 2, afbeelding 2 van 3 Samsung Galaxy S Teardown: stap 2, afbeelding 3 van 3
    • Removing the boring stuff. Back cover, battery etc.

  3. Samsung Galaxy S Teardown: stap 3, afbeelding 1 van 2 Samsung Galaxy S Teardown: stap 3, afbeelding 2 van 2
    • The battery!

    • It shows 1500mAh, decent.

    • also the manufacturing date is shown.

    • I added a piece of sticky tack, to cover up the IMEI code, again showing how hi-tec i am!

  4. Samsung Galaxy S Teardown: stap 4, afbeelding 1 van 2 Samsung Galaxy S Teardown: stap 4, afbeelding 2 van 2
    • This is the point of no return when it comes to warranty.

    • But that's okay, i'm using this phone for spares anyways.

    • Sticky tack

    • Screws, 7 to be exact!

  5. Samsung Galaxy S Teardown: stap 5, afbeelding 1 van 2 Samsung Galaxy S Teardown: stap 5, afbeelding 2 van 2
    • Here comes the first tricky part. it's easiest to start right under the volume button, and work your way from there.

    • Be extremely careful if you are using metal tools like i am. it will easily damage components if you accidentally jam it in.

    • And it's off!

  6. Samsung Galaxy S Teardown: stap 6, afbeelding 1 van 3 Samsung Galaxy S Teardown: stap 6, afbeelding 2 van 3 Samsung Galaxy S Teardown: stap 6, afbeelding 3 van 3
    • Lets see the innards of this thing.

    • The back camera.

    • And the front facing camera

    • The speaker, actually quite large.

    • Water detector on the plastic cover, as you can see, this is a water damaged phone. normally you would see a purple pattern.

    • Contacts, probably for antennas.

  7. Samsung Galaxy S Teardown: stap 7, afbeelding 1 van 2 Samsung Galaxy S Teardown: stap 7, afbeelding 2 van 2
    • Better close ups of the components.

    • Vibration motor

  8. Samsung Galaxy S Teardown: stap 8, afbeelding 1 van 3 Samsung Galaxy S Teardown: stap 8, afbeelding 2 van 3 Samsung Galaxy S Teardown: stap 8, afbeelding 3 van 3
    • Taking off the speaker.

    • Remember to lift the tab on me!

    • And it's off!

  9. Samsung Galaxy S Teardown: stap 9, afbeelding 1 van 3 Samsung Galaxy S Teardown: stap 9, afbeelding 2 van 3 Samsung Galaxy S Teardown: stap 9, afbeelding 3 van 3
    • Now for the camera!

    • Both the rear and front camera are a single component.

    • Lift the connector in picture 2 carefully! lots of components under it.

  10. Samsung Galaxy S Teardown: stap 10, afbeelding 1 van 2 Samsung Galaxy S Teardown: stap 10, afbeelding 2 van 2
    • Now for the motherboard!

    • Detach all (4) of these to get the motherboard out.

    • Done! (do not try to remove yet)

  11. Samsung Galaxy S Teardown: stap 11, afbeelding 1 van 2 Samsung Galaxy S Teardown: stap 11, afbeelding 2 van 2
    • Now detach the power button, its held down by a little bit of glue, not a big deal.

    • Lift it carefully, making sure no connectors are stuck on. Especially the one marked red.

  12. Samsung Galaxy S Teardown: stap 12, afbeelding 1 van 2 Samsung Galaxy S Teardown: stap 12, afbeelding 2 van 2
    • Front/back

    • Flash memory.

    • CPU running at 1Ghz, but can be overclocked.

    • Volume buttons.

    • Ill add more specific specs when i get around to it.

  13. Samsung Galaxy S Teardown: stap 13, afbeelding 1 van 3 Samsung Galaxy S Teardown: stap 13, afbeelding 2 van 3 Samsung Galaxy S Teardown: stap 13, afbeelding 3 van 3
    • Removing the cable for sim/sd card slot..

    • And it's off.

    • Bad white balance, sorry!

  14. Samsung Galaxy S Teardown: stap 14, afbeelding 1 van 2 Samsung Galaxy S Teardown: stap 14, afbeelding 2 van 2
    • The simcard/sd card slot.

    • And the stuff underneath.

  15. Samsung Galaxy S Teardown: stap 15, afbeelding 1 van 3 Samsung Galaxy S Teardown: stap 15, afbeelding 2 van 3 Samsung Galaxy S Teardown: stap 15, afbeelding 3 van 3
    • Now for the metal Shielding on the back! again, more specs coming (hopefully) soon.

  16. Samsung Galaxy S Teardown: stap 16, afbeelding 1 van 1
    • Parts parts parts!

    • And a bad white balance..

  17. Samsung Galaxy S Teardown: stap 17, afbeelding 1 van 3 Samsung Galaxy S Teardown: stap 17, afbeelding 2 van 3 Samsung Galaxy S Teardown: stap 17, afbeelding 3 van 3
    • Now for the component that holds the headphone jack, earpiece and both proximity and light sensor.

    • There is a cool app "androsensor" that lets you access all the sensors in your phone!

    • This thing quite literally just pulls off. you can remove it without any special tools!

    • Be careful not to tug on the cables too hard! there is some glue, but it peels right off.

  18. Samsung Galaxy S Teardown: stap 18, afbeelding 1 van 2 Samsung Galaxy S Teardown: stap 18, afbeelding 2 van 2
    • Now for the bottom portion, including the Mic, vibrating engine and the antenna board.

    • I couldn't get it off completely, but i can give you a good picture of what it looks, lets see..

    • We seem to be connected together!

  19. Samsung Galaxy S Teardown: stap 19, afbeelding 1 van 3 Samsung Galaxy S Teardown: stap 19, afbeelding 2 van 3 Samsung Galaxy S Teardown: stap 19, afbeelding 3 van 3
    • Disconnect, unplug, take off..

  20. Samsung Galaxy S Teardown: stap 20, afbeelding 1 van 3 Samsung Galaxy S Teardown: stap 20, afbeelding 2 van 3 Samsung Galaxy S Teardown: stap 20, afbeelding 3 van 3
    • Be extremely careful when taking off these little boards, they're on tight! and they like to bend around.

  21. Samsung Galaxy S Teardown: stap 21, afbeelding 1 van 3 Samsung Galaxy S Teardown: stap 21, afbeelding 2 van 3 Samsung Galaxy S Teardown: stap 21, afbeelding 3 van 3
    • see that? the AMOLED display is actually transparent!

    • Can't go farther than this without a heat gun that I don't have. I tried removing the bezel, but with no luck.

    • That's about it! Thank you for reading, and please give me feedback!

    • This is my first teardown, and pictures were taken with a functional Galaxy s phone.

valtteri

Lid sinds: 11/18/11

839 Reputatie

1 Handleiding geschreven

8 opmerkingen

I would like to replace just the front lens of the phone , cuz the old one got cracked, can you do a tutorial on that , do I have to teardown the hole phone to replace the front panel without the digitizer.

Samsung galaxy s1 i900

Kasavin Drago - Antwoord

You have come a long way from this tear down to the ones done now!

Shreyas Bharadwaj - Antwoord

thank you. my son broke his Galaxy S sim card pins(third smart phone in five months!!!) and I am hoping to repair it myself with the help of your fix-it.Will let you know if I succeed.Margaret, April 2014.

margaret - Antwoord

Hi I dropped my phone and it the glasses shattered and totally shutdown when dead on me. Wondering any hope for repairs?

Nabikaly - Antwoord

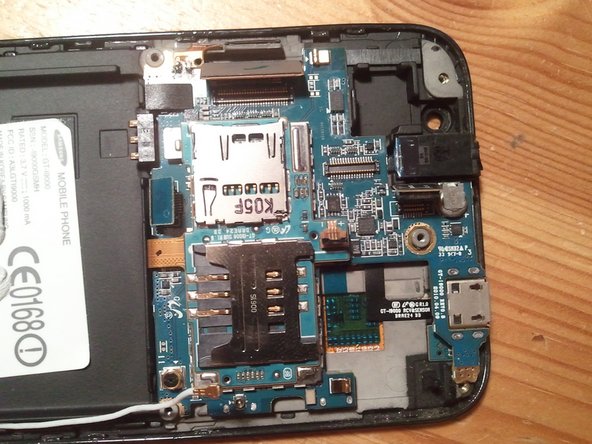
What is the part number of the Bluetooth Chip here?Manufacturer?

Raul Piper - Antwoord

Voeg opmerking toe

Weergavestatistieken:

Afgelopen 24 uren: 7

Afgelopen 7 dagen: 13

Afgelopen 30 dagen: 77

Altijd: 65,301