Ga door naar hoofdinhoud

Wat je nodig hebt

Deze demontage is geen reparatiehandleiding. Om je PSP E1000 te repareren, gebruik onze reparatiehandleidingen.

  1. PSP E1000 Teardown, PSP E1000 Teardown: stap 1, afbeelding 1 van 2 PSP E1000 Teardown, PSP E1000 Teardown: stap 1, afbeelding 2 van 2
    • This is the front and back of the PSP E1000

  2. PSP E1000 Teardown: stap 2, afbeelding 1 van 2 PSP E1000 Teardown: stap 2, afbeelding 2 van 2
    • We are going to start by removing the back panel.

    • To do this open the panel and gently squeeze in the UMD tray until it pops up.

    • It should lay flat against the back panel while open if done correctly

  3. PSP E1000 Teardown: stap 3, afbeelding 1 van 2 PSP E1000 Teardown: stap 3, afbeelding 2 van 2
    • Gently bend the back panel to free the hinge on the left.

    • Once it is popped out it should look like the second photo

    • The back panel can then be slid off

  4. PSP E1000 Teardown: stap 5, afbeelding 1 van 3 PSP E1000 Teardown: stap 5, afbeelding 2 van 3 PSP E1000 Teardown: stap 5, afbeelding 3 van 3
    • Remove the screw with a #00 Philips and slide up the battery cover.

    • The battery can now be removed by pulling it out.

    • When reinstalling it is useful to use a spudger to push the cable back in.

  5. PSP E1000 Teardown: stap 6, afbeelding 1 van 2 PSP E1000 Teardown: stap 6, afbeelding 2 van 2
    • Remove all four screws on the back using the same bit as before.

    • Then remove the two top screws.

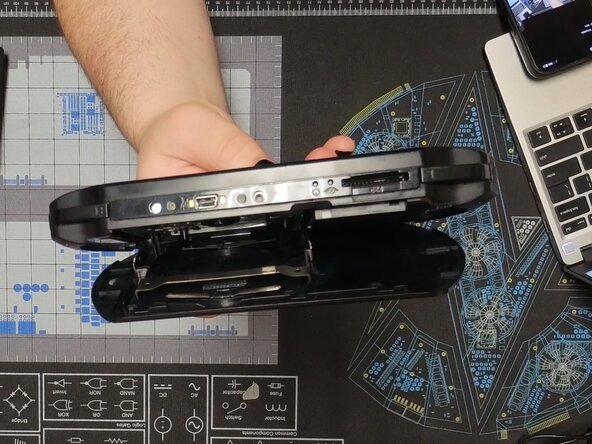
    • Then, insert a spudger between the L button and the face plate and separate them. Then, do the same on the right.

    • Then slide the face plate down towards the bottom of the screen to release the bottom clips.

    • Ensure you support the face plate as the front buttons are still connected with a fragile ribbon cable.

  6. PSP E1000 Teardown: stap 8, afbeelding 1 van 2 PSP E1000 Teardown: stap 8, afbeelding 2 van 2
    • Slide a spudger under both of these clips to release the display

    • Then gently rotate the display to the left side of the device so you can see the mainboard.

  7. PSP E1000 Teardown: stap 9, afbeelding 1 van 2 PSP E1000 Teardown: stap 9, afbeelding 2 van 2
    • Gently unclip the display ribbon cable and remove it

    • Then set the display to the side

    • Untape the front panel ribbon cable, unclip it, then remove it.

  8. PSP E1000 Teardown: stap 10, afbeelding 1 van 3 PSP E1000 Teardown: stap 10, afbeelding 2 van 3 PSP E1000 Teardown: stap 10, afbeelding 3 van 3
    • Remove the ribbon cable and power cable

    • Gently lift the button assembly and charge port

    • The shoulder button is taped down so slide a spudger under the button and gently peel it off

  9. PSP E1000 Teardown: stap 11, afbeelding 1 van 3 PSP E1000 Teardown: stap 11, afbeelding 2 van 3 PSP E1000 Teardown: stap 11, afbeelding 3 van 3
    • Unclip and remove the two marked ribbon cables

    • Remove the marked screw and lift the analog stick out

    • Lift the button pad carefully and peel off the shoulder button

    • When reassembling install the joystick before the buttons.

  10. PSP E1000 Teardown: stap 12, afbeelding 1 van 2 PSP E1000 Teardown: stap 12, afbeelding 2 van 2
    • Unclip both ribbon cables and remove them

    • Remove the marked screw on the mainboard

    • Lift the bottom of the mainboard up and slide it out

    • For reinstallation make sure that the power switch cover is installed before it is screwed in. It has to be unscrewed to do the installation

  11. PSP E1000 Teardown: stap 13, afbeelding 1 van 1
    • Flip the device and remove the marked screws

    • Without touching the lens lift the UMD reader from the device

  12. PSP E1000 Teardown: stap 14, afbeelding 1 van 2 PSP E1000 Teardown: stap 14, afbeelding 2 van 2
    • Congratulations you have disassembled your PSP E1000. Have fun with the reassembly!

Caleb Pierce

Lid sinds: 04/19/22

554 Reputatie

8 handleidingen geschreven

2 opmerkingen

My aim was to clean the inside, so I only disassembled it up to the screen, but I accidentally pulled the socket where the volume button is connected hard.So that black thing broke but the part that goes into the socket is intact. Finally, after cleaning it, I plugged it into the socket, then I put the LCD screen into its socket and placed it. Finally, after putting the device back into its parts, I pressed the power button but the screen did not come on.

Berkay Ghoul - Antwoord

What black thing are you referring to?

When you turned it on did the top LEDs come on or did they stay off?

Caleb Pierce - Antwoord

Voeg opmerking toe

Weergavestatistieken:

Afgelopen 24 uren: 13

Afgelopen 7 dagen: 57

Afgelopen 30 dagen: 280

Altijd: 280